AssayMAP Protein Sample Prep Workbench : Affinity Purification: Aspiration Mode v2.0 User Guide : Running the protocol

Running the protocol
The Affinity Purification: Aspiration Mode protocol does the following:
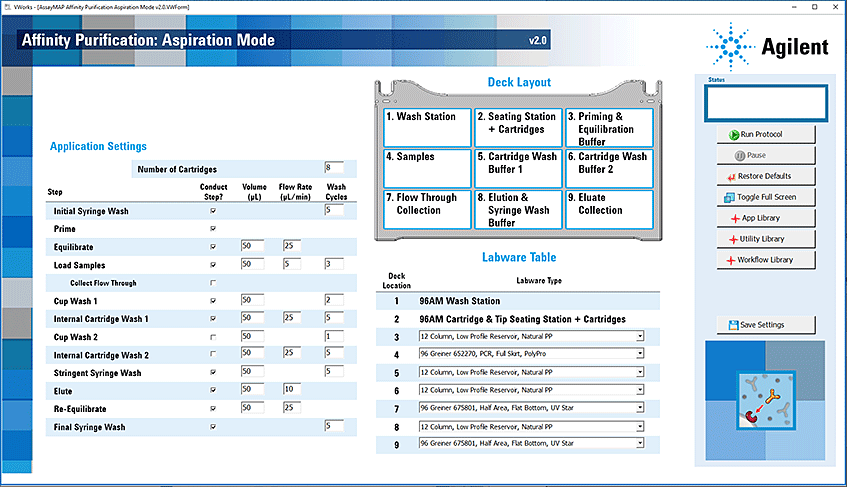
For some of these operations the cartridges are mounted on the syringe probes, while for other operations the cartridges are parked in the Cartridge & Tip Seating Station.
Before you start
Ensure that you:
Transfer the cartridges to the Cartridge & Tip Seating Station. See Cartridge Transfer v1.1.
 
*Cartridges ship dry and therefore contain air entrained in the cartridge bed. Failure to prime the cartridges can prevent the sample and buffers from accessing parts of the bed, resulting in reduced capacity and poor reproducibility.
 
 
*Do not allow wetted cartridges to dry out. Agilent Technologies does not guarantee performance of stored cartridges following equilibration. See Cartridge use and storage guidelines.
 
Setting up the protocol
Before starting the protocol, make sure the appropriate selections and values are specified in the Affinity Purification: Aspiration Mode application.
To set up the protocol:
1
2
Locate Affinity Purification: Aspiration Mode v2.0, and then click App.
 
The Affinity Purification: Aspiration Mode application opens.
 
3
Optional. Click Restore Defaults to set all Application Settings to their defaults.
4
In the Labware Table area, select the labware you are using for the protocol run.
5
In the Application Settings area, specify the Number of Cartridges to use during the run. The position of the columns of cartridge in the tip seating station must match the positions of the samples and solutions in the plates on the deck.
Range: 1–12
Default: 8
 
*Ensure that you specify the number of cartridges for the Affinity Purification: Aspiration Mode app instead of the number of columns, which is the setting used in the other AssayMAP apps. Also, make sure to design experiments in a column format to avoid droplets falling on the deck as described in Planning the microplate setup.
 
 
*If the cartridge selection is greater than the actual number of cartridges used, the Bravo Platform will apply too much force when mounting the cartridges, which can cause damage to both the cartridges and the AssayMAP syringes in the head. For example, if the form specifies 96 cartridges, but only 8 cartridges are in the seating station, the head will apply 12 times more force than what is required. To prevent potential equipment damage, ensure that the column selection is correct.
 
 
*If the cartridge selection is less than the actual number of cartridges used, the Bravo Platform will not apply enough force to seat the cartridges properly. For example, if the form specifies 8 cartridges, but 96 cartridges are in the seating station, the head will apply 1/12th the force required to seat the cartridges properly. To prevent potential equipment damage, ensure that the column selection is correct.
 
 
*Each full column must contain eight cartridges. If a column contains fewer than eight packed cartridges, use the AssayMAP Resin-Free cartridges to fill the empty column positions.
 
6
In the Application Settings table, do the following. For details, see Application Settings table:
a
b
7
Optional. When you are finished, click Save Settings.
 
Return to top
Application Settings table
The following table gives a brief description of each setting. For details, including the full and practical ranges of values for a given setting, see the Assay development guidelines and protocol notes.
 
 
Volume (µL): If you select Prime and Equilibrate, the system calculates the volume required to perform both steps and aspirates it during the Prime step.
 
Return to top
About performing a mock run (optional)
If you are unfamiliar with the protocol and would like to see how it operates before running it with valuable samples and reagents, you can perform a mock run. A mock run uses empty or water-filled labware and source bottles.
You prepare for a mock run the same way you would prepare for a real protocol run, except that you use empty labware for a totally dry run or labware containing water for a wet run. To decrease the run time, you can increase the flow rates to 500 µL/min and decrease the volumes. Use the AssayMAP Resin-Free cartridges instead of packed cartridges for mock runs.
 
*The protocol will not run if cartridges are missing. You can use resin-free cartridges instead of packed cartridges for mock runs.
 
 
Return to top
Starting the protocol run
To start the protocol run:
1
The physical layout on the Bravo deck matches the graphic shown in the Deck Layout area.
In the Labware Table area, the selections reflect the labware you are using for the protocol run.
2
 
*Use only the labware specified, and place them at the AssayMAP Bravo deck locations specified in the form. Using different labware or placing labware at unapproved deck locations can cause a collision resulting in equipment damage.
 
 
*Improperly seated labware can cause a hardware collision, resulting in equipment damage. Ensure that all labware are properly seated within the alignment features of their respective platepads.
 
3
Click Run Protocol.
An error message appears if the software detects an error in the form settings, for example, if an entered value is outside the limits set for a field. If this happens, follow the directions in the message to select Pause and Diagnose, and then select Abort process. After setting the appropriate values, click Run Protocol to restart the run.
Note: For the range of acceptable values for a given setting, see the Assay development guidelines and protocol notes.
To monitor the progress of the run, check the Status box.
 
After the protocol run starts, you can walk away from the AssayMAP Bravo Platform for the duration of the protocol.
 
*To stop a run in an emergency, use the hardware Emergency Stop button.
 
To pause the run, click Pause. The task currently in progress finishes before the protocol pauses. The Scheduler Paused dialog box opens. For details, see Emergency stops and pauses.
 
*Protocols should not be paused to change the settings. However, if you need to change a setting in a running protocol, click Pause during the last task of a step, and then click Abort process in the dialog box that appears. Change the setting, and then clear the check boxes of the steps in the Affinity Purification: Aspiration Mode application that have been completed successfully. Restart the protocol to complete the remaining steps.
 
To troubleshoot errors, see the Error Recovery Guide and the Bravo Platform User Guide in the Literature Library page of the Protein Sample Prep Workbench.
 
Return to top
Cleaning up
When the protocol run is finished, make sure you:
 
*Make sure you discard the chemical waste and used labware according to your lab’s waste disposal procedures and in compliance with all local, state, and federal safety regulations.
 
 
Return to top