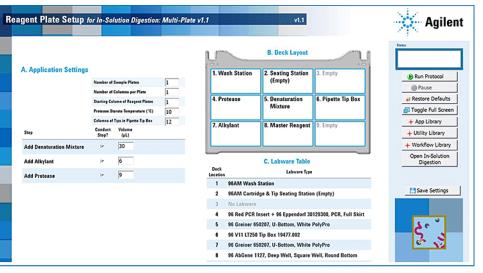
![]() |
Use the Single Liquid Addition v1.1 utility to transfer 300 µL per well of the wash solution to the four Greiner 96-Well Round Bottom, White Plates that will be stacked on deck location 2 prior to running the In-Solution Digestion protocol. During the protocol run, these plates serve two purposes. The plates are moved on top of the sample plates and serve as lids to protect the samples from light during the alkylation step of the protocol. The plates are also used as reservoirs for the syringe wash solution which is used to wash the syringes to prevent carry-over between sample loading steps. Note: You can find the Labware Reference Guide in the Literature Library page of the Protein Sample Prep Workbench.
1
2 Locate In-Solution Digestion: Multi-Plate, and then click Calculator. Microsoft Excel starts and displays the calculator.
1
Read only. The calculator converts the Number of Samples to the Total Number of Sample Columns by rounding up to the nearest multiple of 8. Read only. The number of columns that occupy each sample plate. The value is calculated using the Total Number of Sample Columns and the Number of Sample Plates. Read only. The mass of the sample. The value is calculated using the Sample Volume and Protein Concentration.
2 In the Reaction Setup table, type the values in the green boxes in the 2. Denaturation/Reduction area:
Read only. The concentration of guanidine or urea in the Master Reagent. Read only. The micromoles of reductant. The value is calculated using the Reductant Concentration and the Denaturation Mixture volume. Optional. The concentration of the internal standard stock solution you want to add to the Denaturation Mixture.
3
Read only. The number of micromoles of the alkylant. The value is calculated from the concentration and volume added to the reaction, and the final concentration at the indicated steps is displayed in the B. Reactant Concentrations Summary table.
4 In the Reaction Setup table, type the values in the green boxes in the 4. Dilution/Alkylation Quench area:
Read only. The number of micromoles of reductant that is added during this step. Read only. The volume of the Diluent Mixture you want to add.
5
Read only. The volume of Protease to add. Read only. The final concentration of the buffer. Read only. The digest reaction volume.
6 Review the information in the B. Reactant Concentration Summary table. If you need to make any adjustments, repeat steps 1 through 5.
7 Review the information in the C. In-Solution Digest form inputs table. You will transfer these values when setting up the In-Solution Digestion protocol. See Running the protocol.
•
• If you are using more denaturant than what is required, you can enter the larger mass in the Denaturation Mixer table.The Master Reagent requires iodoacetamide powder. If you are using more than what is required, you can enter the larger mass in the Alkylant table.
2 In the Reagent Volume Calculator, do one of the following:
• Automated Reagent Plate Setup. In the Reagent Volume Calculator, display the Automated Plate Setup worksheet, and then proceed to step 3.
• Manual Reagent Plate Setup. In the Reagent Volume Calculator, display the Manual Plate Setup worksheet. Use manual pipettes to prepare reagent plates for the Protease, Alkylant, Denaturation, and Diluent reagents based on their respective plate layouts. Then proceed to preparing the samples (Preparing the samples) and running the protocol (Running the protocol).
3
4 Add the volumes of the Diluent Mixture into the assigned columns of the Diluent Mixture plate as shown in the B. Diluent Mixture Plate area.
5 Prepare the Syringe Wash Buffer plate. Use the Single Liquid Addition v1.1 utility to fill four Greiner 96-Well Round Bottom, White Plates with the Syringe Wash Buffer.The Reagent Plate Setup protocol uses the AssayMAP Bravo Platform to transfer reagents in the Master Reagent plate to dedicated reagent plates.
1
2
4 In the Application Settings area, specify the following:
5 In the Step table:
6 Optional. Click Save Settings.
7 Confirm that the physical layout on the AssayMAP Bravo deck matches the Labware Table area and the Deck Layout area of the application.
9 Click Run Protocol. The protocol run starts.To monitor the progress of the run, check the Status box.To pause the run, click Pause. The task currently in progress finishes before the protocol pauses. The Scheduler Paused dialog box opens. For details, see Emergency stops and pauses.
•
• Keep all remaining labware on the Bravo deck.