AssayMAP Protein Sample Prep Workbench : In‑Solution Digestion: Single Plate v1.2 User Guide : Detailed interface description

Detailed interface description
The In-Solution Digestion: Single Plate App is designed to mimic common manual in‑solution digestion procedures for successively adding digestion reagents to samples and then incubating.
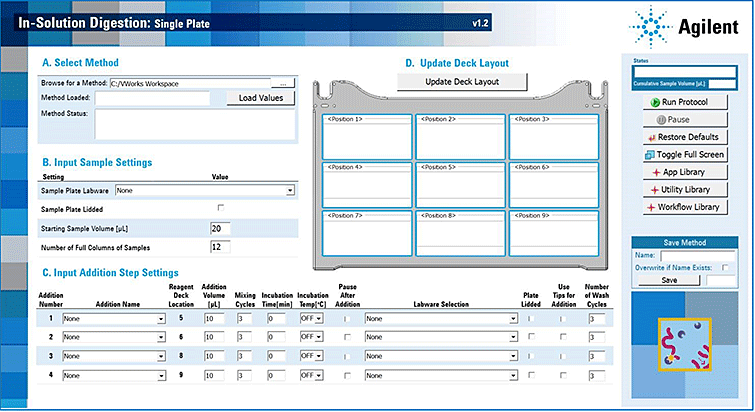
In this App, a 96-well sample plate is placed at Bravo deck location 4, and up to four 96‑well plates containing digestion reagents are placed at deck locations: 5, 6, 8 and 9. During the protocol, the AssayMAP Bravo Platform transfers each of the digestion reagents into the sample plate, one at a time, with optional heated incubation steps after each reagent addition.
Figure. In-Solution Digestion: Single Plate App interface
The App interface includes the following four setup sections (A–D) and a control panel.
A: Select Method
The Select Method section enables you to load previously saved digestion methods.
 
Populates the interface with the application settings that are associated with the selected method file and updates the Bravo Deck Layout display with the labware selections at the appropriate deck locations.
The In-Solution Digestion: Single Plate App includes several pre-loaded digestion methods that cover the following generic digestion sequences:
Denature/Reduce -> Alkylate -> Dilute -> Digest (Protease Addition)
Denature/Reduce - > Alkylate - > Dilute
Digest -> Acidification
These pre-loaded methods provide common, easy-to-follow examples that you can use for initial testing purposes or as templates for creating custom digestion processes.
 
Return to top
B: Input Sample Settings
In this section, you specify the following important details about the Sample Plate at deck location 4:
 
*Failure to properly lid or not lid the Sample Plate could cause a collision, which could result in equipment damage.
 
 
*Proper monitoring of the total liquid volume in the Sample Plate is critical for optimal pipetting behavior.


Return to top
C: Input Addition Step Settings
In this section, you specify the following settings for each of the four reagent addition steps:
 
*Failure to properly lid or not lid the Sample Plate could cause a collision, which could result in equipment damage.
 
 
The default value is OFF (room temperature), which indicates that the Peltier Thermal Station will not be activated for the incubation.
Note: The temperature setting controls the temperature of the Peltier Thermal Station. The temperature in the wells may be less than the set temperature. Using a thermal plate insert helps to minimize this difference. For thermal plate inserts, see the Labware Reference Guide in the Literature Library page of the Protein Sample Prep Workbench.
 
Return to top
D: Update Deck Layout
After setting the properties in sections A to C, click Update Deck Layout with new Settings. The deck image displays the following for the selected settings:
Bravo deck location for each reagent
 
*Failure to update the deck to reflect the settings could result in incorrect labware being placed on the deck, which could cause a potential collision. Ensure that you update the deck immediately before every run to ensure that labware changes, including lids, are displayed during deck setup.
 
 
Return to top
Control panel
The control panel on the far right side of the application interface provides the following controls and indicators:
Status. Indicates which step of the run is currently being executed.
Cumulative Sample Volume (µL). Displays the current volume (µL) contained within the sample plate wells.
Run Protocol. Executes a run using the settings shown in the App interface. After this button is clicked and before any hardware motion occurs, a series of error checks are conducted to verify that the digestion procedure has been properly specified.
 
If an error is identified, an error message will display in the Method Status box.
Pause. Pauses the run after the operation that is in progress has completed. For example, if you click Pause while the AssayMAP Bravo Platform is in the middle of a dispense step, the system will pause after it has completely finished the dispense step in progress. You can resume the run after the pause.
To stop a run in an emergency, press the red emergency-stop button on the pendant. The Bravo motion stops immediately. You might not be able to resume a protocol after an emergency stop.
Note: Interrupting the light curtain causes the Bravo motion to stop immediately.
Restore Defaults. Clears the App interface of all settings and deck setup information.
Toggle Full Screen. Changes the display of the App interface to show the underlying VWorks developer interface. Only experienced users should use the Full Screen Off view.
App Library, Utility Library, and Workflow Library. Returns the display to the corresponding page in the workbench.
Save Method. Enables you to save new method files, and if necessary, overwrite existing methods.
 
When a new method is saved, a primary copy of the method file is saved in the following location:
C:\VWorks Workspace\Methods\AM In Solution Digestion Single Plate v1.0
The software also creates a backup copy when a new method is created or an existing method is overwritten. The backup copy enables recovery of a method file that has been unintentionally overwritten or lost by other means.
The software appends a date and time stamp to the file name of the backup copy. For example, if the method file name is Test Method 1, the backup copy file name would be as follows:
Test Method 1_Mar 3 2015 16_03_25
where March 3 2015 is the month, day, and year; and 16 is the hour, 03 is minutes, and 25 is seconds.
The backup method files are saved in the following location:
C:\VWorks Workspace\Workbench\Backups\AM In Solution Digestion Single Plate v1.0
 
Return to top