AssayMAP Protein Sample Prep Workbench : In‑Solution Digestion: Single Plate v1.2 User Guide : Running the protocol

Running the protocol
The In-Solution Digestion: Single Plate protocol performs up to four successive liquid-addition steps. Each addition step transfers a reagent or mixture of reagents into a common sample plate, followed by incubation on or off deck. The sample volume, incubation time, incubation temperature, labware, and other parameters can be customized for each of the four addition steps, for example:
Before you start
Ensure that you:
Runs that require pipette tips. Prepare the 96AM Cartridge & Tip Seating Station. For details, see Preparing the 96AM Cartridge & Tip Seating Station.
Setting up the protocol
Before you start the protocol, make sure the appropriate selections and values are specified in the In-Solution Digestion application.
To set up the In-Solution Digestion protocol:
1
If not already open, open the Protein Sample Prep Workbench App Library. See Accessing an application.
2
Locate In-Solution Digestion: Single Plate, and then click App.
 
The In-Solution Digestion: Single Plate application opens.
3
Optional. Click Restore Defaults to set all Application Settings to their defaults.
4
In the A: Select Method area, click 
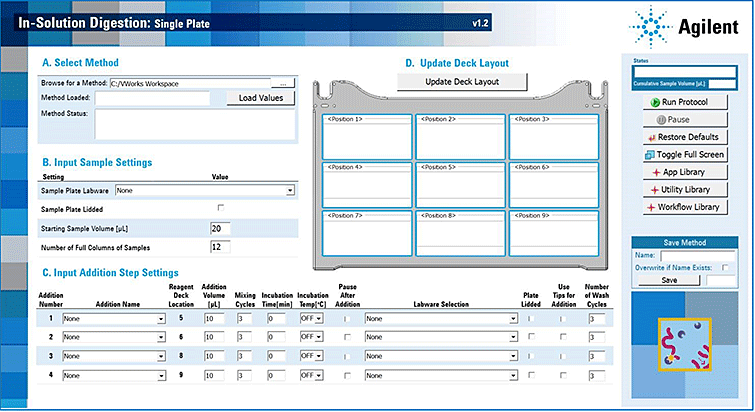
, select the method, and then click Load Values to display all the settings and the Deck Layout associated with the selected method.
Note: By default, the methods are stored in the C:\VWorks Workspace\Methods\AM In Solution Digestion Single Plate v1.0 folder.
To run a saved method exactly as written, skip to step 7. Otherwise, proceed to step 5 to make changes.
5
Under B. Input Sample Settings, verify the settings, or make any required changes to meet the needs of your run. For more details, see B: Input Sample Settings.
6
Under C. Input Addition Step Settings, verify the settings, or make any required changes to meet the needs of your run. For more details, see C: Input Addition Step Settings.
7
Under D. Update Deck Layout, click Update Deck Layout to refresh the deck image so that it reflects the selections for the current method, including any changes that you have made.
 
*Incorrect labware selections can cause a hardware collision, resulting in equipment damage. Ensure that the labware selected in the method matches the physical labware present on the Bravo deck.
 
8
To save a new or edited method, specify the method Name in the Save Method area, select Overwrite if Name Exists if applicable, and then click Save.
For more details, see Control panel.
 
Return to top
About performing a mock run (optional)
If you are unfamiliar with the protocol and would like to see how it operates before running it with valuable samples and reagents, you can perform a mock run. A mock run uses empty or water-filled labware and source bottles.
You prepare for a mock run the same way you would prepare for a real protocol run, except that you use empty labware for a totally dry run or labware containing water for a wet run. To decrease the run time, you can decrease the volumes.
If your In-Solution Digestion protocol requires pipette tips, you must use pipette tips for the mock run. For instructions on how to set up the pipette tips in the 96AM Cartridge & Tip Seating Station, see Preparing the 96AM Cartridge & Tip Seating Station.
 
Return to top
Starting the protocol run
 
*The probes of the Bravo 96AM Head are sharp and can scratch you if they brush across your hand. A probe scratch can expose you to any contaminants remaining on the probes. Be careful to avoid touching the probes.
 
 
*Incorrect labware selections can cause a hardware collision, resulting in equipment damage. Ensure that the labware selected in the method matches the physical labware present on the Bravo deck.
 
To start the protocol run:
1
If pipette tips are required for the run, place the prepared 96AM Cartridge & Tip Seating Station at deck location 2. For details, see Preparing the 96AM Cartridge & Tip Seating Station.
2
 
*Improperly seated labware can cause a hardware collision, resulting in equipment damage. Ensure that all labware are properly seated within the alignment features of their respective platepads.
 
3
Click Run Protocol to start the run.
To monitor the progress of the run, check the Status box.
 
*To stop a run in an emergency, use the hardware Emergency Stop button.
 
To pause the run, click Pause. The task currently in progress finishes before the protocol pauses. The Scheduler Paused dialog box opens. For details, see Emergency stops and pauses.
To troubleshoot errors, see the Error Recovery Guide and the Bravo Platform User Guide in the Literature Library page of the Protein Sample Prep Workbench.
 
Return to top
Cleaning up
When the protocol run is finished, make sure you:
 
*Make sure you discard the chemical waste and used labware according to your lab’s waste disposal procedures and in compliance with all local, state, and federal safety regulations.
 
 
Return to top