AssayMAP Protein Sample Prep Workbench : On-Cartridge Reaction v1.1 User Guide : Preparing the reagents

Preparing the reagents
The following reagents are required for the On-Cartridge Reaction protocol:
To calculate the extra volume needed, use the supplied On-Cartridge Reaction Reagent Volume Calculator.
 
*A small reagent volume excess is required in all labware types to ensure proper volume transfer. Use the Reagent Volume Calculator to automatically include excess volume, or look up the recommended values for each labware type in the Labware Reference Guide.
 
Note: You can find the Labware Reference Guide in the Literature Library page of the Protein Sample Prep Workbench.
Using the Reagent Volume Calculator for On-Cartridge Reaction
 
 
The Reagent Volume Calculator is a Microsoft Excel file that contains a Calculator worksheet. You enter the number of columns to process, the volume for each step in the protocol, and the labware selection for each deck location. The calculator determines the volumes required based on your input, taking into consideration dead volume, pipetting overage, and evaporation concerns.
Figure. On-Cartridge Reaction Calculator worksheet
 
For the pipetting overage recommendations and maximum well volume for a given labware type, see the Labware Reference Guide in the Literature Library page of the Protein Sample Prep Workbench.
To use the Reagent Volume Calculator:
1
Open the App Library.
2
Locate the application, and then click the corresponding Calculator button. Microsoft Excel starts and displays the calculator.
3
4
Note: The green box should remain green after you enter a value. If you enter a value that meets only some of the requirements, the box turns yellow. If you enter a value that does not meet any requirement, the box turns red.
To display the corresponding tooltip for a setting, mouse over a box that has a red triangle in the upper right corner.
Return to top
Determining the volume overage for deck location 4
 
*Volume considerations for deck location 4 are very complex in this application.
 
After using the Reagent Volume Calculator to determine the volumes, make sure you take into account the following variables that can dictate the volume overage required for deck location 4:
Higher temperatures and longer durations will cause more evaporation and, therefore, require more excess volume.
 
*At least 3–5 µL of liquid is required in each well of a 96-well PCR plate at the end of the incubation time as this is the minimum volume required to maintain contact with the bottom of the cartridges. This contact is required to conduct heat into the resin bed. Longer incubation times or higher temperature settings require more volume, which should be determined empirically. A PCR plate is the most practical and common plate type at deck location 4 because of the low volumes of solution typically used at that location. The minimum volume required in the wells at the end of the incubation time for other plate types must be determined empirically.
 
For example, suppose you are using the Red PCR Plate Insert plus a PCR plate. To conduct a 30-minute reaction at a resin bed temperature of approximately 37 °C with a 6 µL total aspiration volume, the temperature should be set to 45 °C and 12 µL of enzyme solution should be added per well before the run is started. A volume of 12 µL is required in this example because:
For more details, see the Temperature step in Assay development guidelines and protocol notes.
Return to top
Preparing the buffers and reagents
The following table describes the reagents and deck locations. The AssayMAP protocols are blind to the composition of the solutions, so you can easily adapt your optimized chemistry. Agilent Technologies recommends the buffers listed in the following table as a starting point for optimizing the AssayMAP On-Cartridge Reaction chemistry.
Note: The simplest AssayMAP Bravo deck configuration for the On-Cartridge Reaction protocol uses four to five solutions in addition to the deionized water used at the wash station.
Table Reagent preparation
 
When preparing these reagents, you must:
The prepared reagents should be kept in a closed container before use to avoid evaporation.
 
Return to top
Planning the reagent layout in the labware
The positions of the cartridges in the 96AM Cartridge & Tip Seating Station at deck location 2 dictate the positions of the solutions in labware at deck locations 3, 4, 5, 6, and 8. The following figure shows some examples.
Figure. Examples of reagent labware layout
 
For details on the cartridge layout, see Planning the cartridge layout.
See Labware requirements for acceptable labware at each deck location.
 
Return to top
Dispensing the reagents
 
*To minimize evaporation, fill the labware immediately before run time or keep them covered until you run the protocol.
 
 
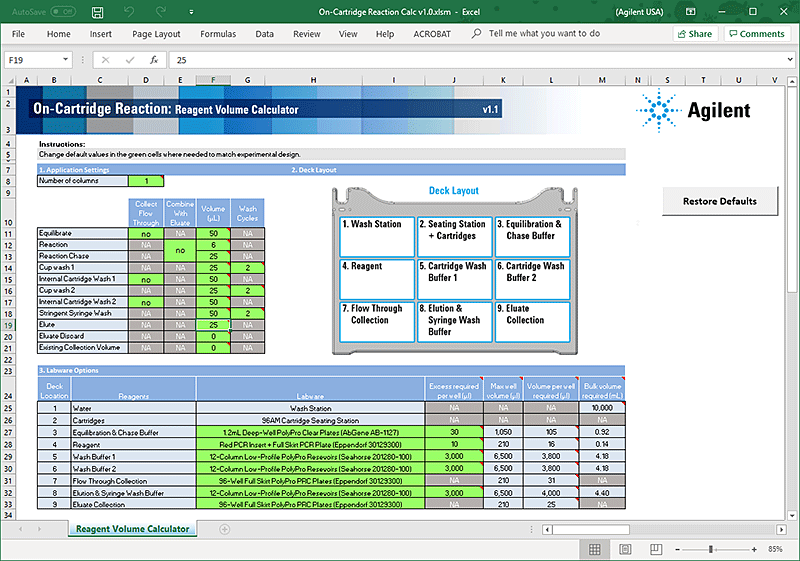
*If you are using fewer than 96 cartridges, make sure you fill the labware columns or wells that correspond with the cartridge positions on the Cartridge & Tip Seating Station. For more information, see Planning the reagent layout in the labware.
 
You can run the Reagent Transfer utility to transfer the buffers and reagents to different labware. For instructions, see Reagent Transfer v2.1.
To dispense the reagents into the labware:
1
Optional. Label the reagent labware so that you can easily identify them.
2
3
4
5
6
7
 
Return to top