AssayMAP Protein Sample Prep Workbench : On-Cartridge Reaction v1.1 User Guide : Running the protocol

Running the protocol
The On-Cartridge Reaction protocol does the following:
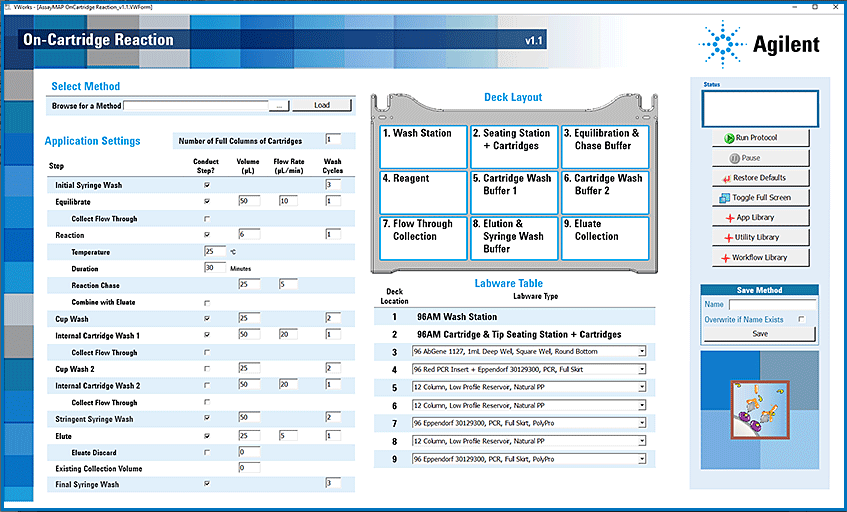
For some of these operations the cartridges are mounted on the syringe probes, while for other operations the cartridges are parked in the Cartridge & Tip Seating Station.
Before you start
Ensure that you:
This application uses cartridges that have been prepared during a preceding AssayMAP application, typically, Affinity Purification.
 
*Do not allow cartridges with immobilized substrate to dry out. If the cartridges do dry out, do not use them.
 
Setting up the protocol
Before starting the protocol, make sure the appropriate selections and values are specified in the On-Cartridge Reaction application.
To set up the protocol:
1
2
Locate On-Cartridge Reaction, and then click App.
 
The On-Cartridge Reaction application opens.
 
3
To restore the default settings, click Restore Defaults.
To use a saved method, under Select Method, click , and locate and select the method file. Click Load to display all the settings associated with the selected method.
 
To use a saved method exactly as written, go to Starting the protocol run.
To modify the settings, proceed to step 4.
4
In the Application Settings area, specify the Number of Full Columns of Cartridges to use during the run. The position of the columns of cartridge in the tip seating station must match the positions of the samples and solutions in the plates on the deck.
Range: 1–12
Default: 1
 
*If the column selection is greater than the actual number of columns used, the Bravo Platform will apply too much force when mounting the cartridges, which can cause damage to both the cartridges and the AssayMAP syringes in the head. For example, if the software specifies 10 columns, but only 1 column of cartridges are in the seating station, the head will apply 10 times more force than what is required. To prevent potential equipment damage, ensure that the column selection is correct.
 
 
*If the column selection in the software is less than the actual number of cartridges used, the Bravo Platform will not apply enough force to seat the cartridges properly. For example, if the software specifies 1 column, but 10 columns of cartridges are in the seating station, the head will apply 1/10th the force required to seat the cartridges properly. In this case, cartridges may fall off during the run or the volume of liquid that moves across the cartridge bed may be variable. To obtain expected instrument performance, ensure that the column selection is correct.
 
 
*Each full column must contain eight cartridges. If a column contains fewer than eight packed cartridges, use the AssayMAP Resin-Free cartridges to fill the empty column positions.
 
5
In the Application Settings table, select the check boxes of the steps that you want to perform and enter values for the selected steps. For details, see Application Settings table.
6
In the Labware Table area, select the labware you are using for the protocol run.
7
To save the method, specify the method Name in the Save Method area. If applicable, select Overwrite if Name Exists, and then click Save to save the settings in a method file.
 
 
Return to top
Application Settings table
The following table gives a brief description of each setting. For more details, including the practical and full ranges of values for a given setting, see the Assay development guidelines and protocol notes.
 
Specifies the set point temperature of the Peltier Thermal Station at deck location 4 during the Reaction step.
Return to top
About performing a mock run (optional)
If you are unfamiliar with the protocol and would like to see how it operates before running it with valuable samples and reagents, you can perform a mock run. A mock run uses empty or water-filled labware.
You prepare for a mock run the same way you would prepare for a real protocol run, except that you use empty labware for a totally dry run or labware containing water for a wet run. To decrease the run time, you can increase the flow rates to 500 µL/min and decrease the volumes. Use the AssayMAP Resin-Free cartridges instead of packed cartridges for mock runs.
 
*The protocol will not run if cartridges are missing.
 
 
Return to top
Starting the protocol run
To start the protocol run:
1
The physical layout on the Bravo deck matches the graphic shown in the Deck Layout area.
In the Labware Table area, the selections reflect the labware you are using for the protocol run.
2
 
*Use only the labware specified, and place them at the AssayMAP Bravo deck locations specified in the form. Using different labware or placing labware at unapproved deck locations can cause a collision resulting in equipment damage.
 
 
*Improperly seated labware can cause a hardware collision, resulting in equipment damage. Ensure that all labware are properly seated within the alignment features of their respective platepads.
 
3
Click Run Protocol.
An error message appears if the software detects an error in the form settings, for example, if an entered value is outside the limits set for a field. If this happens, follow the directions in the message to select Pause and Diagnose, and then select Abort process. After setting the appropriate values, click Run Protocol to restart the run.
Note: For the range of acceptable values for a given setting, see the Assay development guidelines and protocol notes.
To monitor the progress of the run, check the Status box in the upper right corner of the form.
 
After the protocol run starts, you can walk away from the AssayMAP Bravo Platform for the duration of the protocol, which is indicated in the Status box.
 
*To stop a run in an emergency, use the emergency stop pendant.
 
To pause the run, click Pause. The task currently in progress finishes before the protocol pauses. The Scheduler Paused dialog box opens. For details, see Emergency stops and pauses.
 
*Protocols should not be paused to change the settings. However, if you need to change a setting in a running protocol, click Pause, and then click Abort process in the dialog box that appears. Change the setting, and then clear the check boxes of the steps in the On-Cartridge Reaction application that have been completed successfully. Restart the protocol to complete the remaining steps.
 
To troubleshoot errors, see the Error Recovery Guide and the Bravo Platform User Guide in the Literature Library page of the Protein Sample Prep Workbench.
 
Return to top
Cleaning up
When the protocol run is finished, make sure you:
 
*Make sure you discard the chemical waste and used labware according to your lab’s waste disposal procedures and in compliance with all local, state, and federal safety regulations.
 
 
Return to top