AssayMAP Protein Sample Prep Workbench : Utilities User Guides : Reagent Transfer v2.1

Reagent Transfer v2.1
The Reagent Transfer v2.1 utility transfers samples or reagents from a Source Plate to a Destination Plate. This utility is useful for a wide variety of sample manipulation and reagent preparation operations. The Reagent Transfer v2.1 features include the ability to:
Before you start
Prepare the Source Plate and Destination Plate with their intended reagents. Ensure the Source Plate has the required volume overage for the labware type. For details, see the Labware requirements table.
Labware requirements
The following table lists the labware options for Source Plate and Destination Plate at Bravo deck locations 7 and 8.
 
 
Agilent 201280-100
Agilent 201282-100
Agilent 201254-100
*For dimensionally equivalent alternatives, see the Labware Reference Guide in the Literature Library page of the Protein Sample Prep Workbench.
Return to top
Accessing the Reagent Transfer utility
To access the Reagent Transfer utility:
In the Utility Library, locate the Reagent Transfer utility, and then click Utility.
 
The following figure shows the Reagent Transfer v2.1 utility form.
 
 
Return to top
Setting up the method
To set up the Reagent Transfer utility method:
1
Under Select Method, click the Browse for a Method button . Locate and select the method file.
Note: Typically, the methods are stored in the following folder: C:\VWorks Workspace\Methods\AM Reagent Transfer v2.1.
Click Load to display all the settings associated with the selected method.
To use a saved method exactly as written, skip to Running the Reagent Transfer utility. To modify the method, proceed to step 2 to make changes.
 
2
Under Application Settings area, specify the following:
a
 
If the Use Pipette Tips check box is selected, specify whether to transfer pipette tips using the Reagent Transfer utility.
To transfer the pipette tips from a source tip box at deck location 6 to the empty 96AM Cartridge & Tip Seating Station at deck location 2, select the check box.
To use pipette tips that are already present in the 96AM Cartridge & Tip Seating Station at deck location 2, clear the check box.
For example, if you do a run and transfer the pipette tips from deck location 2 to the 96AM Cartridge & Tip Seating Station, and then want to do additional runs with the same setting, the pipette tips can be reused.
If the Transfer Pipette Tips from Deck Location 6 check box is selected, specify the range of full columns of pipette tips present in the source tip box (deck location 6) at the beginning of the run.
b
 
c
 
When using pipette tips, this range can differ from the range specified for the Columns of Samples to Transfer value, but it must contain the same number of full columns. If not, and the software displays an error message, and the protocol automatically aborts.
When using bare probes, use the default range of 1 to 12. The AssayMAP Bravo head moves as if it is transferring liquid from all 96 wells. The wells that contain liquid dictate which wells are transferred.
If (x – 50 µL) > Syringe/Tip Capacity,
then Mixing Volume = Syringe/Tip Capacity
If 50 µL x Syringe/Tip Capacity,
then Mixing Volume = 0.75x
If x < 50 µL,
then Mixing Volume = 0.5x
where,
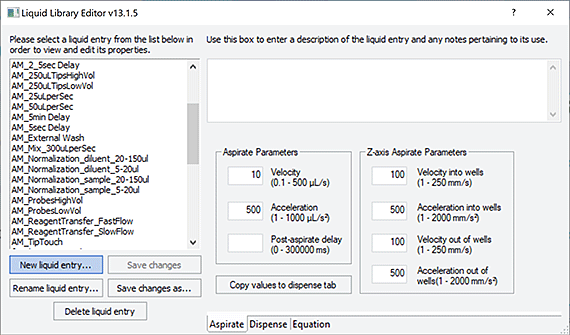
x is the final volume in the destination wells,
maximum Syringe Capacity = 250µL,
maximum Tip Capacity = 140µL
d
 
e
 
If using pipette tips. This step occurs before the Initial Wash cycles.
If using bare probes. This step occurs after the Initial Wash Cycles are completed.
To specify forward pipetting mode. Use the default setting of 0 µL.
To specify reverse pipetting mode. Use a value that is greater than 0 µL, and select the discard location for the extra liquid.
Forward pipetting mode. The blowout occurs after the transfer has completed, and then again after mixing, if conducted.
Reverse pipetting mode. The blowout occurs only after the mixing step, if conducted, because of the presence of the Reverse-Pipetting Overage volume.
<Automatic> (default). Automatically assigns one of the following liquid classes, based on whether pipette tips are used and the volume being transferred. These are good general-purpose liquid classes for most reagents and buffers that are used for the AssayMAP system.
Slow Flow (5 µL/sec). A slower flow rate is better for viscous solutions.
Fast Flow (100 µL/sec). A faster flow rate is a good starting point for high organic solutions.
In the Liquid Class box, type the liquid class name exactly as it appears in the VWorks Liquid Library Editor.
3
In the Labware Table, select that labware you are using at deck locations 7 and 8.
 
*Incorrect labware selections can cause a hardware collision, resulting in equipment damage. Ensure that the selections in the Labware Table exactly match the physical labware present on the Bravo deck.
 
4
a
In the Save Method area, specify the new Name. If applicable, select Overwrite if Name Exists.
b
Click Save to save the settings in a method file.
 
 
Return to top
Running the Reagent Transfer utility
To run the Reagent Transfer utility:
1
2
3
If you selected Use Pipette Tips, do one of the following:
If you selected the Transfer Pipette Tips from Deck Location 6 check box, ensure that the:
Empty 96AM Cartridge & Tip Seating Station is in place at deck location 2.
If you cleared the Transfer Pipette Tips from Deck Location 6 check box, ensure that the 96AM Cartridge & Tip Seating Station at deck location 2 contains the specified range of pipette tips.
Note: A message will appear and ask you to verify that the pipette tips are in the correct locations. Ensure that the pipette tips are arranged in the specified locations.
4
 
*Improperly seated labware can cause a hardware collision, resulting in equipment damage. Ensure that all labware are properly seated within the alignment features of their respective platepads.
 
5
Click Run Protocol to start the protocol run.
If the software detects a conflict in the setup, an error message or warning will appear. The following figure shows examples of Error messages that prevent the run execution.
Figure. Error message examples
 
If an Error message appears:
a
b
c
After you have resolved the conflict, click Run Protocol to start the run.
The following figure shows examples of warning messages, which allow you to continue with the run as specified, while assuming the risk posed by the warning.
Figure. Warning message examples
 
If a Warning or Verification message appears, follow the on-screen instructions verify that the settings are correct, and then do one of the following:
If the settings are correct, click Continue to start the run.
Note: A Pipette Tip Verification message appears whenever pipette tips are used.
Click Pause and Diagnose. The Scheduler Paused dialog box opens.
In the Scheduler Paused dialog box, click Abort process.
 
Click Run Protocol to start the run.
Monitoring the run
You can monitor the progress of the run in the Status box in the upper right corner of the form.
When the run is finished, remove the labware from the deck.
About stopping or pausing the run
 
*To stop a run in an emergency, use the emergency stop pendant.
 
To pause the run, click Pause. The task currently in progress finishes before the protocol pauses. The Scheduler Paused dialog box opens. For details, see Emergency stops and pauses.
To troubleshoot errors, see the Error Recovery Guide and the Bravo Platform User Guide in the Literature Library page of the Protein Sample Prep Workbench.
 
Return to top
Creating a custom liquid class
To create a custom liquid class:
1
In the Reagent Transfer v2.1 form, click Toggle Full Screen to change the display of the form so that the VWorks menubar and toolbar are visible, as the following figure shows.
2
In the VWorks window, click Tools > Liquid Library Editor. The Liquid Library Editor opens.
3
Figure. VWorks Tools menu and form displayed with full screen off
 
Figure. VWorks Liquid Library Editor window
 
 
Return to top
Automation movements during the protocol
The following table describes the basic movements of the AssayMAP Bravo Platform when you run the default Reagent Transfer utility. Different Application Settings will alter the movements.
 
The Bravo 96AM Head moves above the wash station at deck location 1, and then purges the syringe contents to waste for the number of cycles set in the Syringe Drying Cycles setting.
This step is necessary because the Bravo 96AM Head is regularly used to aspirate liquids directly into the syringes, and the presence of residual liquid can cause contamination or inaccurate pipetting behavior.
The head picks up all the pipette tips from the 96AM Cartridge & Tip Seating Station at deck location 2.
10 
11 
12 
13 
14 
 
Return to top