AssayMAP Protein Sample Prep Workbench : Utilities User Guides : Single Liquid Addition v1.1

Single Liquid Addition v1.1
The Single Liquid Addition Utility is specifically designed to adjust the pH of samples after the samples have been digested using the In-Solution Digestion: Multi-Plate application. This utility enables you to rapidly adjust buffer composition or add a component to up to four sample plates by transferring liquid from a common reagent plate, to up to four independent sample plates. An optional stringent syringe wash step is included to prevent carry over.
Before you start
Make sure you:
Place up to four sample plates on the Bravo deck, at the following locations:
You can find the labware-specific values in the Labware Reference Guide, which is in the Literature Library page of the Protein Sample Prep Workbench.
Accessing the Single Liquid Addition utility
To access the Single Liquid Addition utility:
Open the Utility Library, locate the Single Liquid Addition utility, and then click Utility.
 
The following figure shows the Single Liquid Addition utility interface.
 
 
Return to top
Running the Plate Stacking protocol
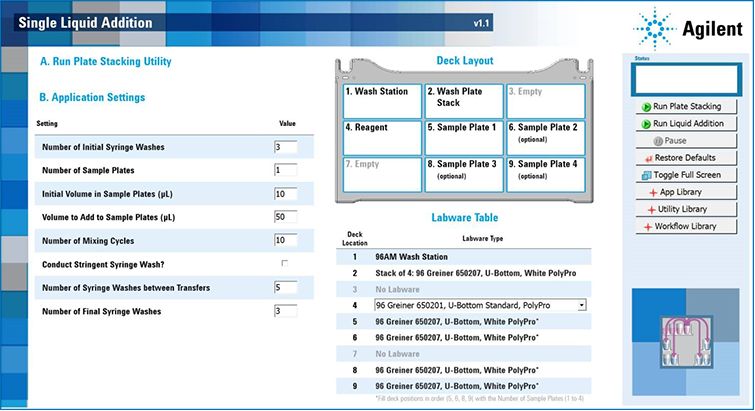
The Plate Stacking protocol stacks the wash plates properly at Bravo deck location 2 to prevent collision during the Single Liquid Addition protocol run.
 
*The Single Liquid Addition protocol requires the stack of four wash plates, even if you have less than four sample plates. Ensure that the wash plates are Greiner 650207 White U-Bottom.
 
Before running the Plate Stacking protocol, prepare four Greiner 650207 White U‑Bottom plates as follows:
To prepare the Wash Plates:
1
In the Single Liquid Addition utility, click Run Plate Stacking. The protocol starts.
2
3
Check the Status box in the upper right corner of the form. When the Protocol Complete message is displayed, click OK.
 
Return to top
Running the Single Liquid Addition utility
To run the utility:
1
In the A. Application Settings area, set the following properties for the run:
 
2
In the Labware Table, select that labware you are using at deck location 4.
 
*Incorrect labware selections can cause a hardware collision, resulting in equipment damage. Ensure that the selections in the Labware Table exactly match the physical labware present on the Bravo deck.
 
3
4
 
*Improperly seated labware can cause a hardware collision, resulting in equipment damage. Ensure that all labware are properly seated within the alignment features of their respective platepads.
 
5
Click Run Liquid Addition to start the protocol run.
To monitor the progress of the run, check the Status box in the upper right corner of the form.
When the run is finished, remove the labware from the deck.
 
*To stop a run in an emergency, use the emergency stop pendant.
 
To pause the run, click Pause. The task currently in progress finishes before the protocol pauses. The Scheduler Paused dialog box opens. For details, see Emergency stops and pauses.
To troubleshoot errors, see the Error Recovery Guide and the Bravo Platform User Guide in the Literature Library page of the Protein Sample Prep Workbench.
 
Return to top