AssayMAP Protein Sample Prep Workbench : Utilities User Guides : Syringe Test v1.2

Syringe Test v1.2
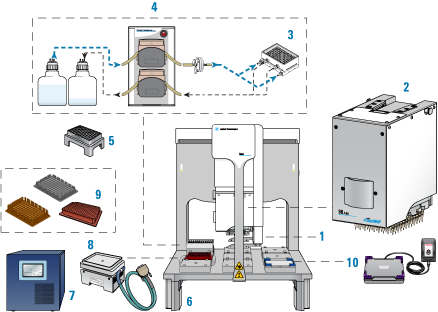
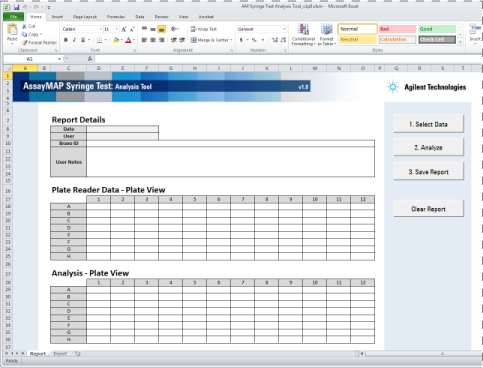
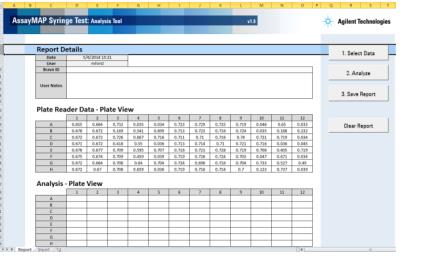
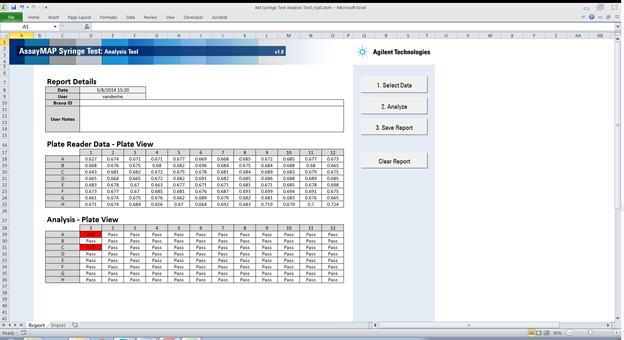
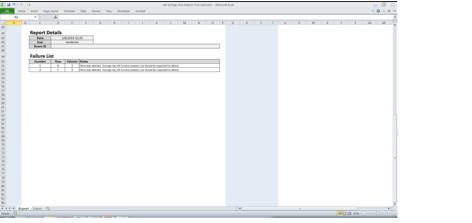
You use the AssayMAP Syringe Test Kit on the AssayMAP Bravo Platform to verify the integrity of the probes and syringes in the Bravo 96AM Head. The test kit is designed to evaluate all the syringes in the head concurrently while the head is mounted on the Bravo Platform.
Description
When to use the AssayMAP Syringe Test Kit
After a Bravo 96AM Head collision in which syringes may have been damaged
How it works
You run a protocol that uses test cartridges mounted on the Bravo 96AM Head. The protocol quickly aspirates a volume of test solution, which creates a partial vacuum in the syringes. After an equilibration period, the aspirated test solution is dispensed into a microplate and the volumes of each well is calculated by measuring the absorbance of the test solution in a microplate reader.
During aspiration, damaged syringes will aspirate air and the resulting volume dispensed will be reduced. The affected syringes are then identified during the data analysis of the microplate reader results.
 
Return to top
AssayMAP Syringe Test Kit components
One AssayMAP Syringe Test Kit provides enough materials and reagents to perform 20 tests of the 96 syringes in the Bravo 96AM head.
The following table provides a description of the kit components.
 
Return to top
Hardware requirements
AssayMAP Bravo Platform
 
 
The following figure and table show the components of the AssayMAP Bravo Platform, which are required for running the AssayMAP protocols.
Figure. AssayMAP Bravo Platform components
 
 
96AM Wash Station or the later model 96 Channel Wash Station
Pump Module 2.0 and two carboys
10 
Orbital Shaking Station with Control Unit
 
*To avoid a hardware crash and equipment damage, ensure that the wash station contains the white wide-bore chimneys when using the 25 µL cartridges.
 
Note: The white wide-bore chimneys work for both 5-µL and 25-µL cartridges and are standard on wash stations purchased in 2020 onward. The wide-bore chimneys are white plastic, whereas the standard-bore chimneys are a semi-clear plastic. For details, see the 96 Channel Wash Station Maintenance Guide.
 
 
Additional required equipment
 
 
Return to top
Software requirements
 
 
The following table lists the minimum software requirements:
 
Agilent VWorks Automation Control
Agilent Protein Sample Prep Workbench


Return to top
Labware requirements
The Syringe Test requires the following labware:
The following figure shows the labware locations on the Bravo deck. The table lists the options for labware type by deck location.
 
Table Labware options by deck location
 
Agilent 201254-100
Agilent 201280-100
Return to top
Workflow
 
Set up the Bravo Platform deck for the syringe test.
Return to top
Accessing the Syringe Test utility
To access the Syringe Test utility:
Open the Utility Library, locate the Syringe Test utility, and then click Utility.
 
The following figure shows the Syringe Test utility interface.
 
 
Return to top
Setting up the test
The following procedure specifies volume requirements for the default labware selections. If you choose different labware types from the list of options, you should adjust the volumes accordingly.
To set up the test:
1
Place the accessories or components on the AssayMAP Bravo deck using the following figure and table as a guide.
 
 
96AM Wash Station or the later model 96 Channel Wash Station
2
Optional. Click Restore Defaults to set all Application Settings to their defaults.
3
In the Labware Table area, select the labware you are using for the protocol run.
4
Optional. To have the Centrifuge Balance Plate filled with 200 µL water by the Bravo Platform, select the Generate Balance Plate check box.
5
6
 
Return to top
Running the syringe test
To run the syringe test:
1
Ensure that the labware positions match the Deck Layout area in the form, and that the labware are properly seated in the platepads.
 
 
*Improperly seated labware can cause a hardware collision, resulting in equipment damage. Ensure that all labware are properly seated within the alignment features of their respective platepads.
 
2
Confirm that the selected labware in the Labware Table area is the labware you are using for the syringe test.
 
*Incorrect labware selections can cause a hardware collision, resulting in equipment damage. Ensure that the selections in the Labware Table exactly match the physical labware present on the AssayMAP Bravo deck.
 
3
Click Run Syringe Test.
Refer to the following table for a summary of the automation movements that occur during the test execution.
 
Return to top
Automation movements during the syringe test run
 
1
2
Parks the cartridges at the 96AM Cartridge & Tip Seating Station.
3
5
6
7
Parks cartridges at the 96AM Cartridge & Tip Seating Station.
8
9
Parks cartridges at the 96AM Cartridge & Tip Seating Station.
Return to top
Analyzing the results
How the data is analyzed
The absorbance measurement of each well is compared to an expected reference value, which is determined from a statistical analysis of the data from all wells.
Any syringe that has a corresponding value > 10% of the reference value fails the test.
To analyze the syringe test results:
1
After the run is completed, remove the collection microplate and the balance microplate from the Bravo deck and spin them in a centrifuge at 500 x g for 1 min to remove any bubbles within the wells.
2
Note: Although 425 nm is optimal, 405 nm is also acceptable.
Note: Alternatively, you can save the data to a Microsoft Excel file (XLSX) and then use the copy and paste commands to transfer the data to the Analysis Tool.
3
4
In the AssayMAP Syringe Test: Using AssayMAP form, click Analysis Tool to open the AssayMAP Syringe Test Analysis Tool.
 
The AssayMAP Syringe Test Analysis Tool opens in Microsoft Excel.
 
5
6
Click Select data. In the Data Selection Options dialog box, click Import New Data.
 
7
In the Import Text File dialog box, select the text (TXT) data file you want to analyze and click Open.
8
a
In the Text Import Wizard Step 1 of 3 dialog box, click Finish to accept the default settings.
b
In the Import Data dialog box, make sure Existing worksheet is selected and then click OK.
 
When the Select Data dialog box appears asking you to Select a continuous 8 row by 12 column range of cells to analyze, select the 96 cells you want to analyze and click OK.
You must select 96 cells, otherwise you will receive a message requesting you to select 96 entries.
 
The data appears in the Analysis Tool window.
 
9
Click Analyze. The Analysis Tool analyzes the imported data and displays the results in the Analysis - Plate View area.
 
Failed syringes are indicated by red cells. A list of the failed syringes is located below the analysis results.
 
10
11
a
Click Save Report.
b
In the Save As dialog box, navigate to where you want to save the results.
c
 
Return to top
Verifying defective syringes
Use the following procedure to verify that failed test results indicate defective syringes and not a non-syringe-related problem.
This procedure specifies volume requirements for the default labware selections. If you choose different labware types from the list of options, you should adjust the volumes accordingly.
Before you start
Procedure
To verify defective syringes:
1
2
3
For example, a faulty cartridge will give a failing result on both the test and retest, but the location of the failure will track with the cartridge. This is why the cartridge rack is rotated by 180-degrees before the verification test.
 
Return to top
Replacing defective syringes
To replace damaged syringes, do one of the following:
Contact Agilent Technical Support to schedule a service call.
If you continue to use the AssayMAP Bravo Platform while awaiting repair, do not use data obtained from the defective syringe.
 
Return to top