AssayMAP Protein Sample Prep Workbench : Utilities: Normalization v2.0 User Guide : Running the protocol

Running the protocol
Before you start
Ensure that you:
Run the Startup protocol to prepare the AssayMAP Bravo Platform for the run. See the System Startup/Shutdown v2.2 utility.
About performing a mock run (optional)
If you are unfamiliar with the protocol and would like to see how it operates before running it with valuable samples and reagents, you can perform a mock run. A mock run uses empty or water-filled labware and source bottles.
You prepare for a mock run the same way you would prepare for a real protocol run, except that you use empty labware for a totally dry run or labware containing water for a wet run. You must use pipette tips for the mock run.
 
Return to top
Running the protocol
To run the protocol:
1
Locate the Normalization banner in the Utility Library, and then click Utility.
 
The Normalization utility opens.
 
2
Under Select and Load a Normalization Method, click 
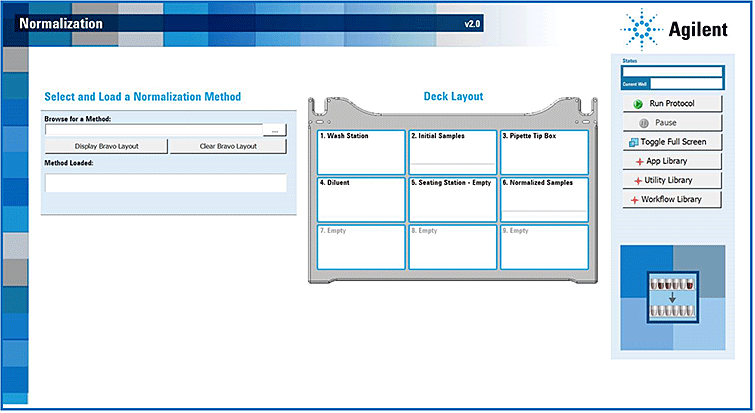
to select the method that you created in Setting up a Normalization run.
3
Click Display Bravo Layout to display the Method Loaded and the Deck Layout information.
 
*The probes of the Bravo 96AM Head are sharp and can scratch you if they brush across your hand. A probe scratch can expose you to any contaminants remaining on the probes. Be careful to avoid touching the probes.
 
4
Ensure that the Bravo Plate Risers are securely in place at AssayMAP Bravo deck locations 2 and 6.
5
Ensure that the tip box full of fresh pipette tips is at deck location 3 and the empty 96AM Cartridge & Tip Seating Station is at deck location 5.
Note: The protocol will transfer the pipette tips to the Tip Seating Station.
 
*To prevent a potential collision, ensure that no thermal plate insert is on the Peltier Thermal Station installed at deck location 4.
 
6
Place the Initial Sample plate on the Bravo Plate Riser at deck location 2.
Place the Normalized plate on the Bravo Plate Riser at deck location 6.
 
*Use only the labware specified, and place them at the Bravo deck locations specified in the instructions. Using different labware or placing labware at unapproved deck locations can cause a collision resulting in equipment damage.
 
7
 
*Improperly seated labware can cause a hardware collision, resulting in equipment damage. Ensure that all labware are properly seated within the alignment features of their respective platepads.
 
8
Click Run Protocol to start the run.
To monitor the progress of the run, check the Status box in the upper right corner of the form.
 
Note: After the protocol run starts, you can walk away from the AssayMAP Bravo Platform for the duration of the protocol. In general, 96 samples requires approximately 110 minutes.
 
*To stop a run in an emergency, use the hardware Emergency Stop button.
 
To pause the run, click Pause. The task currently in progress finishes before the protocol pauses. The Scheduler Paused dialog box opens. For details, see Emergency stops and pauses.
To troubleshoot errors, see the Error Recovery Guide and the Bravo Platform User Guide in the Literature Library page of the Protein Sample Prep Workbench.
 
Return to top
Cleaning up
To clean up after the run:
1
2
3
Transfer the unused pipette tips from the 96AM Cartridge & Tip Seating Station at deck location 5 to unused locations in the tip box.
4
Remove the Bravo Plate Risers from deck locations 2 and 6.
5
 
*Make sure you discard the chemical waste and used labware according to your lab’s waste disposal procedures and in compliance with all local, state, and federal safety regulations.
 
To shut down at the end of the day:
1
Open the System Startup/Shutdown utility. See System Startup/Shutdown v2.2.
2
3
Place the 96AM Cartridge & Tip Seating Station at deck location 2, and then click Run Shutdown.
4
5
Close the Protein Sample Prep Workbench software.
 
Return to top