AssayMAP Protein Sample Prep Workbench : Utilities: Reformatting v2.0 User Guide : Setting up a Reformatting method

Setting up a Reformatting method
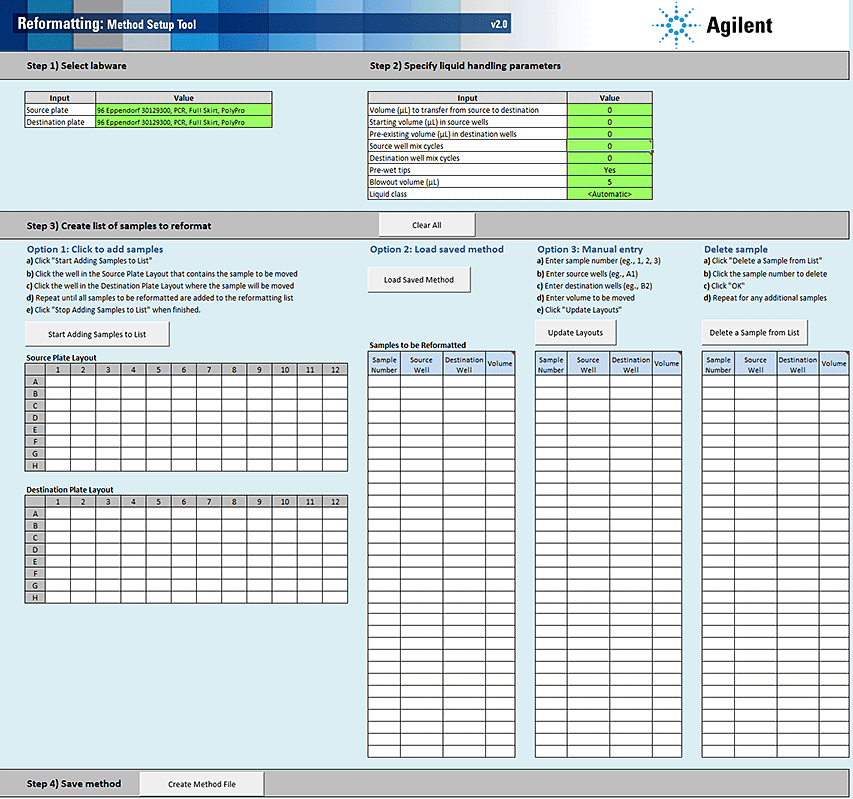
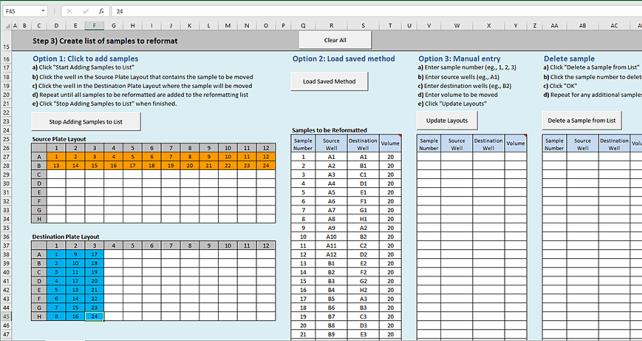
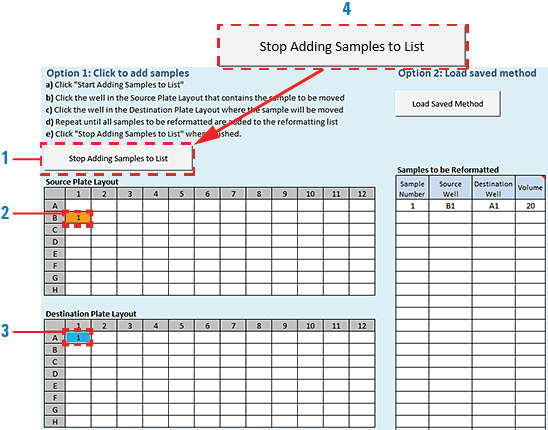
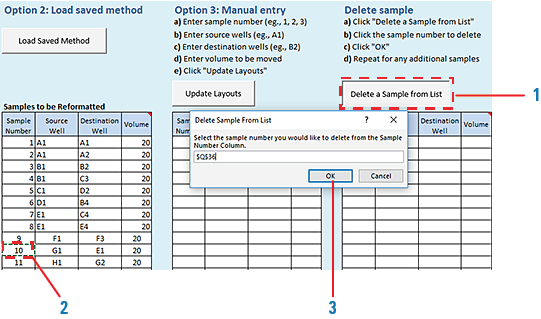
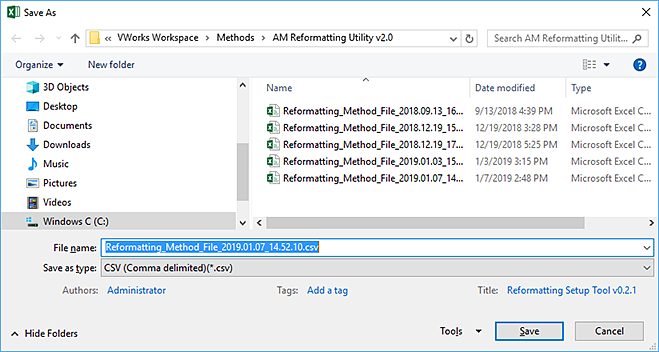
The Method Setup Tool is a Microsoft Excel-based tool that steps you through the process of creating and saving a method file that contains all the information required to run the Reformatting protocol on the AssayMAP Bravo Platform. This tool enables you to define the location of the samples to be transferred, the volumes to be transferred, and the liquid-handling parameters to be used.
Opening the Method Setup Tool
To open the Method Setup Tool:
1
Locate the Reformatting banner in the Utility Library, and then click Method Setup Tool.
 
Microsoft Excel starts and displays the Method Setup Tool.
 
I
*In Microsoft Excel, ensure that you enable content.
 
The Method Setup Tool has the following 4 distinct steps:
1
2
3
4
 
Return to top
Step 1) Select labware
For the labware options at each deck location, see Labware.
To select the labware:
1
In the cell next to Source plate, select the labware that you are placing on the plate riser at deck location 2 as follows:
Click the green cell, and then click the arrow that appears. In the list, click the labware type to be used.
 
2
In the cell next to Destination plate, select the labware that you are placing on the plate riser at deck location 6 as follows:
Click the green cell, and then click the arrow that appears. In the list, click the labware type to be used.
 
*If transfers from multiple source wells will be pooled in a single destination well, be sure that the destination well has enough capacity to receive these multiple transfers. The software will not alert you to this type of error.
 
 
Return to top
Step 2) Specify liquid handling parameters
Note: Only the cells highlighted in green are editable.
To specify the liquid handling parameters:
Type or select the values for the following inputs:
 
If well volumes vary, enter the smallest volume as the Starting volume. By doing so, the error checking can alert you if you enter a value to be transferred that is larger than the initial volume. Also, you should enter the value for the smallest source well volume so as not to introduce bubbles while mixing. Note that the larger volume wells may not mix as well as the smaller volume wells because the mixing volume is based on the value on the Starting volume in source wells setting.
If doing multiple transfers from a single source well, be sure to include enough volume as the error checking assumes only a single transfer.
Including a volume overage. Be sure to include sufficient excess volume (dead volume) in the source well to ensure good accuracy and precision. For volume recommendations, see the Labware Reference Guide (workbench Literature Library page).
<Automatic> (default). Automatically assigns one of the following liquid classes, based on the volume being transferred.
Slow Flow (5 µL/sec). A slower flow rate is better for viscous solutions.
Fast Flow (100 µL/sec). A faster flow rate may improve performance for high organic solutions.
In the Liquid class box, type the liquid class name exactly as it appears in the VWorks Liquid Library Editor.
Pipetting accuracy and liquid classes
 
*Agilent does not guarantee specific accuracy and precision results for the Reformatting v2.0 utility because accuracy and precision are too dependent on the composition and liquid properties of the solutions used.
 
Pipetting accuracy and precision can be greatly affected by liquid properties, such as viscosity and surface tension. If unacceptable accuracy and precision results are observed, you may modify these liquid classes to achieve acceptable results. Use the following procedure to modify or create a liquid class.
 
To modify or create a custom liquid class:
1
In the Reformatting form, click Toggle Full Screen to change the display of the form so that the VWorks menubar and toolbar are visible.
2
In the VWorks window, click Tools > Liquid Library Editor. The Liquid Library Editor opens.
3
Figure. VWorks Tools menu and form displayed with full screen off
 
Figure. VWorks Liquid Library Editor window
 
 
Step 3) Create list of samples to reformat
You can use any of the following options to create and edit the list of samples:
You can also use a combination of options. For example, you can enter some sample transfers using option 1 or 2 and then you can add additional sample transfers manually. If you do this, remember to click Update Layouts after you are done.
The added samples appear in the Samples to be Reformatted table and in the Source Plate Layout and Destination Plate Layout, as the following figure shows. You can use the manual entry method to modify the volumes in the Samples to be Reformatted table.
Note: The Method Setup Tool assigns consecutive sample numbers based on the sequence in which you add the samples.
 
If necessary, you can delete samples from the list one at a time using the Delete sample feature. The Method Setup Tool consecutively renumbers the remaining samples in the list based on the sequence in which they were added.
Return to top
To use the Click to add samples option:
1
Click Start Adding Samples to List.
Note: The button label changes to Stop Adding Samples to List.
2
In the Source Plate Layout, click the well that contains the sample to be moved, and then click the well in the Destination Plate Layout where this sample will go.
As the figure shows, the cells change color in both plate layouts to designate the added samples. The corresponding sample and well designations appear in the Samples to be Reformatted table.
 
3
4
When you are finished adding samples using Option 1, click Stop Adding Samples to List. See figure, item 4.
 
Return to top
To use the Load Saved Method option:
1
2
If applicable, click Clear All to refresh the tables.
3
Click Load Saved Method. In the Open dialog box, select the previously saved method file (*.csv), and then click Open. The samples appear in the Source Plate Layout, Destination Plate Layout, and Samples to be Reformatted table.
By default, the methods are stored in the following folder:
… /VWorks Workspace/Methods/AM Reformatting Utility v2.0
 
 
Return to top
To use the Manual entry option:
1
Note: You can edit volumes that you entered using options 1 or 2. If the volume in the Samples to be Reformatted table has been modified so that it does not equal the volume set in Step 2, the corresponding cell turns yellow in the table. The yellow highlight is only a caution for you to verify that these values are intended.
If you are copying rows from a table, ensure the content of the cells matches the column order of the Samples to be Reformatted table. See the following figure, item 1.
2
Click Update Layouts to populate the sample information in the Source Plate Layout and Destination Plate Layout (figure, item 2).
3
 
Return to top
To delete a sample from the list:
1
Click Delete a Sample from List. See figure, item 1.
The Delete Sample From List dialog box opens.
2
In the Samples to be Reformatted table, click the cell in the Sample Number column (figure, item 2).
Note: Samples can be deleted only one at a time.
3
Click OK in the Delete Sample From List dialog box (figure, item 3).
The software updates the Samples to be Reformatted table and the plate layouts. If you delete a sample that is not at the end of the list, the software renumbers the samples remaining in the list in consecutive order.
 
 
Return to top
 
Step 4) Save method
To save the created reformatting method:
1
Click Create Method File.
2
In the Save As dialog box, specify the file name and the storage location, and then click Save.
The setup tool saves the file as a comma-separated value (.csv) text file.
The default method file storage location is in the following folder:
… /VWorks Workspace/Methods/AM Reformatting Utility v2.0
 
 
Return to top