AssayMAP Protein Sample Prep Workbench : Utilities: Serial Dilution v2.0 User Guide : Setting up a Serial Dilution method

Setting up a Serial Dilution method
The Serial Dilution Method Setup Tool is a Microsoft Excel-based tool that uses formulas to calculate volume requirements for the samples and diluent based on your input.
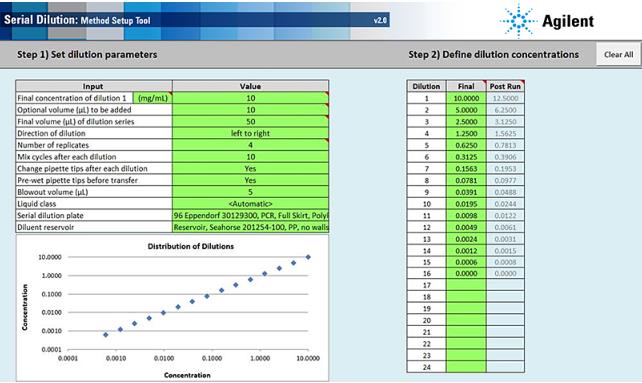
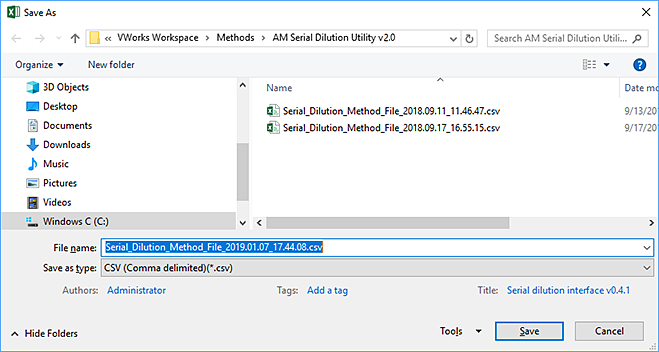
The Method Setup Tool steps you through the process of defining a serial dilution method and creating a method file. The method file contains all the required information for the Serial Dilution protocol on the AssayMAP Bravo Platform. The file is a record of the intended serial dilution process.
Opening the Method Setup Tool
To open the Method Setup Tool:
1
Locate the Serial Dilution banner in the Utility Library, and then click Method Setup Tool.
 
Microsoft Excel starts and displays the Method Setup Tool.
 
 
*In Microsoft Excel, ensure that you enable content.
 
The Method Setup Tool has 7 distinct steps, which are categorized as follows:
 
 
*If you change anything in step 1 or 2 after completing step 3 or 4, make sure that you click Clear Steps 3 and 4 Only and redo steps 3 and 4.
 
 
Return to top
Step 1) Set dilution parameters
Note: Only the cells highlighted in green are editable.
To set the dilution parameters:
1
2
For additional details on these settings, see Assay development guidelines.
 
<Automatic> (default). Automatically assigns one of the following liquid classes, based on the volume being transferred.
Slow Flow (5 µL/sec). A slower flow rate is better for viscous solutions.
Fast Flow (100 µL/sec). A faster flow rate may improve performance for high organic solutions.
In the Liquid Class box, type the liquid class name exactly as it appears in the VWorks Liquid Library Editor.
For options, see Labware. For the capacity limits and the volume overage recommended for each labware, see the Labware Reference Guide in the Literature Library page of the workbench.
Pipetting accuracy and liquid classes
 
*Agilent Technologies does not guarantee specific accuracy and precision results for the Serial Dilution v2.0 utility because accuracy and precision are too dependent on the composition and liquid properties of the solutions used.
 
Pipetting accuracy and precision can be greatly affected by liquid properties, such as viscosity and surface tension. If unacceptable accuracy and precision results are observed, you may modify these liquid classes to achieve acceptable results. Use the following procedure to modify or create a liquid class.
 
To create a custom liquid class:
1
In the Serial Dilution form, click Toggle Full Screen to change the display of the form so that the VWorks menubar and toolbar are visible, as the following figure shows.
2
In the VWorks window, click Tools > Liquid Library Editor. The Liquid Library Editor opens.
3
Figure. VWorks Tools menu and form displayed with full screen off
 
Figure. VWorks Liquid Library Editor window
 
 
Step 2) Define dilution concentrations
To define the concentration of the serial dilution steps:
In the green boxes in the Final column, enter the desired concentration of each serial dilution step.
The method setup tool automatically enters the dilution concentration for dilution 1 when you enter the Final concentration of dilution 1 (Step 1) Set dilution parameters). You enter all the other concentrations in the dilution series directly in each cell or by entering a formula in the cell. You can use the Excel fill series function with formulas to quickly generate a serial dilution.
You can generate serial dilutions with 2 to 24 steps. You can also generate blanks by putting zero as a dilution concentration.
Note: If you enter zero as a concentration, an error message appears and says Negative or zero values cannot be plotted correctly on log charts. Only positive values can be interpreted on a logarithmic scale. To continue and use the zero, click OK. The graph will not include the zero volume but the method will work.
The Post Run column contains non-editable cells that show the concentration of the serial dilution series after the run is complete.
If step 1 Optional volume to be added is >0, the Post Run column will show the concentration of the serial dilution steps after the serial dilution utility is run but before the optional volume is added. The concentrations entered in the Final column represent the concentration of the serial dilution after adding the optional volume.
If step 1 Optional volume to be added is 0, the concentrations entered in the Final column will be the same as the those in the Post Run column.
As you define the concentrations, the graph displays the corresponding log-log plot of the dilution series concentrations. You can use the graph to verify that your dilution formula will yield the expected results. The graph can help you visualize the distribution curve and identify gaps between dilution steps.
 
 
Return to top
Step 3) Select the starting well of the dilution series
 
*If you change anything in step 1 or 2 after starting step 3 or 4, make sure that you click Clear Steps 3 and 4 Only and redo steps 3 and 4.
 
To define the layout of the serial dilution plate:
1
Click Select Starting Well (figure, item 1) and then click the corresponding cell in the Serial Dilution Plate map where the replicate 1 of dilution 1 will be located (figure, item 2).
 
2
When the Choose Starting Location dialog box opens, displaying a formula, click OK (figure, item 3).
The layout for the dilution series appears in the Serial Dilution Plate map, displaying the selected number of replicates in the specified layout (row or column).
Figure. Example of a left-to-right layout by row for a dilution series with 4 replicates
 
Figure. Example of a top-to-bottom layout by column for a dilution series with 4 replicates
 
 
Return to top
Step 4) Calculate the sample and diluent volumes
To calculate the sample and diluent volumes:
Click Calculate Volumes. The tool uses the information provided in the previous steps to calculate the sample and diluent volumes that will be transferred into each well to achieve the specified serial dilution series.
The calculated volumes (µL) appear in the following areas:
 
 
Return to top
Step 5) Correct these errors
Although you may enter values that are not possible or practical given the selected labware or specified concentrations and volumes, the setup tool will flag such values as errors. You must resolve any errors before you can proceed to the next step in the setup tool.
 
*If you change anything in step 1 or 2 at this point, click Clear Steps 3 and 4 Only and redo steps 3 and 4.
 
 
Return to top
Step 6) Create the method file
To create the method file for serial dilution:
1
Click Create Serial Dilution Method.
2
In the Save As dialog box, specify the file name and the storage location, and then click Save.
The setup tool saves the file as a comma-separated value (.csv) text file.
The default method file storage location is in the following folder:
… /VWorks Workspace/Methods/AM Serial Dilution Utility v2.0
 
 
Return to top
Step 7) Prepare serial dilution plates
To prepare the serial dilution plates:
1
2
To close the Method Setup Tool, click File > Close or exit the Microsoft Excel software.
A Microsoft Excel dialog box opens and asks if you want to save the changes. You may click Don’t Save.
 
Return to top