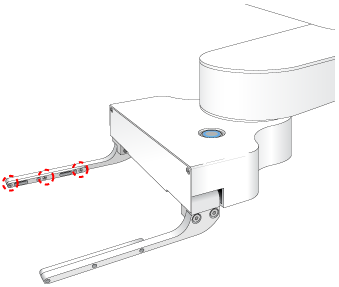
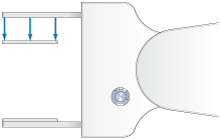
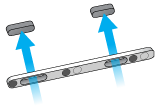
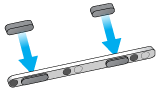
Replacing robot gripper pads Materials and tools Make sure you use the following materials and tools: • Spare pair of robot gripper pads • 1.3-mm hex wrench Before you start Make sure you: • Use BenchBot Robot Diagnostics to move the robot to a position where you can easily access the robot grippers. • Turn off the robot and the system. • Disconnect the power cord from the robot. Procedure WARNING Always turn off the robot and shut down the system before performing any maintenance procedure. WARNING Always disconnect the power cord from the robot before performing any maintenance procedure. To replace a pair of robot gripper pads: 1 Using the 1.3-mm hex wrench, remove the three screws on the pad holders. 2 Remove the pad holder from the gripper finger. 3 From the front side of the pad holder, push the pads until they fall from the holder. 4 Place the two new pads on the back side of the pad holder and press forward until they are positioned securely in the gripper finger. Note: The longer pad should be in the forward slot of the pad holder, and the shorter pad should be in the back slot of the pad holder. 5 Align the pad holder on the inside of the grippers as shown. 6 Insert the three screws in the pad holder, and then use the 1.3-mm hex wrench to tighten the screws. Related information For information about... See... BenchBot Robot component names Hardware components Robot shutdown procedure Turning on and turning off the robot System shutdown procedure System user documentation Safety BenchBot Robot Safety and Installation Guide BenchBot Robot Diagnostics Using BenchBot Diagnostics