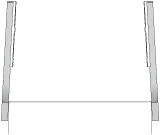
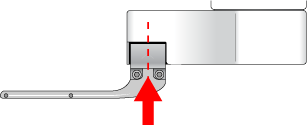
Replacing robot grippers About this topic You can replace the robot grippers under the following circumstances: • One or both grippers are damaged. • You want to use a different set of grippers to accommodate specific teachpoint requirements. For example, a teachpoint at a particular device might be recessed more than in other devices. So the gripper fingers must be vertically longer to reach the labware at that teachpoint. (For the list of different gripper types available, contact Automation Solutions Customer Service.) This topic explains how to replace the robot grippers. WARNING Only administrators and experienced personnel should perform the procedures in this topic. About the shim washers One ultra-thin washer is installed between each gripper and the robot hand, behind the screw at the back end of the gripper. The washers are used to ensure the tips of the grippers point slightly inward to ensure optimal grip performance. The following diagram exaggerates the inward positioning. Note: The number of washers used depends on the robot setup. Typically, only one washer is used behind each gripper. However, the number of washers required to optimize grip performance can vary. In some cases, no washer is required. CAUTION Because the washers are especially thin and light, it might be easy to lose them during the replacement procedure. Materials and tools Make sure you have the following: • Grippers you want to install • 2.5-mm hex wrench Before you start Make sure you: 1 Use BenchBot Diagnostics to move the robot to a position where you can easily access the robot grippers. 2 Turn off the robot and the system. 3 Disconnect the power cord from the robot power source. Procedure WARNING Always turn off the robot and shut down the system before performing any maintenance procedure. WARNING Always disconnect the power cord from the robot before performing any maintenance procedure. To replace the robot grippers: 1 Using the 2.5-mm hex wrench, remove the two screws that are holding the gripper to the robot hand. IMPORTANT As you loosen the screw at the back end of the gripper, hold a hand under the screw to catch the falling washers. 2 Remove the gripper. 3 Place the washers behind the new gripper, aligning them with the screw hole at the back end, and then insert a screw into the hole to hold the washers in place. 4 Position the new gripper finger at the hand as shown, and push upward so that the top of the gripper is pressed securely against the bottom of the gripper mount. 5 While pushing upward on the gripper: a Tighten the screw at the back end of the gripper. b Insert and tighten the remaining screw in the gripper. 6 Repeat steps 1 through 5 to replace the second gripper. Related information For information about... See... BenchBot Robot component names Hardware components Robot shutdown procedure Turning on and turning off the robot System shutdown procedure System user documentation Safety BenchBot Robot Safety and Installation Guide Contacting Automation Solutions Technical Support Reporting problems