|
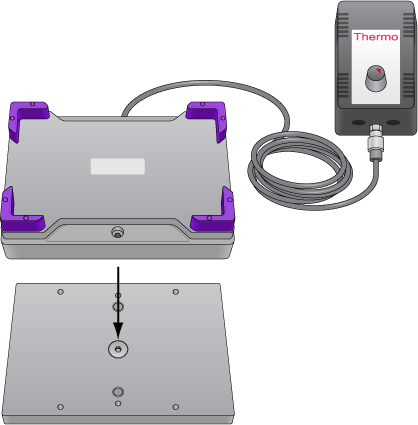
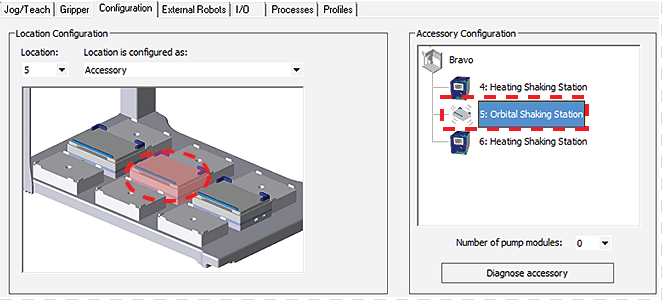
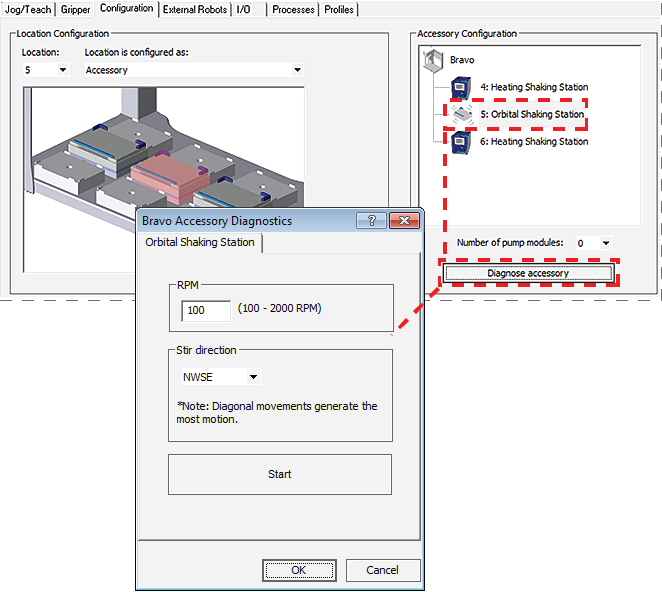
The Orbital Shaking Station is a microplate shaker that can be installed at any deck location on top of a short adapter pad instead of a platepad. The Orbital Shaking Station has the option of using its own control module, or an Inheco Single TEC controller (STC) or Multi TEC controller (MTC). For a full description of the Orbital Shaking Station, see the manufacturer’s documentation.Figure. Orbital Shaking Station with its own control module and an adapter pad
Configure the station in Diagnostics.
• Orbital Shaking Station with adapter pad and attachment screwsIf the Orbital Shaking Station does not have its own control module, make sure that you have an Inheco Single TEC controller (STC) or Multi TEC controller (MTC).Ensure that you remove the platepad from the deck location where you plan to install the Orbital Shaking Station.
3 Place the Orbital Shaking Station atop the adapter pad so that the cable is towards the back of the Bravo deck.Tighten screws evenly to ensure the feet on the bottom of the Orbital Shaking Station are pressed evenly into the adapter pad and the pad remains level.Note: The feet of the Orbital Shaking Station are compressible, and these screws do not reach a hard stop as a result.
If the station that has its own control module, you connect the serial cable from the speed control (on the power cord) to the serial port on the Bravo computer, as described in the following procedure.
1 Route the Orbital Shaking Station cable off the deck and connect it to the control module that contains the power plug. See following figure, item 1.
2 Connect the serial cable with the red stripe to the leftmost port on the control module (figure, item 2). Connect the other end of the cable to the serial port, if available, on the controlling computer.Connecting the Orbital Shaking Station to a serial port on the computer provides more reliable communication than using a USB-to-serial adapter. If a serial port is not available, use a USB-to-serial adpater.
3 On the control module, ensure that the knob is turned fully counterclockwise so that the red arrow (3) is pointing to the RS-232 setting.
4 Connect the power cable (4) from the control module to an AC outlet with a grounded circuit.
5 Turn on and test the Orbital Shaking Station as follows:
a On the control module, turn the knob clockwise to the maximum position, and verify that the Orbital Shaking Station vibrates.
6 Place a sample microplate on the Orbital Shaking Station. Verify that the microplate fits within the four corner tabs but has no extra space.Note: Before the accessory is ready for use, you will verify the deck configuration in the corresponding Bravo profile and set the teachpoint for the accessory location.
1 Disconnect the Orbital Shaking Station power cord from the AC outlet.
2 Disconnect the control module serial cable from the Bravo computer.
4 Remove the Orbital Shaking Station from the adapter pad.
2 In Diagnostics, select the appropriate profile, and then click the Configuration tab and reconfigure this location.
1
2
3
4 Follow the instructions in the Accessories Wizard to:
a Verify the Location of the installed Orbital Shaking Station.
b Choose the Orbital Shaking Station accessory.
c Select the controlling computer Serial Port that connects to the Orbital Shaking Station.
d Select the Module number that indicates the position of the Orbital Shaking Station you are configuring.
5 Click Finish.
6 When the configuration message appears, click Yes to initialize the accessory and move the teachpoint to a safe height. You must set the teachpoint after completing this procedure.
7 Test the station operation using the following procedure, and then verify and adjust the teachpoint for the accessory location. See Adjusting the teachpoint using a teach plate.Ensure that the profile is initialized in Bravo Diagnostics before you perform the following procedure.
1 In the Accessory Configuration area, click the Orbital Shaking Station icon, and then click Diagnose accessory. The Bravo Accessory Diagnostics dialog box opens.
2
3 At the Orbital Shaking Station on the deck, verify that the accessory operates correctly.
4
Bravo Platform hardware components