Bravo Platform User Guide : Accessories and platepads : Using the teach plate to set the teachpoint for an accessory

Using the teach plate to set the teachpoint for an accessory
About this topic
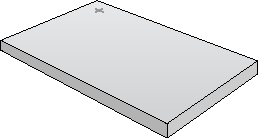
The teach plate is a 10 mm thick metal plate that fits in the plate nest of an accessory, such as the Orbital Shaking Station. The teach plate has a crosshairs in one corner, as the following figure shows. You use the teach plate to set the pipettor teachpoint for an accessory that does not have a crosshairs for alignment.
Figure. Teach plate
 
Adjusting the teachpoint using a teach plate
 
*When editing the teachpoint for the accessory, you must account for the teach plate height before setting the teachpoint.
 
To set a teachpoint using the teach plate:
1
2
In Diagnostics, click the Jog/Teach tab.
3
In the Location list, select the deck location of the accessory.
4
In the Jog/Teach tab, use the controls to jog the head so that the A1 pipette tip is in the correct position (directly over the crosshairs with paper-thin clearance). For details, see Setting the first teachpoint.
5
Jog the head up in the z‑axis so that you have enough room to remove the teach plate. Remove the teach plate.
6
In the Jog/Teach tab, use the controls to jog the head down in the z‑axis until there is paper-thin clearance between the end of the tip and the station’s top surface.
7
Click Teach to set the teachpoint.
8
In the Profiles tab, click Update this profile.
Related information