Bravo Platform User Guide : Accessories and platepads : Setting up the Thermal Station (cooling pad)

Setting up the Thermal Station (cooling pad)
About this topic
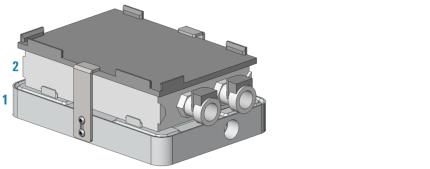
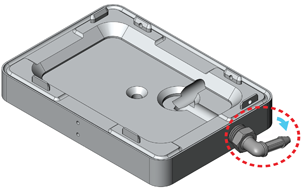
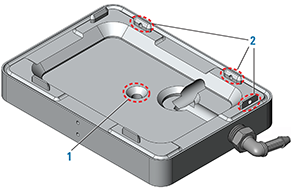
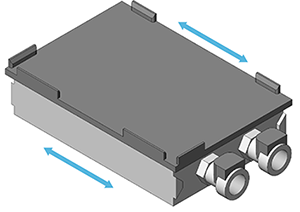
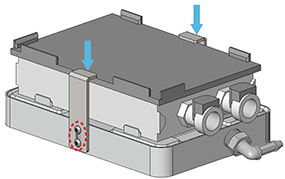
This topic describes how to install the Thermal Station (cooling pad) on a Bravo deck location.
The Thermal Station uses a fluid-filled thermal block to provide temperature control of ±0.1°C uniformly across a microplate. The Thermal Station (cooling pad) consists of the following:
An adapter pad (figure, 1) that attaches to the deck
A thermal pad (figure, 2) that installs on the adapter pad
 
The Thermal Station is available with the drain ports on the short end or long side of the accessory. Typically, the drain ports are on the short end and the tubing is routed off the side of the Bravo deck. A Thermal Station that has the drain ports on the long end may be installed in the back row of the Bravo deck with the tubing routed out the rear. Use the following procedure to install either option.
 
*Routing the Thermal Station tubing out the front of the Bravo deck will interfere with the Bravo Light Curtain. Operating the Bravo Platform without the Light Curtain can expose operators to moving-parts hazards. To prevent potential injury, ensure that no tubing or other accessory parts interfere with the operation of the Bravo Light Curtain.
 
 
*The Thermal Station is not defined as an accessory in the Bravo profile. If you use a thermal plate insert in addition to a microplate at this location, the Bravo gripper cannot safely transfer the labware to and from this location. To prevent a potential collision in this case, make sure that you manually transfer the labware to and from this location when using a thermal plate insert.
 
Note: The installation location is configured as a standard platepad in the Bravo profile.
Setup workflow
 
Installing the Thermal Station
Before you start
Make sure you have the following:
 
*To prevent a potential injury, turn off the Bravo Platform before you install or remove the accessory.
 
Procedure
To install the Thermal Station:
1
To remove the platepad, uninstall the M6 screw in the center of the platepad and then lift the platepad off of the deck.
2
a
b
Figure. Adapter pad with elbow plug installed on the short end
 
3
a
b
Note: If necessary, use a rubber mallet to tap the adapter pad until it sits level on the deck.
c
d
Ensure that the setscrews in the adapter pad tabs (figure, 2) are recessed. Use a M1.5 hex wrench to back out any protruding setscrews.
 
4
 
5
6
a
b
7
 
a
b
Ensure that both brackets are holding the thermal pad securely in place.
Completing the hardware setup
After installing the Thermal Station and adjusting the teachpoint, the following setup tasks must be completed before the accessory is ready for use.
 
b
Watch for the Liquid Level Low message to display on the front panel.
Related information