Bravo Platform User Guide : Autofilling accessories : Configuring an autofilling station for the Bravo Platform

Configuring an autofilling station for the Bravo Platform
 
 
About this topic
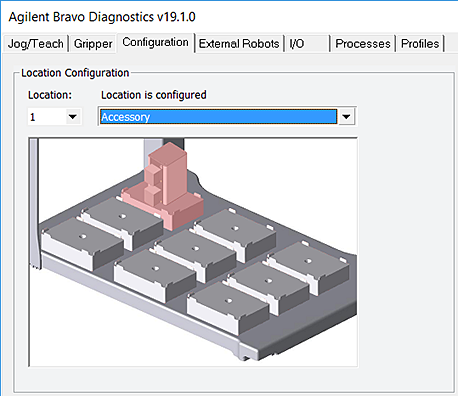
An autofilling station consists of a Pump Module and an autofilling reservoir or wash station. This topic describes how to configure a basic autofilling location.
Connect the Pump Module, Weigh Station, and an Agilent autofilling type reservoir.
For details on how to install a basic autofilling station, see the Pump Module User Guide.
 
*If you are installing an autofilling station on an AssayMAP Bravo Platform, see the AssayMAP Bravo Platform Installation Guide.
 
Configuring the autofilling function
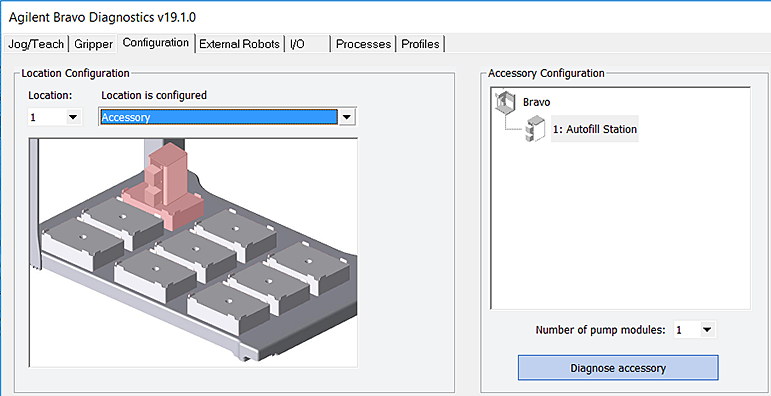
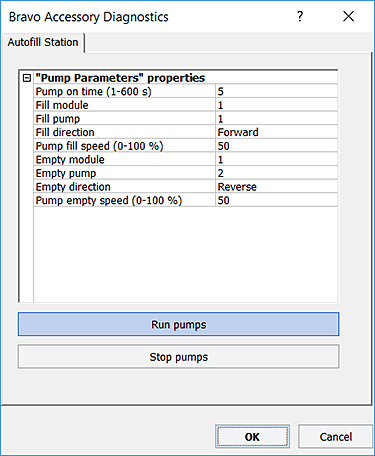
To configure an autofilling station:
1
In Diagnostics, click the Profiles tab, and select the profile that you want to change.
2
In the Configuration tab, select the location in the Location list, or click the location in the graphic display.
3
In the Location is configured list, select Accessory.
 
4
In the Accessories Wizard, do the following:
a
In the Location for accessory list, verify the location and then click Next.
b
In the Accessory list, select Autofill Station, and then click Next.
c
In the Number of pump modules box, select the total number of Pump Modules connected to this device, and then click Next.
For example, if only one Pump Module is connected to this Bravo Platform, select 1. If two Pump Modules are connected to this Bravo Platform, select 2, and so forth.
Note: To make a change, click the number to display a list of options.
d
In the Autofill Station properties table, set the following parameters.
 
Specify the Pump Module that this deck location uses. For example, select 1 if only one Pump Module is connected to the device.
Specify the Pump Module that this deck location uses. For example, select 1 if only one Pump Module is connected to this device.
Use Weigh Station?
If you are using a Weigh Station at this location, select Yes.
Weigh Station module number
If connecting the Weigh Station serial cable to the Pump Module SHELF A input port, select 1.
If more than one Weigh Station is connected, the module number corresponds to the order in which they are connected to the controlling computer.
Note: Agilent Technologies recommends using one Pump Module for each pairing of reservoir and Weigh Station.
e
Click Next, and then click Finish on the Summary page.
5
If you are using a Weigh Station at this location, click Yes to move the teachpoint to a safe value.
On the Profiles tab, click Initialize this profile, and then reset the teachpoint for the installed Weigh Station.
If you are placing the reservoir on a standard deck location, click No to preserve the existing teachpoint. On the Profiles tab, click Update this profile to save the settings.
Testing the autofilling function
To test the autofilling and auto-emptying functions, you can use Diagnostics to run the pumps in real time.
To test autofilling:
1
In Diagnostics, initialize the profile, and then click the Configuration tab.
2
In the Accessory Configuration area, highlight the Autofill Station icon, and then click Diagnose accessory.
Note: The Autofill Station is represented by a Pump Module graphic in the software.
 
3
In the Accessory Diagnostics dialog box, verify the following settings.
 
 
Specifies the Pump Module that this deck location uses. One Pump Module can function as both the Fill module and Empty module. For example, select 1 if only one Pump Module is connected.
Forward. Moves the pumped fluid in the forward direction of the pump.
Reverse. Moves the fluid in the opposite direction.
4
Click Run pumps and verify that the pump is functioning properly.
5
Click Stop pumps, and then click OK.
 
Related information
 
Calibrating a Weigh Station