Bravo Platform User Guide : Setting up the Bravo Platform : Creating and managing profiles

Creating and managing profiles
About this topic
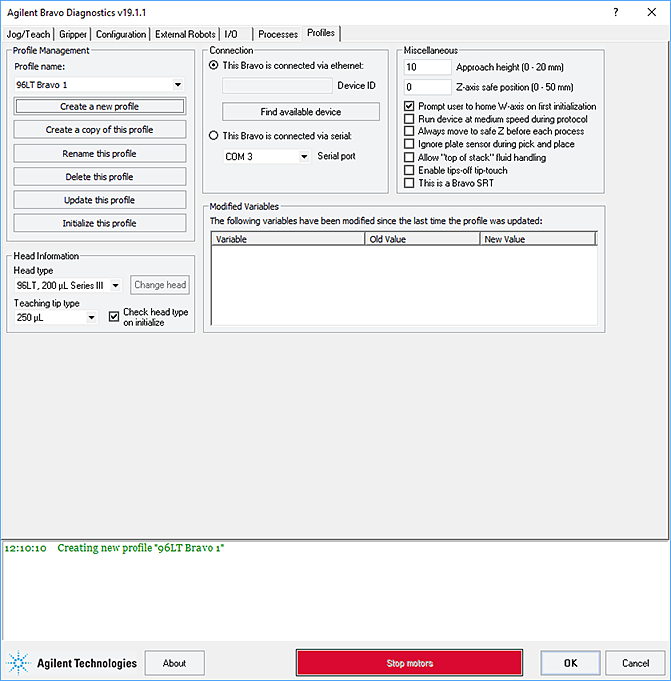
VWorks software users with Administrator or Technician privileges (advanced users) can create and manage profiles for the Bravo Platform.
Profiles defined
 
*Each Bravo Platform that you install requires a unique profile, which enables communication settings specific to the given instrument.
 
A profile is a collection of settings, stored in the Microsoft Windows registry, that manages how you connect to devices. A Bravo profile does the following:
Stores the gripper y-axis offset
Each combination of Bravo instrument, liquid-handling head, gripper, and deck layout requires a profile that defines the specific configuration. If the configuration changes, a modified profile or a new profile is required. For example, if you add an accessory such as a Orbital Shaking Station to the Bravo deck, you must modify the profile or create a new profile that includes the new deck layout and the teachpoint for the accessory.
If you have more than one Bravo Platform of the same configuration and you may copy the profile, but you must verify that the teachpoints are correct for each of the platforms.
 
*Using a profile that is associated with teachpoints from a different Bravo Platform can result in a hardware collision and cause equipment damage. Ensure that you verify the profile and associated teachpoints for each specific Bravo Platform.
 
Before you start
The profile is referenced by a VWorks device file. The device file must be open before you can create or modify a profile.
 
*Each profile can be used by multiple protocols. Deleting, renaming, or changing the parameters for a profile based on one protocol can invalidate other protocols that use the profile.
 
For information about device files, see Creating or adding a Bravo device. For a detailed description of the relationships between the device file, profile, and teachpoints, see the VWorks Automation Control User Guide.
About managing profiles
You use the Profiles tab in Bravo Diagnostics to manage the Bravo device profiles.
Figure. Bravo Diagnostics Profiles tab
 
The Profiles tab enables you to:
A log of these events appears in the box at the bottom of the Bravo Diagnostics window. The VWorks software records these events and stores the information in the Main log. For details on the logs, see the VWorks Automation Control User Guide.
Note: Unless you login to the VWorks software as an Administrator or Technician, only the Profile name list and the Initialize this profile button are available in the Profile Management area of the Profiles tab.
Creating a profile
A Bravo profile consists of a combination of parameters that you set in the Profiles tab, Configuration tab, Jog/Teach tab, Gripper tab, and the External Robots tab of Bravo Diagnostics.
To create a new profile:
1
In Bravo Diagnostics, click the Profiles tab.
2
Click Create a new profile.
 
3
In the Create Profile dialog box, type a name for the new profile, and click OK.
Use a profile name that identifies the specific configuration. For example, include the liquid-handling head type and serial number in the profile name. If this computer controls multiple Bravo Platforms, also identify the device, for example, the device serial number.
4
Under Connection, select This Bravo is connected via ethernet, and then click Find available devices.
Note: If you have an earlier model, you may select This Bravo is connected via serial, and then select which COM port on the computer you are using.
5
In the Discovered BioNet Devices dialog box that appears:
a
Click the Select the Ethernet adapter to use from the list below, and select the correct adapter for the device connection.
b
In the list of devices that appear, select the Bravo device. If multiple Bravo devices are on the network, use the MAC Address to identify the Bravo device for this profile. To successfully communicate with the Bravo device, the Status column must display New or Matched.
c
 
6
Under Head Information, configure the following:
 
a
Select the Head type from the list.
b
Select the Teaching tip type from the list.
 
*Selecting the wrong Teaching tip type can result in a head crash. Ensure that you select the correct Teaching tip type.
 
 
*Disposable pipette tips must be an Agilent brand.
 
c
Ensure that the Check head type on initialize check box is selected.
Note: If the Check head type on initialize check box is cleared, the w-axis controls in the Jog/Teach tab will be disabled even when the device is initialized.
 
*If this check box is cleared, the Bravo Platform will run with any head installed. Therefore, if the profile specifies a 96-channel head type, but a 384-channel head is installed, the head will crash.
 
7
Optional. In the Miscellaneous area, verify the settings to be applied during a protocol run. If you are unsure of which values to set, start with the default values. You can change them later if necessary.
For more details, see Miscellaneous area.
8
Verify the list of changes in the Modified Variables area, and then click Update this profile to save the current selections and settings.
The Modified Variables area clears, and the update is logged in the box at the bottom of the Bravo Diagnostics window.
9
To initiate communication with the Bravo Platform using the new profile, click Initialize this profile.
 
*When you initialize the Bravo Platform, the head can move. Keep clear of the Bravo head while it is in motion. Do not touch any of the moving parts or attempt to move labware while the Bravo Platform is in operation. The device could pinch, pierce, or bruise you.
 
Steps to finish creating the profile
Verify the following settings, which are saved with the given profile.
 
If applicable. Use the Gripper tab to verify the gripper y‑axis offset.
If applicable. Use the External Robots tab to specify the deck locations that the external robots can access.
Related information
 
Relationship of VWorks components, such as device files, profiles, teachpoints, and labware
What to do if the Bravo Platform device does not appear in step 5