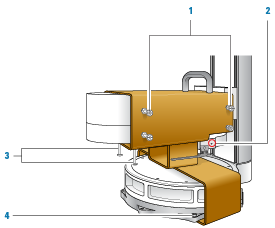
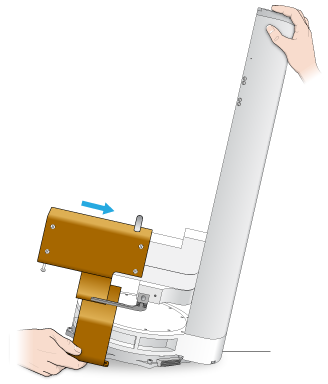
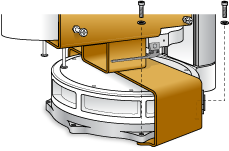
Removing and installing the shipping brace Required tools Before you start, make sure you have the following tools: • 2-mm hex wrench • 5-mm hex wrench Removing the shipping brace IMPORTANT Save the shipping brace and the screws in case you need to move or ship the robot. To remove the shipping brace: 1 Loosen the four nylon screws on each side of the brace by hand. 2 Using the 2-mm hex wrench, turn the gripper lead screw to open the grippers as wide as possible. 3 Loosen the two nylon screws below the robot arm. 4 Using the 5-mm hex wrench, unscrew and remove the four metal screws that are holding the shipping brace to the robot base. 5 Tilt the robot at a slight angle as shown. 6 While holding the brace by the handle, carefully slide the brace away from the robot. Installing the shipping brace In addition to the items listed in Required tools, make sure you have the following: • Shipping brace • 10 nylon screws • Four 5-mm metal screws with washers CAUTION Make sure you have followed the instructions in Removing the Direct Drive Robot before installing the shipping brace. To install the shipping brace: 1 Have another person tilt and hold the robot at a slight angle toward the mast. Make sure the connector at the base is not aligned with the mast. 2 While holding the brace by the handle and supporting the weight of the brace at the opposite end, slowly and carefully slide the brace onto the robot. The tucked robot arm fits in the brace’s upper sleeve, and the robot base fits in the brace’s lower sleeve. 3 Insert the four metal screws with washers in the mounting holes at the robot base, and use the 5-mm hex wrench to tighten the screws. The screws should hold the shipping brace to the robot base. 4 Using the 2-mm hex wrench, turn the gripper lead screw to close the robot grippers until they are secured against the brace. 5 Tighten the two nylon screws under the robot arm. 6 Tighten the eight nylon screws on both sides of the brace. Related information For information about... See... Installing the robot Installing the robot Turning on the robot Turning on the Direct Drive Robot Installing the VWorks software VWorks Automation Control Setup Guide Adding the robot to a device file Adding and deleting Direct Drive Robots in the device file Creating profiles for the robot Creating Direct Drive Robot profiles Setting teachpoints Setting teachpoints Packing the robot and power supply Packing the robot in the shipping crate