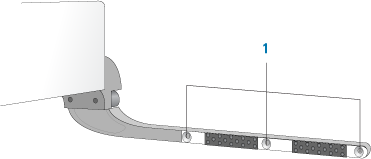
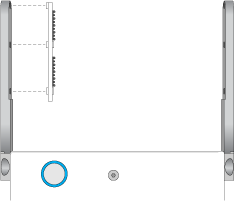
Replacing robot gripper pads About this topic Gripper pads can become worn with use. Agilent Technologies recommends that you check the gripper pads monthly and replace them if necessary. This topic explains how to replace the robot gripper pads. WARNING Only administrators and trained personnel should perform the procedures in this topic. Materials and tools Make sure you use the following materials and tools supplied with the robot: • Spare pair of robot gripper pads • Star-head cap screws (6) • Star-head wrench • Thread-locking solution Before you start Make sure you: 1 Use DDR Diagnostics to move the robot to a position where you can easily access the robot grippers. 2 Turn off the robot and the system. 3 Disconnect the power cord from the robot power supply. Procedure WARNING Always turn off the robot and shut down the system before performing any maintenance procedure. WARNING Always disconnect the power cord from the robot power supply before performing any maintenance procedure. To replace a robot gripper pad: 1 Using the star-head wrench, remove the three cap screws that are holding the pad to the gripper finger (1). 2 Pull the pad from the gripper finger. 3 Align the new pad on the inside of the grippers as shown, and then press it against the gripper finger so that the pad is held in place. 4 Add a tiny drop of thread-locking solution across the thread of each screw. The solution functions like glue to prevent the screws from becoming loose. 5 Insert the three cap screws in the gripper finger, and then use the star wrench to tighten the screws. Related information For information about... See... Direct Drive Robot component names Hardware components Robot shutdown procedure Turning on and turning off the robot System shutdown procedure System user documentation Safety Direct Drive Robot Site Preparation and Safety Guide DDR Diagnostics Using DDR Diagnostics