Microplate Labeler User Guide : Installing the device : Loading labels and ribbon

Loading labels and ribbon
About this topic
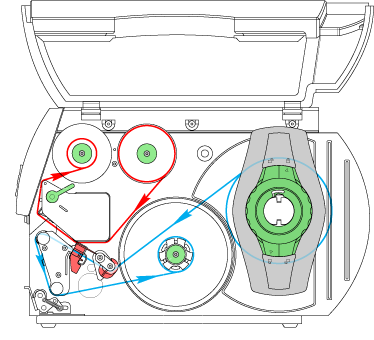
This topic describes how to load labels and ribbon in the Microplate Labeler printer.
After you load the labels and ribbon, perform several print-and-apply tests to ensure that the labels are printing correctly and that the vacuum pads on the applicator head can pick the labels off of the label backing.
Note: If the Microplate Labeler is fitted with a cab SQUIX printer, you can go to the printer touchscreen Help menu to view videos showing how to load labels and ribbon.
Before you begin
Ensure that you have the Microplate Labeler Media Kit from Agilent Technologies. The kit contains a one-to-one quantity of ribbon and labels so that you can replace them at the same time. The kit contents are:
 
*The printhead can be hot after use. Allow the printhead to cool before changing the ribbon.
 
Open the printer cover to gain access for loading the labels and ribbon.
Figure. Printer (side view) showing the feed paths of the ribbon (red) and labels (blue)
 
Removing the used ribbon
See the following figure for the component locations referenced in the procedure.
 
To remove the used ribbon:
1
While firmly grasping the ribbon supply hub (1), turn the green knob clockwise 
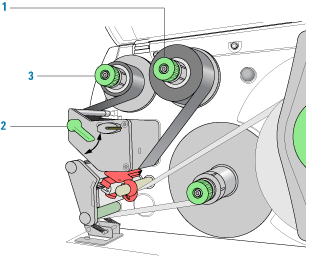
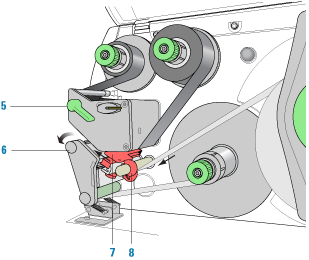
to contract the hub and loosen the empty roll. Slide the roll off of the hub.
2
Lift the printhead lever (2) counterclockwise to lift the printhead.
3
While firmly grasping the take-up hub (3), turn the green take-up knob clockwise to contract the hub and loosen the used roll of ribbon. Slide the used roll off of the take-up hub.
4
 
*Clean the printhead before loading the new ribbon. See Cleaning the printer components.
 
Loading the new ribbon
See the following figure for the component locations referenced in the procedure.
 
To load new ribbon:
1
a
b
2
Ensure the printhead lever (2) is up to lift the printhead, and then guide the ribbon under and around the printhead.
 
*The printhead can be hot after use. Allow the printhead to cool before changing the ribbon. The printhead is the narrow bar that presses the image through the ribbon and onto the label as the media move onto the print roller.
 
 
*Do not touch the protective glass layer of the printhead with your fingers. A dirty printhead will result in a poor print image.
 
3
a
b
c
4
Turn the ribbon take-up hub (3) counterclockwise to smooth out the ribbon slack.
If you are also loading labels, continue to the next procedure. If you are finished loading all media, turn the printhead lever (2) clockwise to lower the printhead.
Removing a used label roll
See the following figure for the component locations referenced in the procedure.
 
To remove a used label roll:
1
2
Push down on the pinch-roller lever (2) to release the label strip.
3
4
While firmly holding the rewinder (3), turn the green knob clockwise to contract the rewinder and release the wound roll.
5
Note: You will remove the empty label core when you install the new label roll in the following procedure.
Loading the new labels
You install the labels in three basic steps:
 
Step 1. Installing the label roll on the roll retainer
 
To install the label roll on the roll retainer:
1
Turn the green locking ring (1) counterclockwise, so that the arrow points to .
2
3
On the roll retainer (3), load the new label roll so that it feeds counterclockwise with the label side up.
4
Reposition the margin stop (2) on the roll retainer (3).
5
While firmly pushing the margin stop against the label roll (4), turn the green locking ring (1) clockwise, so that the arrow points to 
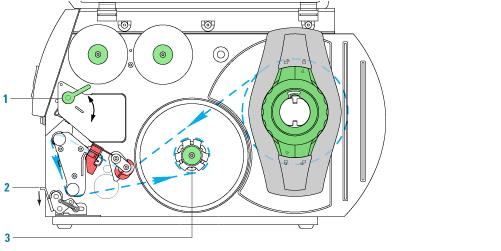
, securing the label roll in position.
 
*To ensure the roll feeds properly and label presentation is repeatable, the margin stop must be firmly in place against the label roll.
 
Step 2. Feeding the label strip under the printhead
 
To feed the label strip through the printhead:
1
Turn the printhead lever (5) counterclockwise to lift the printhead.
2
Slide the red guide ring (8) to the end of the axis bar.
3
Guide the label strip below the axis bar and through the label sensor (7) so that the label strip exits the print unit between the printhead and the print roller (6).
4
Push the guide ring (8) on the axis bar against the outer edge of the label strip.
Step 3. Securing the label strip to the rewinder
 
To secure the label strip to the rewinder:
1
Push down on the pinch-roller lever (9) to lift the pinch roller off the rewind assist roller.
2
3
While holding the rewinder (11) firmly, turn the green knob clockwise until it stops.
4
Insert the label strip under the three brackets on the rewinder (11), and turn the green knob counterclockwise 
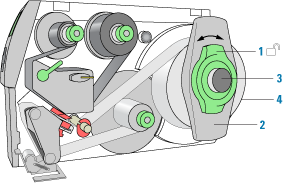
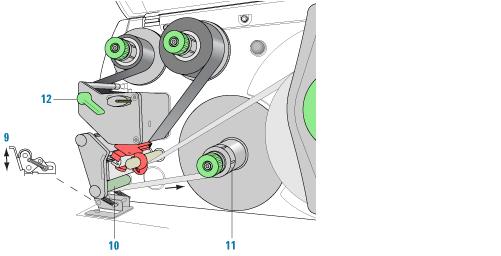
until it stops. The rewinder is fully expanded, gripping the label strip firmly.
The inside edge of the label strip should be flush against the printer.
5
Turn the rewinder (11) counterclockwise to tighten the label strip.
6
Push up on the pinch-roller lever (9) to position the pinch roller into position on the rewind assist roller.
7
Turn the printhead lever (12) clockwise to lower the printhead into position.
After you finish loading new ribbon and labels
Use Microplate Labeler Diagnostics to run a print-and-apply test and verify that the labels print correctly and the applicator head can pick up the labels from the printer.
Optionally, you can reset the label counter in the I/O Functions tab to track the number of labels used.
Related topics