|
The Microplate Labeler contains a set of template label formats that are ready to use or that you can modify. For an overview of the templates, see Templates for barcode formats.
• Microplate Labeler Diagnostics is open. For details, see Opening Diagnostics.
•
1
2
1
2 In the Open dialog box, navigate to the file storage location, select the XML file, and then click Open.C:\VWorks Workspace\Microplate Labeler Label Formats
1
2 In the dialog box that appears, type the format name, and then click OK. The new name appears in the Current format list.
2 Right-click in the Label Editor preview box, and then choose one of the following from the shortcut menu:
• Insert text. Available for any field.
• Insert barcode. Available for field 2 only.
•
•
•
1 In the Label Field Data table, select the desired field (Index 1 to 6), and then click Rename field.
2 In the dialog box that appears, type a name, and click OK. The name appears in the Field Alias column for the selected field.
The value property that you specify in the Label Editor tab is used only when performing a test print from the Label Editor tab. When you run a labeling protocol using the VWorks software, the value of each field comes from the data source that you select in the VWorks software.
• Human-readable field. The actual text that is printed during a test print.
• Barcode field. The actual data that is encoded into the barcode for a test print. The barcode text should follow the rules of the specified symbology, for example, limited to numbers only or uppercase letters and numbers.
1 In the Field Data Table, click the entry in the Value column for the field that you want to edit. The row is highlighted.
1 In the Label Field Data table, click the name in the Format column for the field that you want to edit. The row is highlighted.
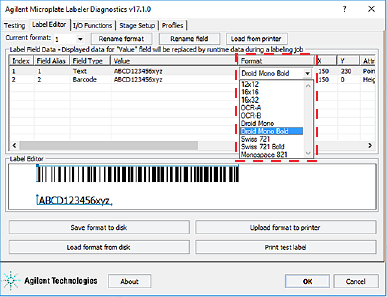
For barcode fields, make sure that the symbology you choose supports all of the characters in your field’s data. Also, if you are using a barcode reader, make sure that symbology you choose can be read by your barcode readers. For a description of the available symbologies for the Microplate Labeler, see Barcodes and supported symbologies.
• Label Editor preview box. You can drag each field to an approximate position in the preview box. However, the preview is not precise, and you must test print the label to see the actual field sizes and positions, and then adjust as necessary.
• X and Y columns. The X and Y values in the Label Field Data table correspond to the printer’s x- and y-coordinates for the label, where the origin is at the top left corner of the label.
– x-coordinate. The horizontal start position, the distance between the label’s left edge and the field’s left edge.
– y-coordinate. The vertical start position, the distance between the label’s top edge and the text field (bottom left corner) or barcode field (upper left corner).
1 In the Label Field Data table, click the value in the X column for the field that you want to edit. Click the value again to enable editing, and type the new value.
2 Click the value in the Y column for the field that you want to edit. Click the value again to enable editing, and type the new value.In addition to the field’s x, y coordinates, the field size attributes affect the field’s placement on the label. Initially, you can use the default values in the Attributes column. You can upload the label format to the printer, print a test label, and then evaluate whether to adjust the size or placements of the fields.
1
1
2 After you upload a label format to the printer, you can check your changes by printing a test label.
1 Alternatively, you can perform test print-and-apply cycles using the Testing tab. See Performing a print-and-apply test.
Opening Microplate Labeler Diagnostics