Microplate Labeler User Guide : Maintenance and troubleshooting : Performing a print-and-apply test

Performing a print-and-apply test
About this topic
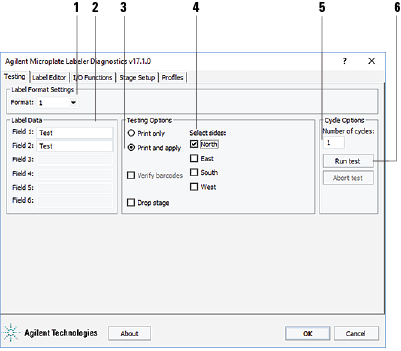
This topic describes how to perform a print and apply test using the Testing tab in Microplate Labeler Diagnostics.
When to do a test print
Perform a print-and-apply test when first setting up your Microplate Labeler, after creating a new label format, when loading new labels and ribbon, or when troubleshooting printing problems.
Testing helps you detect problems such as:
Before you begin
The following procedure assumes that:
Microplate Labeler Diagnostics is open. For details, see Opening Diagnostics.
 
*Field data entered in the Testing tab of Microplate Labeler Diagnostics is stored temporarily in the computer and not the printer, so it can be used for testing purposes only.
 
Procedure
To print a label from the Testing tab:
 
1
In the Testing tab, verify that the label format you want to use for this test is selected in the Format list.
Note: You can display a preview of the label format in the Label Editor tab.
2
Under Label Data, type the text in the field box for the position that you want to test.
Note: Only the fields that are defined in the label format can be edited. Fields that are defined in the label format as barcode fields will be encoded into a barcode before printing.
3
In the Testing Options area, select Print and apply.
4
 
 
*Make sure that the height of the plate stage is suitable for the type of microplate being labeled, and that there is a microplate on the plate stage.
 
5
In the Number of cycles list, set the value to the number of microplates that you want to test label.
6
Click Run test or press the green button on the top of the device.
The first label is printed and applied to the microplate.
7
Repeat this step until all the test cycles are completed.
Related topics
 
Opening Microplate Labeler Diagnostics
Microplate Labeler Diagnostics controls and indicators