Vertical Pipetting Station User Guide : Installing Vertical Pipetting Station : Connecting the air and vacuum sources

Connecting the air and vacuum sources
About this topic
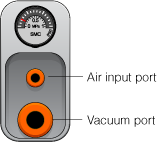
Compressed air is used to move the Vertical Pipetting Station shelves, tipbox press, and other components. If the Vertical Pipetting Station is fitted with vacuum shelves, a vacuum source is required. This topic explains how to connect the Vertical Pipetting Station to an air source and vacuum source and how to check the connections for leaks before use.
Before you begin
Make sure the laboratory set up requirements for compressed air have been met. See Laboratory requirements.
Make sure you have the supplied ¼-in tubing for the compressed air.
If the Vertical Pipetting Station is fitted with vacuum shelves, make sure you have the supplied 3/8-in tubing for the vacuum.
Ensure you follow all safety precautions.
 
WARNING Working with open, charged air lines can result in injury. Switch the compressed air line off before installing the Vertical Pipetting Station. Contact your facilities department or Automation Solutions Technical Support with questions about setting up the air line.
 
CAUTION Ensure that the air coming into the Vertical Pipetting Station is properly filtered from moisture or aerosolized impurities. Significant moisture or impurities in the air line can adversely affect the performance and life of the Vertical Pipetting Station. Using oil compressors can cause oil to leak into the Vertical Pipetting Station and void your warranty.
Connecting the air source
To connect the Vertical Pipetting Station to the air source:
1
2
3
4
Figure. Vertical Pipetting Station rear air panel
 
To connect the tubing, push the end of the tubing into the quick-disconnect fitting. Make sure the tubing is free of any kinks.
Note: If your house air uses a threaded nozzle, attach the ¼-in NPT fitting to your house air.
Connecting the vacuum source
If your Vertical Pipetting Station is fitted with a vacuum shelf, use the following procedure to connect the device to the vacuum source.
To connect the Vertical Pipetting Station to the vacuum source:
1
2
3
Checking air and vacuum connections
To check the air and vacuum connections:
1
If you feel resistance at the connection, the tubing has been properly installed.
2
3
If you hear hissing sounds, turn off the air at the source, check and tighten the connections, and then turn on the air again. If the problem persists, contact your facilities department or Automation Solutions Technical Support.
4
Disconnecting air and vacuum sources
You must disconnect the air and vacuum tubing before moving or shipping the Vertical Pipetting Station and before performing maintenance or cleaning.
 
To disconnect the air and vacuum tubing from the Vertical Pipetting Station:
1
2
3
At the back of the Vertical Pipetting Station, push and hold the locking collar against the quick-disconnect fitting, and then gently pull the tubing out of the fitting.
Figure. Closeup view of quick-disconnect fitting
 
Note: Alternatively, you can use the SMC Pneumatics tool (TG-2) to aid in this task. See the manufacturer’s documentation for use instructions. Contact your local SMC parts supplier for ordering details.
4
Repeat step 3 for the vacuum line, if applicable.
Related topics
 
How to set up the Vertical Pipetting Station