Vertical Pipetting Station User Guide : Maintaining Vertical Pipetting Station : Changing the pipette head

Changing the pipette head
About this topic
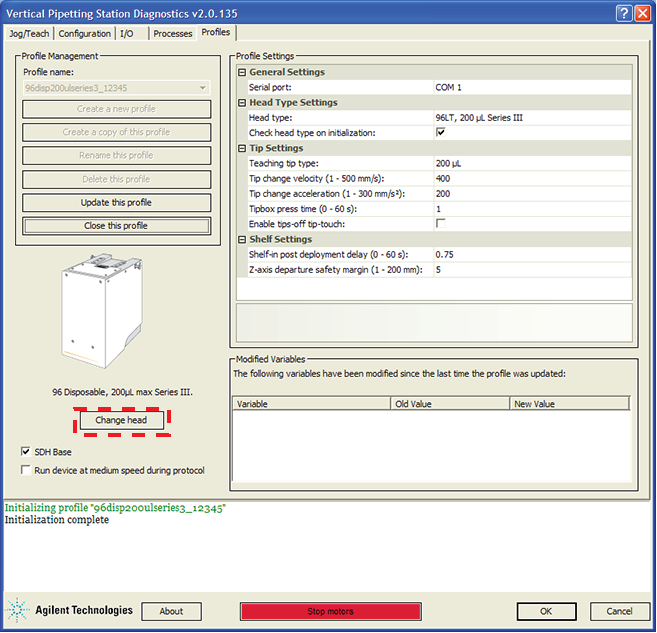
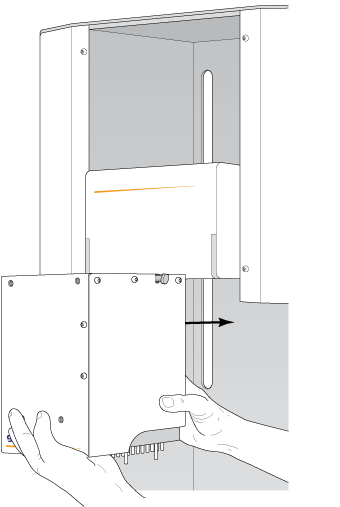
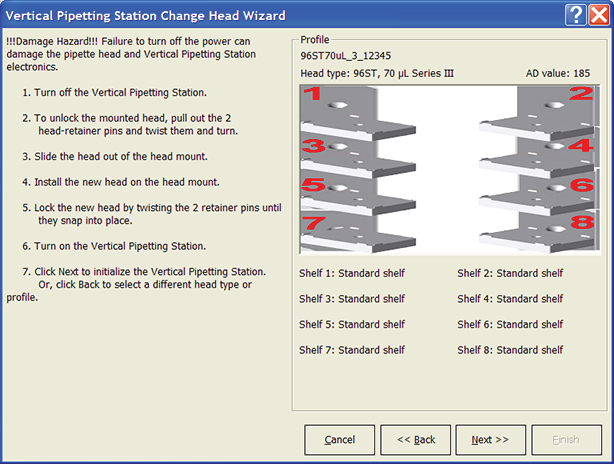
This topic describes how to change the pipette head using the Change Head wizard in Vertical Pipetting Station Diagnostics. The wizard positions the pipette head for easy access and provides prompts that step you through the procedure.
Before you begin
IMPORTANT If a pipette head is being used for the first time, make sure you have a profile specifically for the pipette head.
IMPORTANT If you have an older model Vertical Pipetting Station, verify that the device can accept a serial-dilution pipette head before attempting to install this type of pipette head.
Verify the following:
Changing a pipette head
To change the pipette head using the Change Head wizard:
1
In Vertical Pipetting Station Diagnostics, click the Profiles tab.
2
On the Profiles page, click Change head.
Note: The Change head button is available only after initializing the current profile.
 
3
In the Change Head Wizard:
a
Select the pipette head from the Select the head type list.
b
In the Select the profile for this head type list, select the profile name.
c
Click Next.
 
 
WARNING  Keep clear of the Vertical Pipetting Station while it is in motion. Never touch any of the moving parts or attempt to move labware while the Vertical Pipetting Station is in operation. The device could pinch, pierce, or bruise you.
The pipette head moves down into position. The Change Head Wizard displays an overview of the procedure for changing the pipette head. For the detailed procedure, proceed to step 4 through step 11.
4
To turn off the Vertical Pipetting Station, press the power switch on the rear panel to the off (o) position.
 
 
CAUTION Always turn off the Vertical Pipetting Station before removing a pipette head. Failure to turn off the Vertical Pipetting Station before changing the pipette head can damage the pipette head electronics.
5
8‑ and 16‑channel heads. On the front of the pipette head, rotate the head lock (not shown) counterclockwise to the Unlock position.
96‑ and 384‑channel heads. Pull out and twist the two head-retainer pins one-quarter turn so that they remain retracted.
 
6
 
7
 
8
Slide the pipette head onto the Vertical Pipetting Station head mount. Press the pipette head firmly into place to ensure the head is plugged into the connector receptacle on the head mount.
 
9
98‑ and 384‑channel heads. Twist the two head-retainer pins so that they snap into place.
8‑ and 16‑channel heads. On the front of the pipette head, rotate the head lock (not shown) counterclockwise to the Lock position.
10
 
 
11
 
WARNING During initialization the pipette head can move. Keep fingers, hair, clothing, and jewelry away from the Vertical Pipetting Station while it is in motion. Never touch any of the moving parts or attempt to move labware while the Vertical Pipetting Station is in operation. The device could pinch, pierce, or bruise you.
12
In the Change Head Wizard, click Next to initialize the installed pipette head.
When the Vertical Pipetting Station initialization was successful page appears, click Finish to complete the process.
 
Related topics
 
Opening Vertical Pipetting Station Diagnostics