Vertical Pipetting Station User Guide : Setting up Vertical Pipetting Station : Setting shelf teachpoints

Setting shelf teachpoints
About this topic
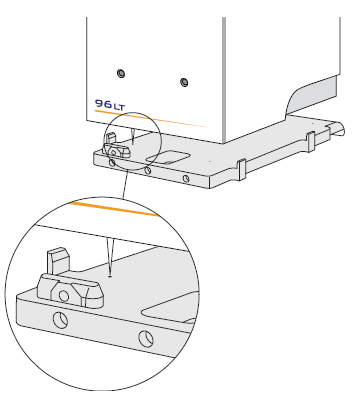
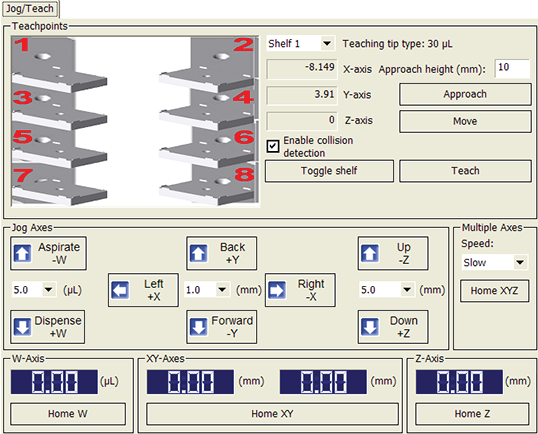
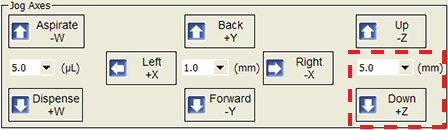
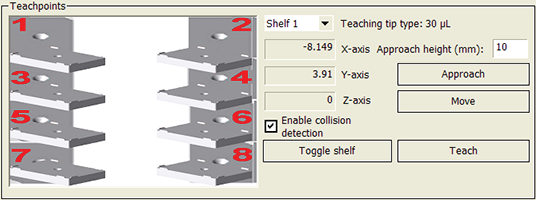
This topic describes how to set the shelf teachpoints for the Vertical Pipetting Station.
 
Teachpoint defined
A teachpoint is the x‑, y‑, and z‑axes coordinates that the pipette head moves to when the left-front tip (A1 position for a 96‑well plate) is over the shelf index point and almost touching the surface of the shelf.
 
When aspirating or dispensing, the software uses the shelf teachpoint and information about the labware geometry to determine where to position the pipette head to access the wells specified in the protocol.
When to do this
You must set the teachpoints when you:
Set up the Vertical Pipetting Station
Before you begin
Verify that the following conditions are met:
Vertical Pipetting Station teachpoints are stored in the Microsoft Windows registry, which requires administrative privileges for making changes. See the system administrator for details.
A device file exists for the Vertical Pipetting Station.
 
 
IMPORTANT To perform an immediate stop, press the SPACEBAR on your keyboard, or click Stop motors in the Vertical Pipetting Station Diagnostics window.
Note: Each shelf teachpoint is set individually. Adjusting one shelf’s teachpoint has no effect on the another shelf’s teachpoint.
Setting the shelf teachpoints
Use the following procedure to set teachpoints for:
For disposable-tip pipette heads, see Teaching shelves 7 and 8 for tipboxes.
If you are using a fixed-tip pipette head, you set the teachpoint according to the A1 needle of the pipette head. If you are using a pipette head with disposable tips, you place a tip on the A1 barrel to set the teachpoint.
To set a shelf teachpoint:
1
In Vertical Pipetting Station Diagnostics, click the Jog/Teach tab.
2
 
3
Under Multiple Axes, set the Speed to Slow. This slows down the pipette head movement.
4
5
Make sure to use an Automation Solutions tip that is the same type specified in the profile as the teaching tip type.
6
In the Teachpoints area, set the Approach height to a safe stopping distance above the shelf (typically, 20 mm).
IMPORTANT The approach height value is dependent on the type of pipette head, the tip size, and shelf height. For example, the Approach height for shelves 1 and 2 might be smaller than the approach height for other shelves. If you are uncertain about how to set this value, start with a large value, such as 50 mm.
7
Click Approach. The head moves along the x‑, y‑, and z‑axes to the specified coordinates above the saved teachpoint.
8
9
Click Toggle shelf. The shelf slides into position under the pipette head.
10
Under Jog Axes, use the controls to jog the pipette head down to the teachpoint position as follows:
IMPORTANT Set the increment of travel based on how far above the shelf the pipette head is located. If you are uncertain about how to set this value, start with a small value, such as 1 mm or less.
 
a
Set the z‑axis increment to 2–5 mm, and click Down +Z to jog the head down until the tip is just above the shelf index point.
b
Set the z‑axis increment to 0.1 mm.
c
d
Click Up –Z to back off the teachpoint by 0.1 mm.
e
Set the x‑ and y‑axes increment to 0.1–0.2 mm.
f
Use the X and Y buttons to position the tip exactly above the shelf index point.
11
Verify the information in the message box before you click Yes.
12
Click Approach to move the pipette head up, and then click Toggle shelf to move the shelf out.
 
13
Repeat step 4 to step 12 to teach the next shelf.
(Disposable-tip pipette heads only) To set the teachpoints for shelves 7 and 8, see Teaching shelves 7 and 8 for tipboxes.
14
On the Profiles tab, click Update this profile to save the teachpoints.
 
Related topics
 
Opening Vertical Pipetting Station Diagnostics