|
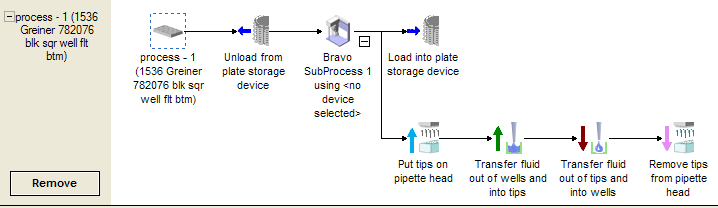
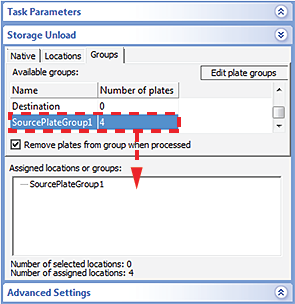
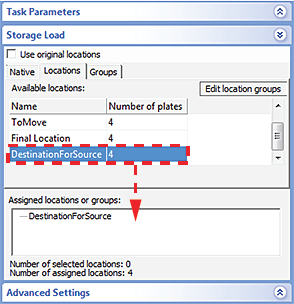
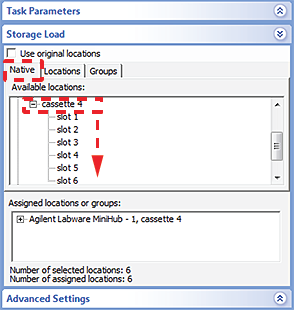
This topic shows an example protocol where a plate group is moved out of a Labware MiniHub, transferred to a liquid-handling device where liquid is aspirated, and then loaded back into the same or different locations of the Labware MiniHub.Read this topic if your lab automation system has incubators and random-access storage devices such as the Labware MiniHub.
• Place the labware in Labware MiniHub and make sure the labware are added to the Inventory Editor.
•
2 Select the Unload task, and in the Task Parameters area, click the Groups tab and drag the plate group to the Assigned location area.
3 If you want the labware to be handled in the same numerical order or will not be reusing the labware, select Remove plates from group when processed.
4 Select the Load task and then select Use original locations. The Locations and Native tabs will become unavailable.
Optional. You can reassign the labware back to the original group or to a new plate group. Click the Groups tab and drag the plate group from the Available groups area to the Assigned locations area.
5 Click Start.
6 In the Number of Cycles dialog box, enter a number that is equal to or less than the number of labware that you want to process from the group.
7 Click OK.
a Click the Load task.
b
c Click the Inventory Management tab.
2 Select the Unload task. In the Task Parameters area, click the Groups tab and drag the plate group to the Assigned locations or groups area.
3 Select the Load task. In the Task Parameters area, choose one of the following ways to load the labware into a different location.
• Specify a predefined location group to load to. To specify a predefined location group, click the Locations tab and drag the location group to the Assigned locations or groups area.
4 Click Start.
5 In the Number of Cycles dialog box, enter a number that is equal to or less than the number of labware that you want to process from the group.
6 Click OK.
a Click the Load task.
b
c Click the Inventory Management tab.