VWorks Setup Guide : Setting up a Windows 10 MySQL database

 
Setting up a Windows 10 MySQL database
The VWorks labware inventory management feature requires a MySQL database. This section describes how to install and configure a MySQL 5.7 database if you are running the VWorks software on the Microsoft Windows 10 64-bit operating system.
Note: The database may be configured already if the computer was provided by Agilent Technologies and your system contains a device that requires a database, such as a Labware MiniHub.
If you are running the VWorks software on the Microsoft Windows 7 operating system, see Setting up a Windows 7 MySQL database.
If you are running VWorks 13.1.7 and installing MySQL 8.0.18, see the VWorks Automation Control 13.1.7 Setup Guide Addendum .
Before you start
Required installation files
To install MySQL 5.7, ensure you have the following installation files:
This file is installed with the VWorks software in
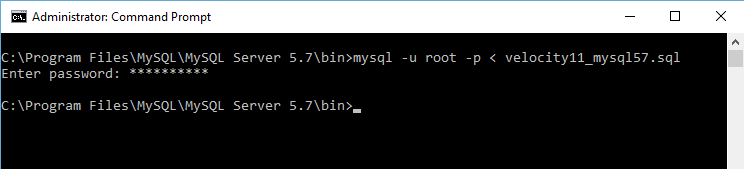
C:\Program Files (x86)\Agilent Technologies\VWorks\Schema\velocity11_mysql57.sql.
For assistance, contact Agilent Technologies Automation Solutions Technical Support.
Required computer settings
Before you install the software:
Folder options > View settings:
Select Show hidden files, folders, and drives.
Clear the Hide extensions for known file types check box.
For detailed instructions, see the Microsoft Windows user documentation.
Installation and setup workflow
 
Connect to the VWorks inventory management database.
Installing MySQL 5.7
To install Microsoft Visual C++ 2013 redistributable package:
1
2
To install MySQL 5.7:
1
mysql-installer-community-5.7.13.0.msi
2
When the MySQL Installer setup wizard opens, accept the license terms and click Next.
 
3
In the Choose a Setup Type page, select Custom, and then click Next.
 
4
In the Select Products and Features page:
a
Under Available Products, select the MySQL Server 5.7.13 - X64 and Connector/ODBC 5.3.6 - X86 products.
b
c
Click Next.
 
5
In the Installation page:
a
b
 
6
In the Product Configuration page, click Next.
 
7
In the Type and Networking page, specify the following:
In the Config Type list, select Development Machine.
Select the TCIP/IP and Open Firewall port for network access check boxes.
Select the Show Advanced Options check box.
Click Next.
 
8
In the Accounts and Roles page, type velocity11 for MySQL Root Password and Repeat Password fields.
Click Next.
 
9
In the Windows Service page, do the following:
Select the Configure MySQL Service as a Windows Service check box.
In the Windows Service Name box, type MySQL.
Select the Start the MySQL Server at Startup check box.
Select the Standard System Account option.
Click Next.
 
10
In the Plugins and Extensions page, keep the default settings. Click Next.
 
11
In the Advanced Options page, keep the default settings. Click Next.
 
12
In the Apply Server Configuration page, click Execute to apply the configuration settings.
 
13
Click Next to finish the configuration.
 
14
Click Finish to close the installer.
 
Installing and setting up a MySQL ODBC
During the MySQL ODBC connection setup you will:
Import the VWorks inventory (velocity11) database into MySQL. This sets up the database table structures for use by the VWorks Inventory Editor.
To import the database structure:
1
C:\Program Files\MySQL\MySQL Server 5.7\bin\
2
a
In the C:\Windows\System32 folder, right-click cmd.exe, and then select Run as administrator.
b
In the User Account Control dialog box, click Yes.
3
cd c:\program files\mysql\mysql server 5.7\bin <ENTER>
mysql -u root -p < velocity11_mysql57.sql <ENTER>
 
When prompted for a password, enter velocity11.
To create an ODBC connection:
1
a
Navigate to C:\Windows\SysWOW64.
b
Right-click odbcad32.exe, and select Run as administrator.
2
In the ODBC Data Source Administrator dialog box:
a
Click the User DSN tab, select any predefined MySQL ODBC Driver Sources named velocity11, and click Remove.
Click the System DSN tab, select any predefined MySQL ODBC Driver Sources named velocity11, and click Remove.
b
In the System DSN tab, click Add to create a new data source.
c
In the Create New Data Source dialog box, select MySQL ODBC 5.3 ANSI Driver, and then click Finish.
 
3
In the MySQL Connector/ODBC Data Source Configuration dialog box that opens, define your data source as follows:
Note: You do not have to provide a port number. Use the default number displayed.
a
 
v11 database (optional)
b
Click Details to expand the dialog box.
c
In the Connection tab, select the Enable automatic reconnect check box.
d
In the Cursors/Results tab, select the Return matched rows instead of affected rows check box.
4
Click Test. A Success, Connection was made message appears. Click OK.
 
Related information
 
VWorks labware inventory management feature
How to connect to the VWorks inventory management database