|
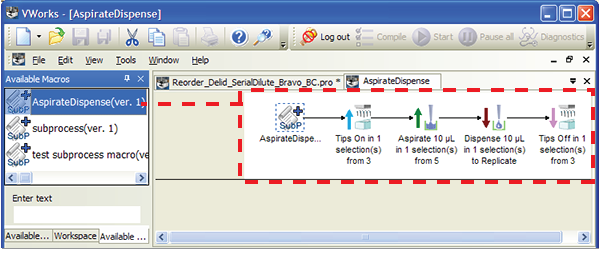
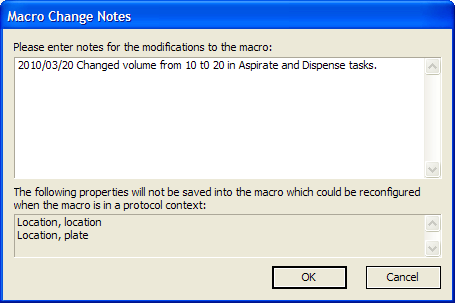
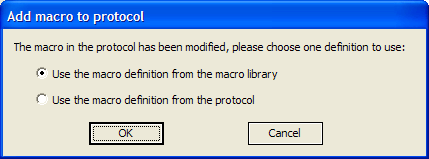
To edit a macro, you must have VWorks Technician- or Administrator-level access.You can edit the VWorks macros in the following ways:
• Editing a macro from the macro library in the macro editor tab. Replaces the version of the same name in the macro library, incrementing the version number by 1.
• Editing a macro directly in the protocol tab. Updates the macro in the protocol only. Macros in the macro library remain unchanged. Instead, you have the following options:The software does not maintain a change history of the macros that are edited in the protocol tab. However, you can easily update all instances of a macro in a protocol to match the version of the same name in the macro library. See Updating instances of a macro to match the version in the macro library.
1 In the Available Macros tab, right-click the macro icon, and then choose Edit from the shortcut menu.Figure. Macro editor tab
• Add a task. Either drag the task icon from the Available Tasks area to the macro editor tab, or double-click the task icon in the Available Tasks area to add the task to the macro editor tab.
• Delete a task. In the macro editor tab, right-click the task icon, and then choose Delete from the shortcut menu.
• Change a task’s parameter values. Click the task icon in the macro editor tab. In the Task Parameters area, edit the task parameters as you typically would when creating a protocol.
•
3 Choose File > Save. The Macro Change Notes dialog box opens:
• Click Yes to update all instances of the macro with the same name in the specified protocol, regardless of version number. The software increments the macro version number by 1 in the macro library.
• Click No to increment the macro version number by 1 in the macro library only. Any previous versions of the macro in the protocol with the same macro name remain in the protocol intact.
1 In the macro editor tab, right-click the macro icon, and then choose Add Custom Icon from the shortcut menu. The Edit Macro Icon dialog box opens.
3 Click OK. The selected image replaces the macro icon in the macro editor tab.
• Add a task. Drag the task icon from the Available Tasks area to the macro in the protocol, or double-click the task icon in the Available Tasks area.Alternatively, you can copy a task icon from elsewhere in the protocol. To do this, right-click the task icon, and then choose Copy. Click the target location in the macro, right-click, and then choose Paste.
• Change task parameter values. Click the task icon. Edit the values in the Task Parameters area as you typically would when creating a protocol.
• Delete a task. Right-click the task icon, and then choose Delete from the shortcut menu.
•
• To rename the edited macro and add it to the macro library. In the protocol, right-click the icon of the edited macro, and then choose Save macro as. The Add to Macro Library dialog box opens.
• To keep the edited macro definition in the protocol only. Choose File > Save. The changes are applied to all instances in the protocol that have the same name and version number. The name of the edited instance changes to “macro_name Derived from Version n”.
• Update this macro. Replaces the selected macro instance in the open protocol with the definition from the macro library.
• Update all revisions of this macro. Replaces all macro instances of the same name with the definition from the macro library, regardless of the version number of the other macro instances in the protocol.
1 In the Available Macros tab, right-click the macro icon, and then choose Rename from the shortcut menu.
2