VWorks User Guide : Setting parameters for microplate-handling tasks : CentrifugeAuto

CentrifugeAuto
Description
Note: If you want to manage counterweights and counterweight modes using JavaScript, see the examples in Using JavaScript with the CentrifugeAuto task.
Note: The CentrifugeAuto task () performs all the functions of the Centrifuge Process task but does not require a subprocess.
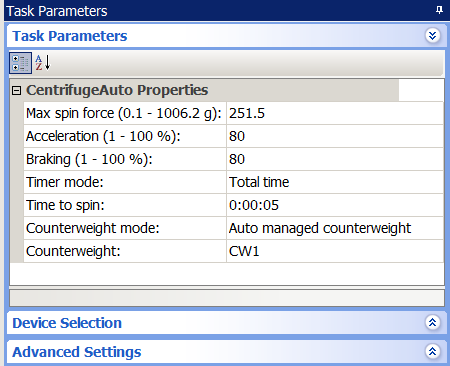
The CentrifugeAuto task () can be used with the Microplate Centrifuge (
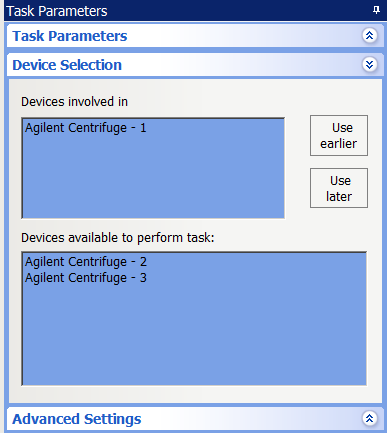
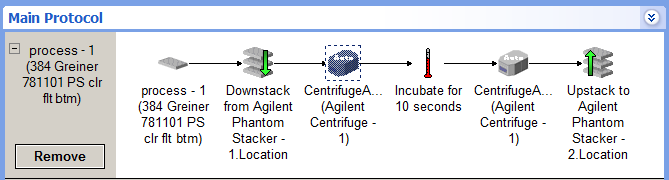
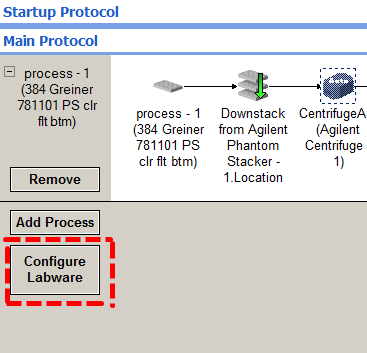
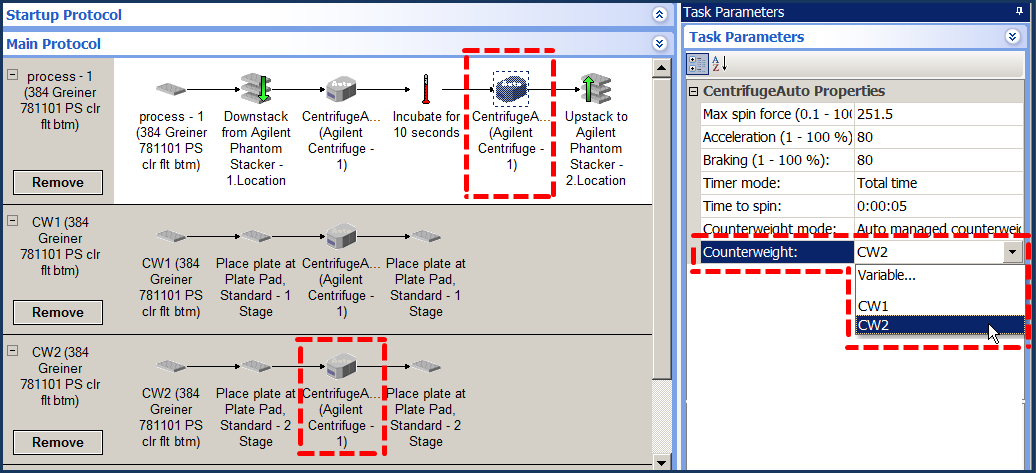
) and Centrifuge with Loader (
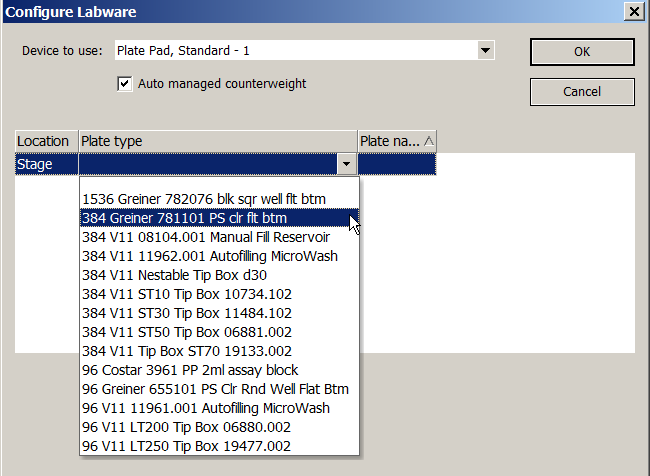
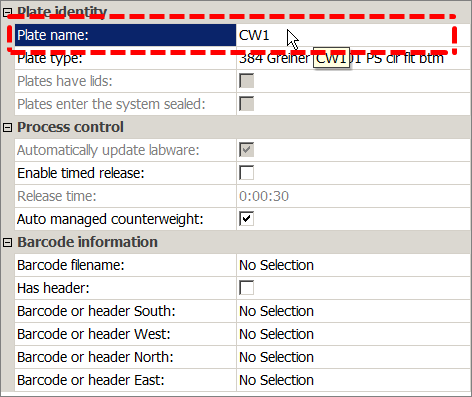
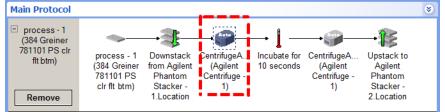
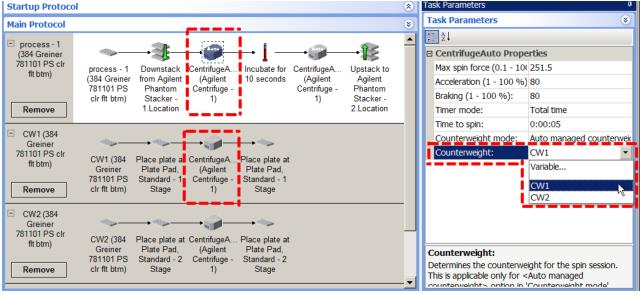
) devices to spin microplates according to the task parameter settings. The CentrifugeAuto task enables you to spin one microplate with a counterweight or spin two microplates from a protocol process, at the same time. Counterweights can be placed manually or robotically. When using counterweights, you can use multiple counterweights for protocols with multiple processes. This is accomplished by using the Configure Labware feature to manage the centrifuge tasks.
 
The CentrifugeAuto task cannot be used in the following cases:
You cannot assign multiple devices to a single CentrifugeAuto task.
Task parameters
After adding the CentrifugeAuto task in the main protocol, set the CentrifugeAuto Properties in the Task Parameters area:
 
 
Total time. The specified spin time includes acceleration and braking.
Time at speed. The specified spin time does not include acceleration and braking.
A counterweight managed as a Configure Labware process.
The robot will move the counterweight from a platepad or Labware MiniHub (specified by the plate process) into the Centrifuge during the run and return it to the platepad when the run is finished. If you select this mode, use the Counterweight parameter to select the Configure Labware process that corresponds to the counterweight you want to use.
To avoid deadlocks, whenever using this task, set Simultaneous plates to 2 or greater and run the protocol at least twice.
If using the same Centrifuge with Loader, ensure the tasks are not adjacent to each other.
Note: This is true only for the Centrifuge with Loader and not for the Centrifuge.
Tip boxes and reservoirs, or any other labware not compatible with the Microplate Centrifuge or Centrifuge with Loader, cannot be used as counterweights.
Guidelines for use with two modes (Auto managed and Use 2 protocol plates)
Use the following guidelines to avoid deadlocks when the protocol has two or more CentrifugeAuto tasks, and one task uses the Auto managed mode and another uses the Use 2 protocol plates mode.
Multiple CentrifugeAuto tasks using the same device
If the tasks are using the same device, run an even number of plates.
A Reorder task is between two CentrifugeAuto tasks
A long Incubation task is between two CentrifugeAuto tasks
If placing a long Incubation task between two CentrifugeAuto tasks that use the same device, and if the Auto managed CentrifugeAuto task is before the Incubation task, set the number of incubation locations to an even number.
Device selection
You must select a device for each CentrifugeAuto task. After adding the CentrifugeAuto task at the desired point in the protocol, select the task, and then click Device Selection in the Task Parameters area.
To select a device for the task:
Double-click the desired device in the Devices available to perform task area to move it to the Devices involved in task area. Only one device can be assigned to a given task.
 
Example: Auto managed counterweight mode
Goal
Perform two spins on one microplate with a different task between spins, in this case, an incubate task. Both spins are performed with the same device and each spin uses a different counterweight.
Implementation
1
2
Select the parameters in the Task Parameters area for the Downstack, Incubate, and Upstack tasks.
 
3
a
Click Configure Labware.
 
b
In the Configure Labware dialog box, do the following:
Select Auto managed counterweight.
Click OK.
 
 
The configure labware process appears.
 
c
In the Task Parameters area, type a name for the Configure Labware process in the Plate name field (in this case, CW1).
Note: When the Auto managed counterweight option is selected, the Simultaneous plates and Automatically update labware options are not available.
 
d
4
Select the device for the CentrifugeAuto tasks:
a
Select the first CentrifugeAuto task in the process.
 
 
b
In the Device Selection area, drag Agilent Centrifuge-1 to the Devices involved in task area.
 
c
5
When setting the parameters of the first CentrifugeAuto task, select the Auto managed counterweight mode, and then select CW1 from the Counterweight list.
Note: A CentrifugeAuto task is automatically added to the Configure Labware process chosen for the counterweight.
 
6
When setting the parameters of the second CentrifugeAuto task, select the Auto managed counterweight mode, and then select CW2 from the Counterweight list.
 
7
Plate movement
When the protocol runs, the robot will place the downstacked microplate in bucket 1 of the centrifuge and the counterweight, CW1, into bucket 2. Counterweight CW1 will be swapped out for counterweight CW2 after the microplate is incubated and after it is placed back into bucket 1 of the Centrifuge. Both counterweight plates will automatically be placed back on their starting locations at the end of the process.
Related information