|
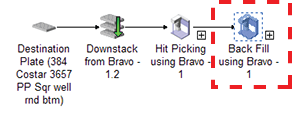
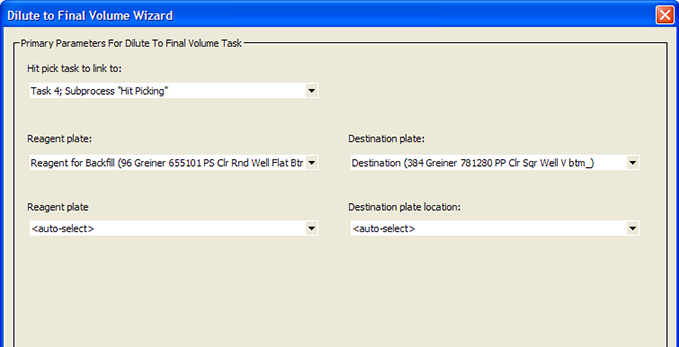
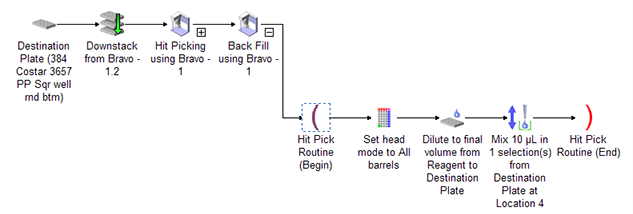
Dilute to Final Volume (Bravo)The Dilute to Final Volume task () allows you to transfer liquid from a reagent labware to a destination microplate. The task is available only if you specified dilution series parameters within the Format Wizard in the Hit Pick Replication task.
Main Protocol, Bravo Subprocess
• Before hit-picking. Prefills the destination microplate with reagent. If the destination microplates are empty when the task starts, you only need to change the pipette tip with every destination microplate. You do not have to change the pipette tip between each reagent well, thus reducing the number of tips used.
• After hit-picking. Backfills the destination microplate with reagent. In this case, you must change the pipette tip between each reagent well to prevent contamination, thus using more tips.
1 Add another Bravo Subprocess in the destination microplate process. (You cannot add the Dilute to Final Volume task in the subprocess that contains the Hit Pick Replication task.)In the following example, the first Bravo subprocess (called Hit Picking) contains the Hit Pick Replication task. The second Bravo subprocess, Back Fill, contains the Dilute to Final Volume task. Notice that both subprocesses are in the Destination Plate process.
When you add the Dilute to Final Volume (Bravo) task, the software automatically starts the Dilute to Final Volume Wizard.
3
• Never change. If you select option, you must add the Set Head Mode, Tips On, and Tips Off tasks in the subprocess, outside of the Dilute to Final Volume routine, after you are finished with the wizard.
• Change after every dispense. Changes the tips after every dispense within the routine.
• Change with every reagent well change. Changes the tips after every reagent well change during the routine.
• Never. Use single instance of tip boxes (example: Static labware). Does not change the tipbox within the routine.
• Change tip box based on Automatic Tip Selection. Uses tip-tracking within the routine, and changes the tipbox when the box if fully used. Select this option if the tipboxes you are using are configured labware.
• Change tipbox with every source plate change (replication only). Changes the tipbox every time the source microplate changes. This option is available only when a replication format file is selected.
• Change tipbox with every destination plate change (replication only). Changes the tipbox every time the destination microplate changes. This option is available only when a replication format file is selected.
5
6 If you selected mixing options in step 4. Set the mixing parameters. For a description of the parameters, see Mix (Bravo, Vertical Pipetting Station).
7 If you selected wash options in step 4. Set the wash parameters.
a In the Wash In area, select the type of labware to be used for the wash task:
– Tip Wash Station (MicroWash Reservoir). Adds Wash Tips tasks and will use either configured or static labware.
– A microplate or standard reservoir. Adds Mix tasks.
b In the Wash plate list, select the desired labware and location.
c
8 If you selected a tip-change option in step 4. Select the tipbox options.
– Allow automatic tracking of tip usage. Allows the software to track pipette tip usage during the protocol run or across different protocol runs. If you select the option in this task, you must also select the option in the Tips Off task. In general, use the default selections displayed.
– Mark tips as used. The option to use only new pipette tips during the protocol run. Select the option so that the software counts the number of tips used during the protocol run. The tips that have been used once are marked as used so that they cannot be reused. Clear the check box so that during the next Tips On task, the same tips can be reused. In general, use the default selections displayed.
9 Click Finish.
•