|
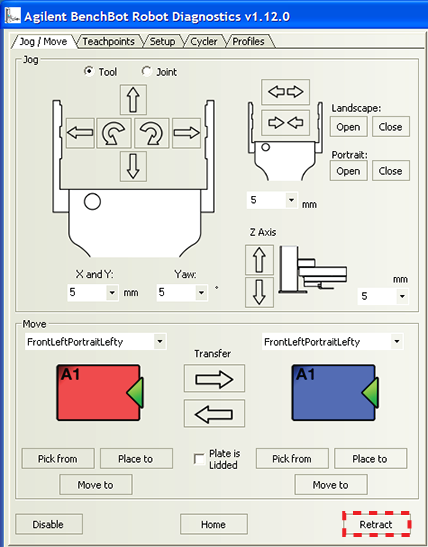
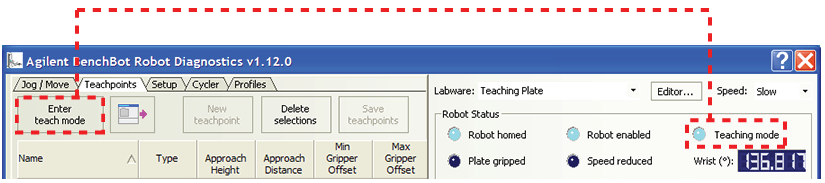
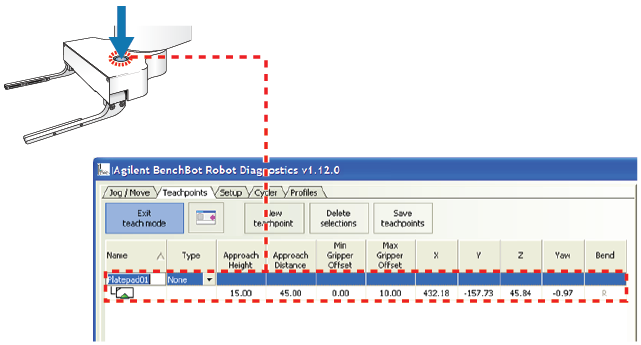
Depending on the type of device, the teachpoint setting procedure can vary. This topic provides basic teachpoint setting concepts: how to use the supplied teaching plate or the desired labware to set, verify, and edit BenchBot Robot teachpoints.
• For instructions, see the VWorks Automation Control Setup Guide.The teachpoints you set are saved in the XML format in a teachpoint file. The default teachpoint file name is Teachpoints_<profilename>.xml, where <profilename> is the name of the profile. The software saves the file in the C:\VWorks Workspace\VWorks\BenchBot\Teachpoints folder. However, you can select another file name and location when saving the file.
You can have multiple teachpoint files for each BenchBot Robot if a device needs to serve multiple purposes. For example, a platepad can be taught as a platepad or as a regripping station. You can also have multiple teachpoint files for the system if a device is only used in some protocols but not others. For example, if a device is installed on a docking table and can be removed when it is not in use.
The teachpoint file is referenced by a profile. For information about profiles, see Creating BenchBot Robot profiles.
• You have the provided BenchBot Robot teaching plate. If size restrictions at teachpoints prevent the use of the teaching plate, use the labware intended for the location. See Setting teachpoints using a labware.
• The safety interlock is in the override mode. (See the BenchBot Robot Safety and Installation Guide or the system user documentation for instructions.)
IMPORTANT If size restrictions at a teachpoint prevent the use of the teaching plate, use the labware intended for the location. For information, see Setting teachpoints using a labware.
1
2
3
4 Click Enter teach mode.In the Robot Status area, the Teaching mode indicator light turns on.
Note: In tight-fitting or hard-to-reach locations, you can use the jog commands in the Jog/Move tab to move the robot in small increments. For more information about the jog commands, see Jogging the robot. When you return to the Teachpoints tab, be sure to click Enter teach mode before proceeding to the next step.
If it is not possible to access the blue button on the robot hand, you can click the New teachpoint button in the Teachpoints tab.
4 To view the entire teachpoints table, click the
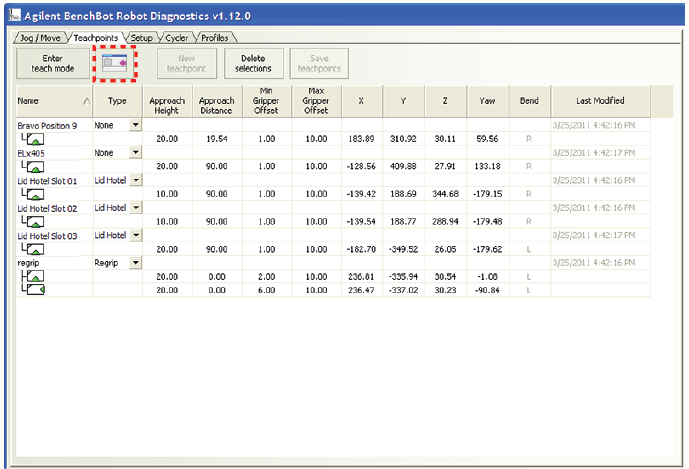
(Maximize) button. The table expands so that all of the columns are displayed in the tab. To reduce the number of columns displayed, click the
(Minimize) button.
Double-click the Name box and type a new name for the teachpoint. Use a name that describes the location, such as the device name (for example, Lid Hotel Slot 01).