BenchBot Robot User Guide : Setting teachpoints : Setting the Approach Height and Approach Distance parameters

Setting the Approach Height and Approach Distance parameters
About this topic
The Approach Height and Approach Distance parameters are used together to clear obstacles near or at a teachpoint. This topic explains the function of each parameter and provides guidance for setting values that work optimally together.
Approach Height
Approach Height is the height clearance, in millimeters, the robot must maintain above the teachpoint as it moves towards or away from the teachpoint with labware in its grippers.
 
You can reduce the Approach Height value to prevent collision with shelves or other obstacles above the teachpoint. However, make sure there is sufficient clearance below the labware to prevent collision with raised tabs or other obstacles at the teachpoint.
Note: To prevent collisions, the software does not allow you to set an Approach Height value that is less than the minimum gripper offset value.
 
Approach Distance
Approach Distance is the straight-line distance, in millimeters, from the teachpoint. Within this distance, the robot must:
 
You use Approach Distance to ensure that the robot maintains a straight path while approaching or moving away from the teachpoint. Doing so enables the robot to navigate in tight spaces while avoiding obstacles.
For example, you can use the Approach Distance parameter to make sure the robot grippers can enter and exit a device such as the Microplate Centrifuge without bumping into the sides of the narrow entryway.
Guidelines for setting the parameters
IMPORTANT The Approach Height value works in conjunction with the Approach Distance to clear obstacles near or at the teachpoint. Therefore, before setting the approach height value, you should determine the approach distance value to use.
In general, use the following guidelines when specifying values for these parameters:
Before setting Approach Distance at 0 mm, you should consider the obstacles surrounding and at the teachpoint. If obstacles near or at the teachpoint do not permit the rotating movement, set Approach Distance at the smallest possible value for the location.
IMPORTANT The software will not allow you to specify an Approach Height or Approach Distance value that is too large for the teachpoint.
The following table summarizes the guidelines for setting the Approach Height and Approach Distance parameters.
 
Examples
Example 1: High Approach Height, low Approach Distance
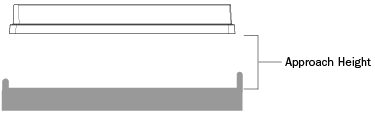
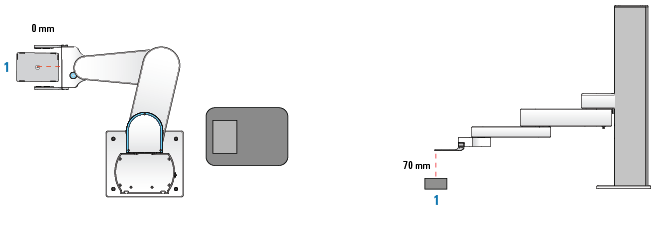
In the following diagram, the teachpoint (1) does not have obstacles nearby. In this case, set the Approach Distance at 0 mm to take advantage of the robot’s rotating movement. Because the tallest labware expected at the teachpoint is a tipbox, the Approach Height is set at 70 mm.
 
Example 2: Low Approach Height, high Approach Distance
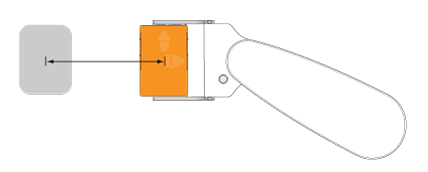
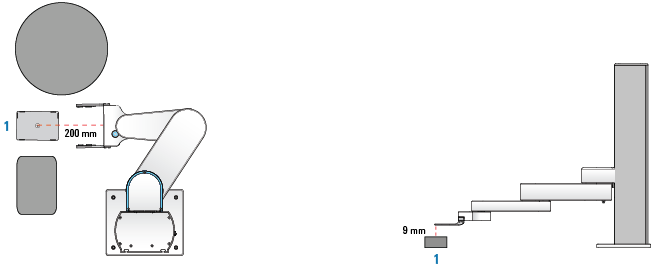
In the following diagram, the teachpoint (1) has two tall obstacles on both sides. In this case, set the Approach Distance at 200 mm (the distance that allows the robot to move to the teachpoint without bumping into the tall obstacles). The Approach Height is set at 9 mm to avoid the tabs on the front side of the teachpoint.
 
Procedure
To set the Approach Height parameter:
Double-click in the Approach Height box and type the desired value. The default value for the parameter is 20 mm.
To set the Approach Distance parameter:
Double-click in the Approach Distance box and type the desired value. The default value is 75 mm for the landscape orientation and 125 mm for the portrait orientation.
Related information