BenchBot Robot User Guide : Setting teachpoints : Verifying teachpoints

Verifying teachpoints
After you set a new teachpoint, you should verify that it is accurate by:
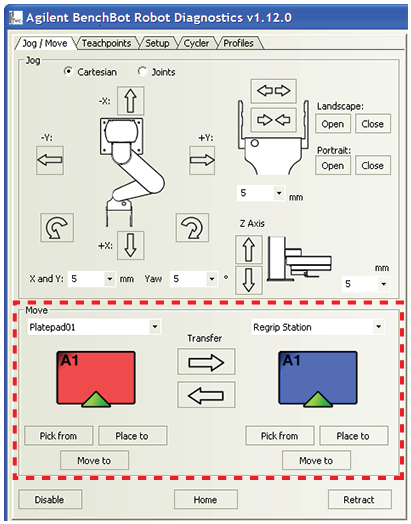
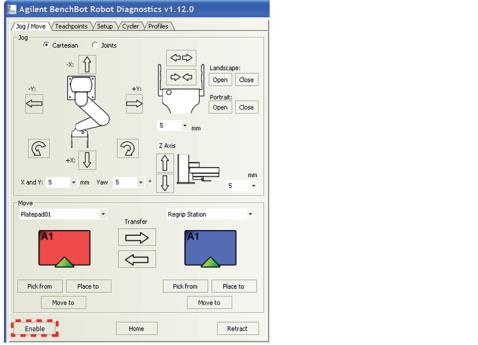
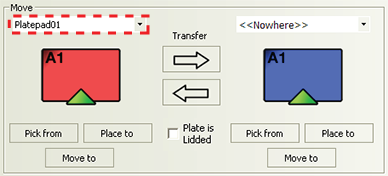
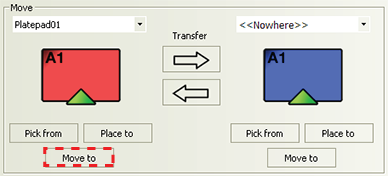
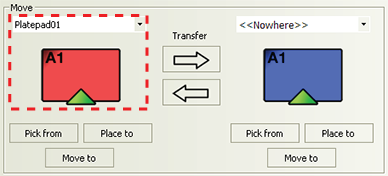
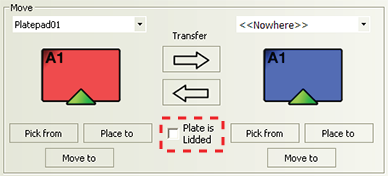
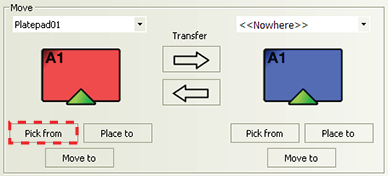
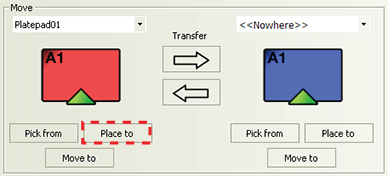
You use the commands in the Jog/Move tab for the verification procedure.
 
Moving the robot to the new teachpoint
You use the Move to command to check that:
 
 
To move the robot to the teachpoint:
1
2
In BenchBot Robot Diagnostics, make sure the correct labware is selected in the Labware list.
 
3
In the Speed list, select Slow.
 
4
Click the Jog/Move tab, and, if necessary, click Enable to enable the robot motors.
 
5
In the Move area, select the teachpoint you want to verify from the list above the red labware.
In the following example, the Platepad01 teachpoint is selected.
 
6
If multiple labware orientations are available, make sure only one orientation is selected. Click a triangle to select or clear the orientation selection. A green triangle means the orientation is selected. A white triangle means the orientation is not selected.
In the following example, three labware orientations are available: Landscape with the A1 well away from the grippers, landscape with the A1 well toward the grippers, and portrait with the A1 well away from the grippers (1). For the verification procedure, only one orientation is selected: Landscape with the A1 well away from the grippers (2).
 
7
In the Move area, click Move to under the red labware.
 
The robot moves to the selected teachpoint. The robot remains at the teachpoint and the grippers are open.
8
Based on the selection shown in the following example, the robot grippers should be at the teachpoint in the landscape orientation.
 
9
10
Picking up labware at the teachpoint
You use the Pick from command to check that:
 
 
To pick up labware from the teachpoint:
1
2
3
In BenchBot Diagnostics, select the labware you want to use from the Labware list.
 
4
In the Speed list, select Slow.
 
5
Labware with lids only. In the Move area, select Plate is Lidded to indicate the robot will be moving a labware that has a lid. This selection is only available if you selected a labware that can have lids. (If you selected a labware that cannot have lids, the Plate is Lidded selection is not visible.) If the labware can have lids but you intend to move it without the lid, clear the check box.
 
IMPORTANT The sum of the grip height plus the finger height must be less than the lid-resting height (specified in the Labware Editor). Otherwise, the software will display an error message when you attempt to pick up the labware with lid.
Note: The Plate is Lidded selection is only used while you are in BenchBot Diagnostics.
6
In the Move area, select the teachpoint you want to verify from the list above the red labware.
 
7
If multiple labware orientations are available, make sure only one orientation is selected. Click a triangle to select or clear the orientation selection. A green triangle means the orientation is selected. A white triangle means the orientation is not selected.
In the following example, three labware orientations are available: Landscape with the A1 well away from the grippers, landscape with the A1 well toward the grippers, and portrait with the A1 well away from the grippers (1). For the verification procedure, only one orientation is selected: Landscape with the A1 well away from the grippers (2).
 
8
In the Move area, click Pick from under the red labware.
 
The robot moves to the teachpoint, picks up the labware, and moves it to the robot zone. The labware remains in the robot grippers.
9
10
11
Placing labware at the teachpoint
You use the Place to command to check that:
 
 
IMPORTANT To use the Place to command, you must first use the Pick from command to pick up a labware so that the gripper offset is known.
To place labware at the teachpoint:
1
2
3
In BenchBot Diagnostics, make sure the correct labware is selected in the Labware list.
 
4
In the Speed list, select Slow.
 
5
Labware with lids only. In the Move area, select Plate is Lidded to indicate the robot will be moving a labware that has a lid. This selection is only available if you selected a labware that can have lids. (If you selected a labware that cannot have lids, the Plate is Lidded selection is not visible.) If the labware can have lids but you intend to move it without the lid, clear the check box.
 
IMPORTANT The sum of the grip height plus the finger height must be less than the lid resting height (specified in the Labware Editor). Otherwise, the software will display an error message when you attempt to place the labware with lid.
Note: The Plate is Lidded selection is only used while you are in BenchBot Diagnostics.
6
In the Move area, select the teachpoint you want to verify from the list above the red labware. In the following example, the Platepad01 teachpoint is selected.
 
Note: Alternatively, you can select a teachpoint above the blue labware.
7
If multiple labware orientations are available, make sure only one orientation is selected. Click a triangle to select or clear the orientation selection. A green triangle means the orientation is selected. A white triangle means the orientation is not selected.
In the following example, three labware orientations are available: Landscape with the A1 well away from the grippers, landscape with the A1 well toward the grippers, and portrait with the A1 well away from the grippers (1). For the verification procedure, only one orientation is selected: Landscape with the A1 well away from the grippers (2).
 
8
In the Move area, click Place to below the red labware.
 
If you selected a teachpoint above the blue labware, click Place to below the blue labware instead.
With the labware in its grippers, the robot moves to the teachpoint, places the labware, and retracts to the robot zone.
9
10
11
Transferring labware between two teachpoints
To ensure that a new teachpoint is accurate, check that the robot is able to transfer labware between the new teachpoint and an existing verified teachpoint, or a reference teachpoint. Incorrectly placed labware indicates that the teachpoint coordinates are incorrect.
 
 
To transfer labware from an existing verified teachpoint:
1
2
3
In BenchBot Robot Diagnostics, select the labware you want to use from the
Labware list.
 
4
In the Speed list, select Slow.
 
5
Labware with lids only. In the Move area, select Plate is Lidded to indicate the robot will be moving a labware that has a lid. This selection is only available if you selected a labware that can have lids. (If you selected a labware that cannot have lids, the Plate is Lidded selection is not visible.) If the labware can have lids but you intend to move it without the lid, clear the check box.
 
IMPORTANT The sum of the grip height plus the finger height must be less than the lid resting height (specified in the Labware Editor). Otherwise, the software will display an error message when you attempt to pick up or place the labware with lid.
Note: The Plate is Lidded selection is only used while you are in BenchBot Diagnostics.
6
In the Move area:
a
b
 
7
If multiple labware orientations are available, make sure only one orientation is selected. Click a triangle to select or clear the orientation selection. A green triangle means the orientation is selected. A white triangle means the orientation is not selected.
In the following example, three labware orientations are available: Landscape with the A1 well away from the grippers, landscape with the A1 well toward the grippers, and portrait with the A1 well away from the grippers (1). For the verification procedure, only one orientation is selected: Landscape with the A1 well away from the grippers (2).
 
8
In the Move area, click the right-arrow Transfer button.
 
The robot picks up the labware at the reference teachpoint, places it at the teachpoint you want to verify, and retracts into the robot zone.
9
Note: If the labware, pick-location, and place-location gripper offset ranges do not overlap, the software will display an error message when you attempt to transfer labware from teachpoint to teachpoint. Correct the error, and then try to transfer the labware again.
10
11
12
Repeat the transfer procedure at the Fast robot speed (at step 4, select Fast).
Related information