Preparing the solutions
The following solutions are required for the Affinity Purification protocol:
• Priming & Equilibration Buffer
• Cartridge Wash Buffers
• Elution & Stringent Syringe Wash Buffer
Note: You can find the Labware Reference Guide in the Literature Library page of the Protein Sample Prep Workbench.
Using the Reagent Volume Calculator for Affinity Purification
The Reagent Volume Calculator is a Microsoft Excel file that contains the following:
• Calculator worksheet. You enter the number of columns to process, whether to perform the Collect Flow Through option, the volume for each step in the protocol, the number of wash cycles to conduct, and the labware selection for each deck location. The calculator determines the volumes required based on your input, taking into consideration pipetting overage and evaporation concerns.
Note: The pipetting overage suggested is generally conservative. The minimal overage may be greater or less depending on the volatility of the solution, the length of the run, and when the step occurs during the run. The overage volume can be optimized to minimize loss of precious reagents.
• Reagent Recipe worksheet. You enter the concentrations of each component in your reagent, and the worksheet calculates the recipe volumes required.
To use the Reagent Volume Calculator:
1 Open the App Library.
2 Locate the application, and then click the corresponding Calculator button. Microsoft Excel starts and displays the calculator.
3 Ensure that you enable content in Microsoft Excel.
4 Click one of the following:
• Set defaults for 5µL cartridges. Sets the values in the calculator using the values from the default method for the 5 µL cartridges.
• Set defaults for 25µL cartridges. Sets the values in the calculator using the values from the default method for the 25 µL cartridges.
5 Modify the values in the green boxes as required to match your specific method. As you change the values in the green boxes, the calculated values change.
Note: The green box should remain green after you enter a value. If you enter a value that is outside the normal working range, the box becomes yellow. If you enter a value that is outside of the acceptable range, the box becomes red.
To display the corresponding tooltip for a setting, mouse over a box that has a red triangle in the upper right corner.
The following figures show the worksheets of the Reagent Volume Calculator.
Figure Affinity Purification Calculator worksheet
 |
Figure Affinity Purification Reagent Recipe worksheet
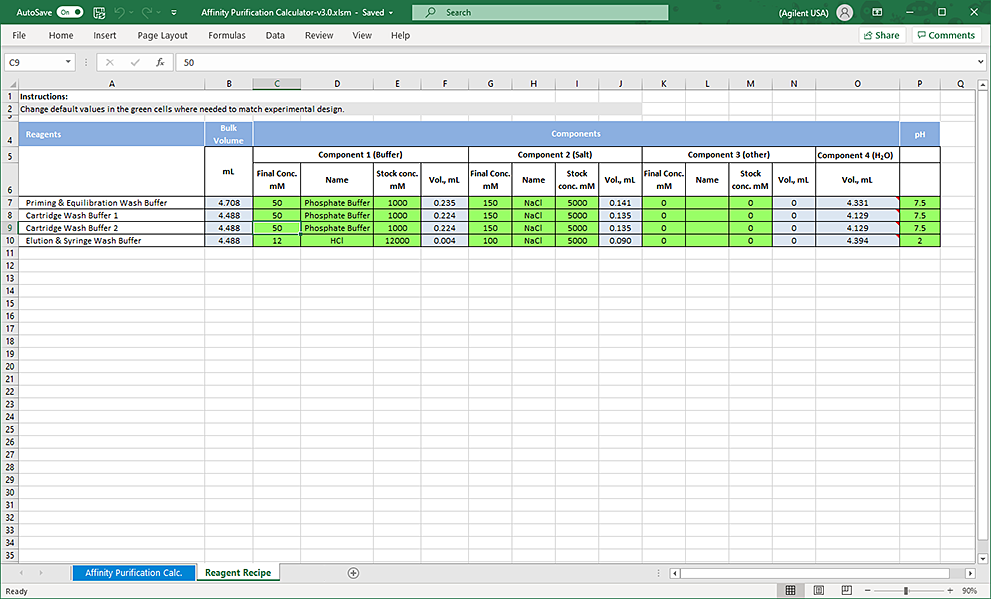 |
Preparing the buffers
The following table describes the reagents and deck locations. The AssayMAP protocols are blind to the composition of the solutions, so you can easily adapt your optimized chemistry. Agilent recommends the following buffers as a starting point for optimizing the AssayMAP affinity purification chemistry.
Table Reagent preparation
Reagent (deck location) | Composition and comments |
|---|---|
Priming & Equilibration Buffer (deck location 3) | Typically a buffered aqueous solution with neutral pH and physiologic salt concentration, such as Phosphate-Buffered Saline (PBS), that is similar in composition to the buffer solution used to prepare the sample. |
Cartridge Wash Buffer 1 (deck location 5) | High-stringency buffer (for example, a neutral buffer with high NaCl) or a low-stringency buffer (for example, PBS or a neutral mass-spec-friendly buffer) The Affinity Purification application is designed to allow the use of two wash buffers for high and low stringency washes or a single wash buffer. The buffer selection depends on a number of factors. First, consider whether Cartridge Wash Buffer 2 will or will not be used. This decision is often dependent on whether or not a stringent wash is desired in the protocol. If so, one would typically use the stringent buffer for Cartridge Wash Buffer 1 and then a less stringent wash buffer for Cartridge Wash Buffer 2, which would remove the stringent component of the buffer before elution. If a stringent buffer is not used, you would typically use Cartridge Wash Buffer 1 only, and it would be a low-stringency wash buffer, such as PBS or a neutral mass-spec-friendly buffer. Note: If you only do a single internal cartridge wash, it should be wash buffer 1, as skipping wash 1 and using wash 2 will result in skipping the sample chase which might decrease the amount of target recovered. |
Cartridge Wash Buffer 2 (deck location 6) | Typically, a low-stringency buffer (for example PBS or a neutral mass-spec-friendly buffer) The composition of this buffer is often dictated by sensitivity of downstream steps to components of Wash Buffer 2 as the void volume in the cartridges (~2 µL for 5 µL cartridges or ~10 µL for 25 µL cartridges) will contain the last wash solution used before the Eluate step and end up in the eluate unless the Discard Eluate option is selected and this volume is discarded. |
Elution & Stringent Syringe Wash Buffer (deck location 8) | 12 mM HCl with 100 mM NaCl pH 2.0 or 5% acetic acid The elution solution is typically a low pH solution. A key consideration is if the sample will be neutralized following elution. If so, a 12 mM HCl solution with 100 mM NaCl is a good choice as it is very easy to neutralize. However, this solution requires approximately 4—6 column volumes to elute antibodies off the cartridge. If neutralization is not a key consideration or minimizing elution volume is a critical driver, a 5% acetic acid solution is a good choice because targets can be eluted in as little as 2 column volumes. |
Dispensing the solutions
To dispense the solutions into the labware:
1 Optional. Label the labware so that you can easily identify them.
2 Add the specified volume of Priming & Equilibration Buffer into the labware to be placed at deck location 3.
3 Add the specified volume of Cartridge Wash Buffer 1 into the labware to be placed at deck location 5.
4 If using two wash buffers, add the specified volume of Cartridge Wash Buffer 2 into the labware to be placed at deck location 6.
5 Add the specified volume of Elution & Stringent Wash Buffer into the labware to be placed at deck location 8.
6 If necessary, centrifuge the reagent labware to remove bubbles.
Note: You can use the Reagent Aliquot utility to dispense the buffers. For details, see Reagent Aliquot v2.0 User Guide.