Reagent Aliquot v2.0 User Guide

The Reagent Aliquot utility aliquots a reagent from a single column or reservoir of a Bulk Reagent storage plate into 1 to 12 columns of a 96-well microplate (Reagent Aliquot plate). The utility uses a single column of eight Agilent 250-µL pipette tips to prepare the aliquots.
This utility is a useful starting point for most applications and workflows, because it simplifies the process of preparing reagent plates for an automation run.
Before you start
Labware
The following table provides a complete list of labware options and the corresponding deck locations.
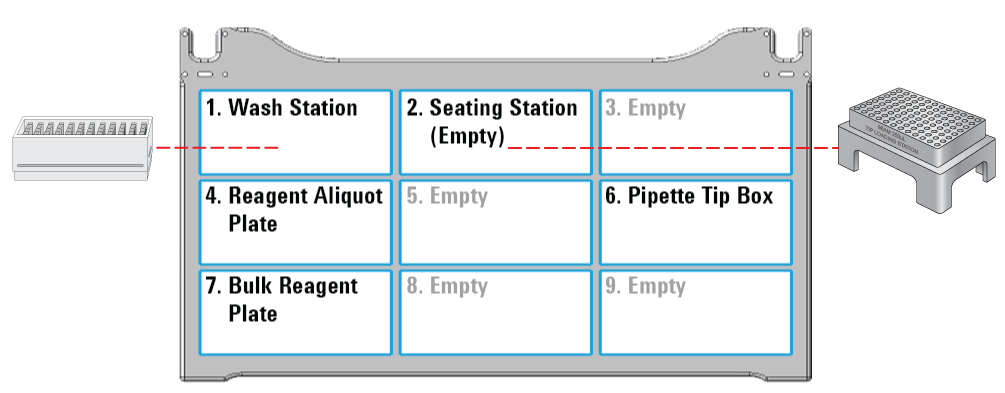
The following figure shows the nine Bravo deck locations for labware.
Figure Labware locations on the Bravo deck (top view)
 |
Labware options | Manufacturer part number* | Deck location |
|---|---|---|
96 Eppendorf 30129300, PCR, Full Skirt, PolyPro | Eppendorf 30129300 | 4, 7 |
96 Bio-Rad PCR, Hard-Shell, Low-Profile, Full Skirt | Bio-Rad HSP‑9611 | 4, 7 |
96 Greiner 652270, PCR, Full Skirt, PolyPro | Greiner 652270 | 4, 7 |
96 ABgene 1127, 1mL Deep Well, Square Well, Round Bottom | ABgene AB-1127 | 4, 7 |
96 Greiner 650201_U-Bottom, Clear PolyPro | Greiner 650201 | 4, 7 |
96 Greiner 650207_U-Bottom, White PolyPro | Greiner 650207 | 4, 7 |
96 Greiner 651201_V-Bottom, Clear PolyPro | Greiner 651201 | 4, 7 |
96 Costar 3363, PP Conical Bottom | Corning Costar 3363 | 4, 7 |
96 Nunc 269620, Flat Bottom, Polystyrene | Thermo-Fisher 269620 | 4, 7 |
96 Eppendorf 96-500 V-bottom, Clear, PolyPro | Eppendorf 96/500 | 4, 7 |
96 Eppendorf 96-1000 U-bottom, Clear, PolyPro | Eppendorf 96/1000 | 4, 7 |
96 Waters 186005837, Clear PolyPro | Waters 186005837 | 4, 7 |
12 Column, Low Profile Reservoir, Natural PP | Agilent 201280-100 | 7 |
8 Row, Low Profile Reservoir, Natural PP | Agilent 201282-100 | 7 |
Reservoir, Seahorse 201254-100, PP, no walls, pyramid bottom | Agilent 201254-100 | 7 |
Reservoir, Axygen Scientific RES-SW96-LP, 86mL pyramid bottom | Axygen Scientific RES‑SW96‑LP | 7 |
96 V11 Manual Fill Reservoir | Agilent G5498B#049 | 7 |
*For dimensionally equivalent alternatives, see the Labware Reference Guide in the Literature Library page of the Protein Sample Prep Workbench. | ||
Reagents
• When preparing a reagent plate for another application run, make sure to use the application-specific Reagent Volume Calculator to:
– Determine the amount of reagent or sample required in each well.
– Make appropriate labware selections.
– Calculate bulk reagent volumes required, including required overage volumes.
• Prepare appropriate volumes of bulk reagents, and manually prepare a Bulk Reagent Plate.
• Prepare the Bulk Reagent Plate with the intended reagents. Pipette an excess volume in the plate of at least:
– PCR plates: 15–20 µL per well
– U-bottom, V-bottom, and flat-bottom microplates: 25–30 µL per well
– Deep-well plates: 35–45 µL per well
– Reservoir plates: varies depending on type
For details, see the Labware Reference Guide in the Literature Library page of the Protein Sample Prep Workbench.
Note: These overage volumes are higher than in other applications because this utility uses reverse pipetting.
Note: You can find the Labware Reference Guide in the Literature Library page of the Protein Sample Prep Workbench.
Experiment ID and method requirements
Each workbench application and utility has an Experiment Settings section that allows you to select an experiment ID and a method.
• An experiment ID is a database record that captures the steps executed and the settings used during each run of an application or utility. Any errors that may have occurred during a run are also recorded.
To create an experiment ID, you open the Experiments Editor by clicking  in any Workbench app or utility. For details, go to the Literature Library and open Using the Protein Sample Prep Workbench. In the browser that opens, click Using Experiment IDs.
in any Workbench app or utility. For details, go to the Literature Library and open Using the Protein Sample Prep Workbench. In the browser that opens, click Using Experiment IDs.• A method is a comprehensive collection of saved settings for an application or utility, which you can use to run the application or utility.
Experiment IDs and methods are required for compliance-enabled VWorks editions and optional for noncompliance-enabled VWorks editions.
VWorks edition | Experiment ID and method selection |
|---|---|
VWorks Plus | Required |
VWorks Standard | Optional |
Setting up the protocol
Before starting the protocol, make sure the appropriate selections and values are specified in the Reagent Aliquot utility.
To set up the protocol:
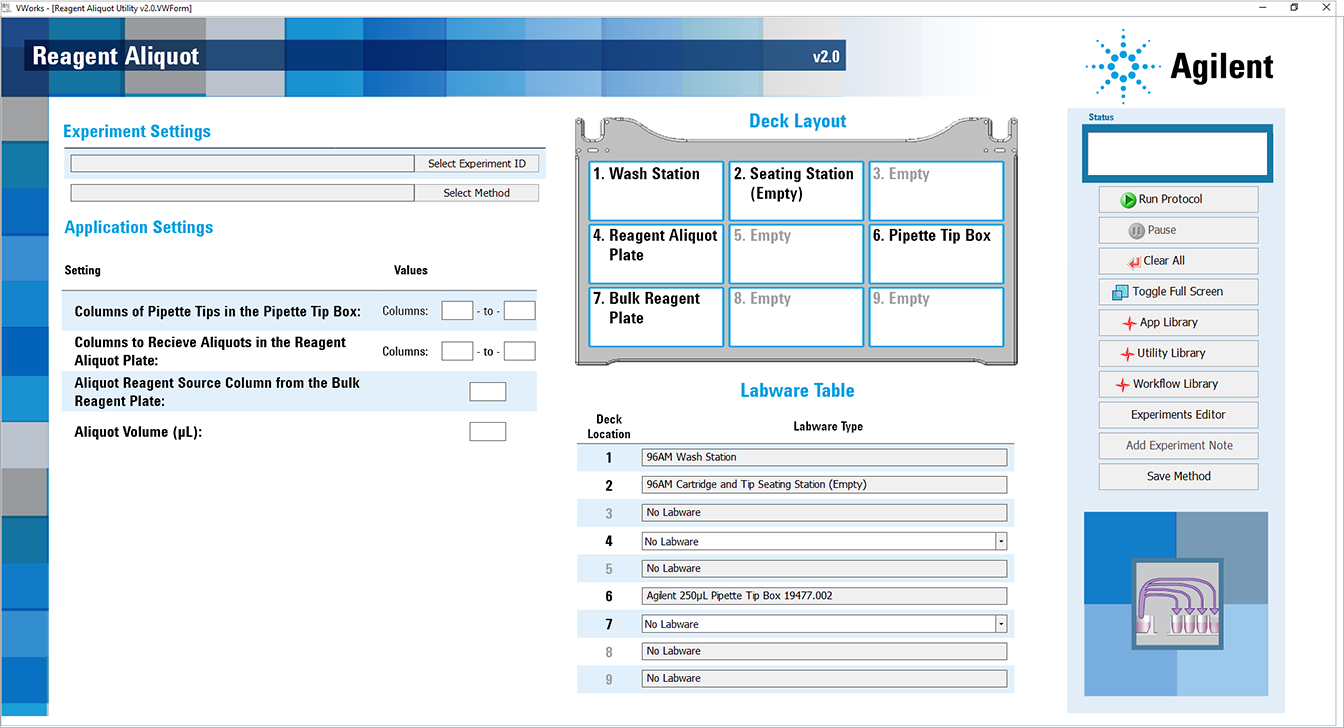
1 Open the Utility Library.
2 Locate Reagent Aliquot, and then click Utility.
 |
The Reagent Aliquot utility opens.
 |
3 If applicable, click Select Experiment ID.
 |
The Experiments Editor opens.
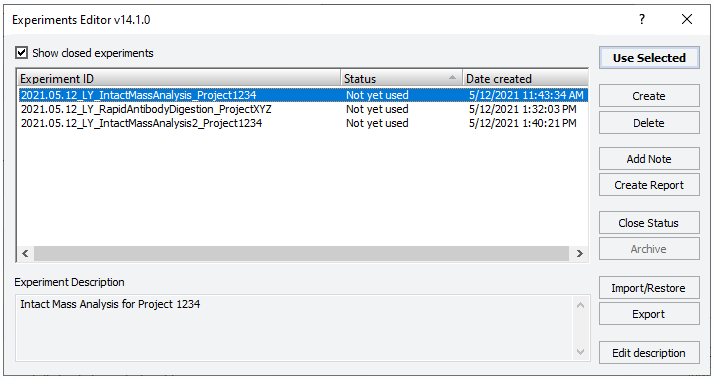 |
4 Select the Experiment ID that you want to use to record the steps performed during this application run, and then click Use Selected.
The Experiments Editor closes.
5 In the form, click Select Method to locate and select a method.
In the Open File dialog box, select the method, and click Open.
• To run the selected method, go to Starting the Reagent Aliquot run.
• To create or modify a method, proceed to step 6.
VWorks Plus. Administrator or technician privileges are required to create and modify methods.
6 In the Application Settings area, specify the following settings for the run:
Setting | Description |
|---|---|
Columns of Pipette Tips in the Pipette Tip Box | Specifies the range of pipette tips present in the pipette tip box before the run starts.  • In the left field, specify the column number of the first column of pipette tips present in the tip box. • In the right field, specify the column number of the last column of pipette tips present in the tip box. One full column of pipette tips is used for every run of this utility. The remaining pipette tips are automatically returned to the pipette tip box for use in future runs. |
Columns To Receive Aliquots in the Reagent Aliquot Plate | Specifies the range of wells that you want to fill in the Reagent Aliquot Plate. • In the left field, specify the column number of the first column in the Reagent Aliquot Plate that will be filled with aliquots. • In the right field, specify the column number of the last column in the Reagent Aliquot Plate that will be filled with aliquots. |
Aliquot Reagent Source Column from the Bulk Reagent Plate | Defines the column of the Bulk Reagent Plate that contains the bulk reagent to be aliquoted into the Reagent Aliquot Plate. |
Aliquot Volume (µL) | Defines the volume of bulk reagent to be aliquoted to each of the selected wells in the Reagent Aliquot Plate. Note: The overage volume is not automatically included in this value. If overage is required for your application, ensure that this value is adjusted to include overage. |
7 To save the method:
a Click  .
.
.b In the Save File As dialog box, type the file name and click Save.
VWorks Plus. You must save the method before you can run it.
Starting the Reagent Aliquot run
To start the protocol run:
1 Ensure that the accessories, filled reagent plates, and collection plates are at the assigned deck locations, as shown in the Deck Layout image of the form.
Make sure the labware are properly seated on the Bravo deck.
|
2 Click  to start the run.
to start the run. To monitor the progress of the run, check the Status box.
 |
When the run is finished, remove the labware from the deck.
To pause the run, click Pause. The task currently in progress finishes before the protocol pauses. The Scheduler Paused dialog box opens. For details, see Emergency stops and pauses.
To troubleshoot errors, see the Error Recovery Guide and the Bravo Platform User Guide in the Literature Library page of the Protein Sample Prep Workbench.
Automation movements during the protocol
This section describes the basic movements of the AssayMAP Bravo Platform during the Reagent Aliquot protocol using the Default Method settings. Changing the selections or parameters will alter the movements.
Protocol step | Head moves to deck location... | Action |
|---|---|---|
1 | 1 | Dispenses any liquid remaining in the syringes into the wash station. |
2 | 2 | Performs Tips Off to ensure no tips remain on the head at the beginning of the run. |
3 | 1 | Performs two syringe drying cycles by aspirating and dispensing air and then conducting at tip touch across the wash station chimneys. |
4 | 6 | Presses on all the pipette tips in the tip box. Although all the pipette tips are picked up from the tip box at this step, only 1 column of pipette tips is used for this utility. |
5 | 2 | Ejects the pipette tips into the seating station. Note: The head is centered over the seating station when ejecting the pipette tips. |
6 | 2 | If applicable, picks up any columns of excess pipette tips from the seating station. Note: The head is offset to the right side of the seating station when picking up columns of excess pipette tips. |
7 | 6 | If applicable, ejects the excess pipette tips back into the tip box. Note: Excess pipette tips are always returned to the left side of the tip box, starting at column 1. |
8 | 2 | Presses on a single column of pipette tips from the seating station using the left-most column of syringes. |
9 | 7 | Aspirates bulk reagent into the pipette tips from the Bulk Reagent Plate. Note: This step uses reverse pipetting, which involves aspirating a small excess of liquid into the pipette tips to ensure accurate pipetting for the final aliquot of a set. |
10 | 4 | Dispenses the reagent into the Reagent Aliquot Plate. The utility uses either of the following two dispense modes: • Multiple low-volume aliquots are dispensed from a single aspirate step. • A single high-volume aliquot requires multiple aspirate steps. In both cases, a small excess volume of the bulk reagent remains in the pipette tips because of the reverse pipetting technique used. |
11 | 7 & 4 | Step 9 and Step 10 are repeated until all aliquots have been prepared in the Reagent Aliquot Plate. |
12 | 7 | Dispenses excess reagent within the pipette tips back into the Bulk Reagent Plate. |
13 | 2 | Ejects the used pipette tips back into the seating station. Note: The used pipette tips are always ejected to column 1 of the seating station. |
14 | 1 | Moves the head to a safe distance above the wash station. |