Preparing the samples

When preparing the samples, you must:
• Remove macromolecular particulates before the samples are loaded onto AssayMAP cartridges.
• Adjust the buffer composition to optimize the binding conditions (for example, pH).
• Determine the volume of samples to load on the AssayMAP cartridges.
• Transfer the samples to the microplate you want to use for the protocol run.
Removing macromolecular particulates
Make sure the samples are free of macromolecular particulates, such as large protein aggregates and cellular debris to prevent clogging the cartridges. Samples should be filtered through a 0.45‑µm filter or centrifuged at a high g‑force before loading on an AssayMAP cartridge.
Adjusting the sample composition
The optimal chemical environment for binding is generally similar for protein A, protein G, and streptavidin.
• Protein A and G resins bind selectively to antibodies.
Examine the scientific literature for differences in their affinity for antibody subtypes from different species.
• Streptavidin resin binds selectively to biotinylated molecules.
• Protein A, protein G, and streptavidin are relatively unaffected by most sample components, including those present in complex protein mixtures.
What are optimal pH conditions?
One of the most important considerations for optimizing binding conditions is the pH of the sample, which should be near neutral pH. Both low (2 to 3) and high (10 to 11) pH ranges can prevent binding to protein A or protein G resins. The sample should generally be:
• Protein A. Greater than pH 6.
• Protein G. Greater than pH 4.
What sample components cause concerns?
Protein A, protein G, and streptavidin generally tolerate moderate levels of salt, non-ionic detergents, and mild denaturing reagents, such as urea, quite well. You should examine scientific literature for the known effects and tolerances of protein A, protein G, and streptavidin, keeping in mind that these tolerances may differ depending on the antibody species and subtype for protein A and protein G.
Does the antibody species and isotype in the sample match the cartridge binding specificity?
Protein A and protein G bind a wide variety of antibody subtypes and species.1 Carefully consider the species and subtype of antibody when choosing between using an AssayMAP Protein A or Protein G cartridge for purification.
The antibodies that bind to protein G largely overlap the set that binds to protein A. While protein A is the industry standard for purification and titer determination of human therapeutic antibodies, protein G is the standard for purification of antibodies used as bioanalytical tools, primarily because many antibody subtypes are generated in species that bind poorly to protein A, for example, mouse IgG1 and rat IgG1.2
Determining the volume of sample to load
The AssayMAP Immobilization protocol permits loading up to 1000 µL of sample onto AssayMAP cartridges. For sample volumes > 250 µL, the protocol will iteratively load samples onto cartridges to stay within the maximum syringe volume (250 µL) of the Bravo 96AM Head.
What is the binding capacity of the cartridge?
Two ways to express the binding capacity of a cartridge are quantitative binding capacity and total binding capacity:
• Quantitative binding capacity. The maximum mass of the target molecule that can bind to the cartridge in a single pass, where less than 10% of the load appears in the flow-through. This value is dependent on the sample load flow rate.
• Total binding capacity. The maximum mass of the target molecule that can bind to the cartridge. This can be achieved only by loading significantly more of the target molecule than can be bound by the cartridge. This value is significantly greater than the quantitative binding capacity.
See the Agilent AssayMAP Bravo Cartridges Selection Guide for detailed information about the binding capacity for Protein A, Protein G, and Streptavidin cartridges.
What is the concentration of the affinity ligand in the sample?
If you know the approximate concentration of the target molecule in your sample and you are working within the quantitative binding range of the cartridge, you can determine the volume of sample to load as follows:
 |
How much affinity ligand should I immobilize?
The amount of affinity ligand to immobilize depends on the amount of target. Use at least a 5‑fold molar excess compared to the amount of target to be captured. A low molar excess of affinity ligand (approximately 5-fold) requires a very slow loading flow rate (approximately 2 µL/min). As the molar excess increases so too can the loading flow rate. The exact molar excess and the flow rate should be determined empirical as they depend on many factors such as the strength of the affinity interaction and the diffusion rate of the target molecule.
Preparing the sample plates
Planning the microplate setup
Before transferring the samples, you should plan the layout of the samples in the microplate. Consider the following:
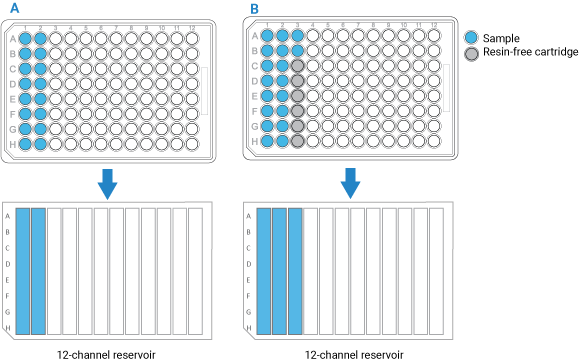
• You can process 1 to 96 samples in parallel. The position of the samples in the microplate dictates the positions of the cartridges in the 96AM Cartridge & Tip Seating Station. These positions must also match the locations of the buffer solutions in microplates and reservoirs.
• If you have fewer than 96 samples, make sure the samples occupy full columns in the microplate, as the figure below shows.
The default protocol settings assume that samples will be arranged in multiples of 8 in a column-based configuration. Also, the AssayMAP Bravo Platform applies differential pressure to seat cartridges based on the number of full columns of cartridges. To achieve proper cartridge seating, entire columns must be used.
• If the number of samples you have is not a multiple of 8, use AssayMAP Resin-Free cartridges to fill the empty well positions. This will prevent liquids from dripping on the deck or being dispensed on the deck during the Cup Wash steps.
Figure Example of sample microplate and reservoir layout: A) Multiple of 8 samples, and B) Not a multiple of 8
 |
See Labware for acceptable labware at each deck location.
Transferring the samples to the microplate
An excess (overage) volume ensures that a microplate well does not fully deplete, which would result in aspiration of air into the syringes and then into the cartridges, compromising performance.
The reagent volume calculator shows the recommended overage for the labware types being used and automatically includes recommended overages in the volume it recommends per well.
Labware-specific overage recommendations are also presented in the Labware Reference Guide, which you can find in the Literature Library page of the Protein Sample Prep Workbench. More or less overage can be used depending on the volatility of the solution and the length of the run but the recommended overages are fine for most standard runs.
To transfer the samples to the microplate:
1 Run the Reagent Transfer utility or Reformatting utility to transfer the samples. For instructions, see one of the following:
2 If necessary, centrifuge the sample labware to remove bubbles.