Preparing the samples

When preparing the samples:
• Remove macromolecular particulates before the samples are loaded onto AssayMAP cartridges.
• Adjust the buffer composition to the optimal binding conditions (for example, low pH and low organic).
• Determine the sample volume to load on the AssayMAP cartridges.
• Transfer the samples to the microplate you want to use for the protocol run.
Removing macromolecular particulate
Make sure the samples are free of macromolecular particulates, such as large protein aggregates and cellular debris to prevent clogging the cartridges. Samples should be filtered through a 0.45‑µm filter or centrifuged at a high g‑force before loading on an AssayMAP cartridge.
Adjusting the buffer composition
The Protein Cleanup application can be used for a wide variety of proteins. Given the range of physiochemical properties that proteins display, you should examine the relevant scientific literature to determine the sample buffer conditions that favor efficient binding and avoid negatively affecting your protein of interest. In general, acidification, which can be accomplished by the addition of TFA, formic acid, or acetic acid to the sample, improves binding to reversed phase resins such as RP-W.
Agilent app note 5991-6478EN (Reference library) provides a detailed analysis of the optimal conditions for using the RP-W cartridges for the cleanup of denatured antibodies. This app note focuses on the cleanup of denatured antibodies to enable rapid trypsin digestion, but it also provides a general approach to optimize the conditions to clean up your protein of interest.
Avoid samples containing organic solvents or some types of detergents as they might inhibit binding to the cartridge. For example, loading samples in a buffer containing greater than 5% acetonitrile might inhibit binding of some proteins. If you have concerns about a specific buffer component, you should survey the scientific literature for any known effects of this type of molecule on reversed-phase resins.
The Reagent Transfer utility is a simple way to adjust the pH or dilute your sample before loading it onto the RP‑W cartridge. For instructions, see Reagent Transfer v3.0 User Guide.
Note: A reverse-phase protein clean up may not work for all proteins due to limited solubility in the high organic solvent, which is required for elution. In addition, when desalting a denatured protein, the removal of the denaturation reagent may cause solubility problems.
Determining the volume of sample to load
The Protein Cleanup protocol permits loading of up to 1000-µL sample volume onto the AssayMAP cartridges. If the sample volume is greater than 250 µL, the protocol will iteratively load samples onto the cartridges to stay within the maximum AssayMAP syringe volume (250 µL).
What is the binding capacity of the cartridge?
Two ways to express the binding capacity of a cartridge are quantitative binding capacity and total binding capacity:
• Quantitative binding capacity. The maximum mass of protein that can bind to the cartridge in a single pass, where less than 10% of the load appears in the flow-through.
The quantitative binding capacity depends on the composition of the solution in which the protein is bound. For denatured antibodies, the binding capacity is slightly reduced when there is greater than 1.5 M guanidine in the sample and if the sample is not acidified.
• Total binding capacity. The maximum mass of protein that can bind to the cartridge. This can only be achieved only by loading significantly more protein than can be bound by the cartridge. This value is significantly greater than the quantitative binding capacity.
See the Agilent AssayMAP Bravo Cartridges Selection Guide for detailed information about the binding capacity for the RP-W cartridges.
What is the concentration of the target in the sample?
If you know the approximate concentration of the target molecule in your sample and you are working within the quantitative binding range of the cartridge, you can determine the volume of sample to load as follows:
 |
Preparing the sample plates
Planning the microplate setup
Before transferring the samples, you should plan the layout of the samples in the microplate. Consider the following:
• You can process 1 to 96 samples in parallel. The position of the samples in the microplate dictates the positions of the cartridges in the 96AM Cartridge & Tip Seating Station. These positions must match the locations of the buffer solutions in microplates and reservoirs.
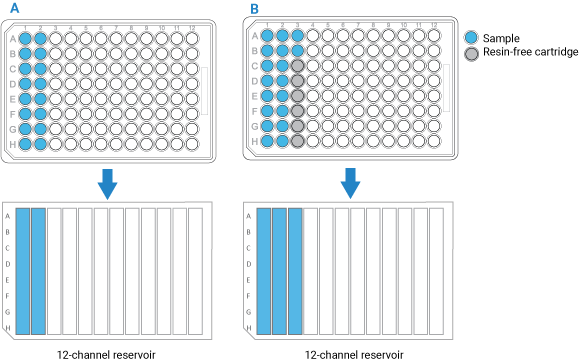
• If you have fewer than 96 samples, make sure the samples occupy full columns in the microplate, as the following figure shows.
• The default protocol settings assume that samples will be arranged in multiples of 8 in a column-based configuration. Also, the AssayMAP Bravo Platform applies differential pressure to seat cartridges based upon the number of full columns of cartridges. To achieve proper cartridge seating, entire columns must be used.
• If the number of samples you have is not a multiple of 8, use the AssayMAP Resin-Free cartridges to fill the empty column and row positions. This will prevent liquids from dripping on the deck or being dispensed on the deck during the Cup Wash step.
Figure Example of sample microplate and reservoir layout: A) Multiple of 8 samples, B) Not a multiple of 8
 |
See Labware for acceptable labware at each deck location.
Transferring the samples to the microplate
An excess (overage) volume ensures that a microplate well or column does not fully deplete, which would result in aspiration of air into the syringes and then into the cartridges, compromising performance.
The Reagent Volume Calculator shows the recommended overage for the labware types being used and automatically includes recommended overages in the volume it recommends per well. See Using the Reagent Volume Calculator for Protein Cleanup.
Labware-specific overage recommendations are also presented in the Labware Reference Guide, which you can find in the Literature Library page of the Protein Sample Prep Workbench. More or less overage can be used depending on the volatility of the solution and the length of the run but the recommended overages are fine for most standard runs.
To transfer the samples to the microplate:
1 Run the Reagent Transfer utility or Reformatting utility to move samples into one of the labware options for deck location 4. For instructions, see one of the following:
2 If necessary, centrifuge the sample labware to remove bubbles.