Mounting the robot
About this topic
Typically, the BenchCel Microplate Handler will be installed for you. However, this topic provides a reference for how to mount the robot on the BenchCel device.
Procedure
Figure Correct and incorrect lift points on the robot head
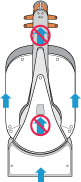 |
To mount the robot on the BenchCel device:
1 Remove the shipping bracket from the BenchCel x‑axis carriage as follows:
a Refer to the following figure to locate the BenchCel x‑axis carriage.
b Loosen the two large black bracket screws that prevent the x‑axis carriage from moving during shipping.
c Use a 5-mm hex wrench to remove the four screws that secure the shipping bracket to the x‑axis carriage.
d Carefully lift the shipping bracket straight up, ensuring that you do not scratch the electronics.
Figure BenchCel device with shipping bracket removed from the x‑axis carriage
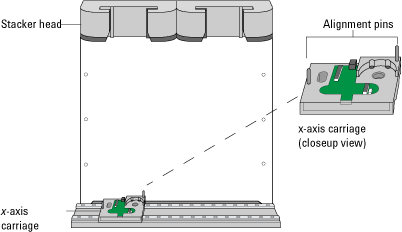 |
2 Slide the x‑axis carriage into position directly under a stacker head opening.
3 Inspect the x‑axis carriage and ensure any cables are recessed.
4 Using the correct lift points, grasp the robot head and, carefully, lower it onto the x‑axis carriage, aligning the two holes on the robot z-column bottom with the dowel pins on the x‑axis carriage.
5 Gently slide the robot downwards. When the robot is in position, push down on it to ensure the electronics are fully connected.
6 Gently rotate the robot arms to one side to expose the two screw holes on the robot base. Insert the two 35‑mm M6 screws and tighten to secure the robot to the base.
Figure BenchCel robot with rotated arms to expose screw holes in the base
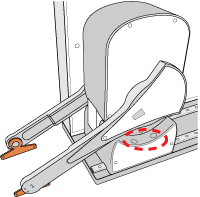 |
7 Lift the robot head from the base to expose the remaining two screw holes in the base. While firmly supporting the robot head, install the two 45-mm M6 screws to finish securing the robot base to the x‑axis carriage.
Figure BenchCel robot head in up position: (1) mounting screw holes and (2) front panel
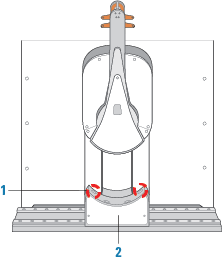 |
8 Gently lower the robot head onto the base.
9 To secure the front panel to the robot base, use a 2-mm hex wrench to install the two screws.
Related information
For more information about… | See… |
|---|---|
Installation requirements | |
Installing the BenchCel Microplate Handler |