Using the gripper controls
About this topic
If your Bravo Platform has a gripper, you can use the controls in Diagnostics to move the gripper and troubleshoot problems.
See Verifying the gripper setup for instructions on how to:
• Test the gripper pick-and-place function
• Adjust the y‑axis offset
Using the Move and Approach commands
The gripper Move and Approach commands are used when verifying teachpoints. In the Gripper Teaching area:
• Click Move to quickly move the liquid-handling head to a teachpoint above a selected deck location and lower the gripper to the surface of the platepad.
• Select the Approach height (mm), and then click Approach to lower the gripper to the approach (offset) height. The offset height is the distance above the teachpoint.
Jogging the gripper
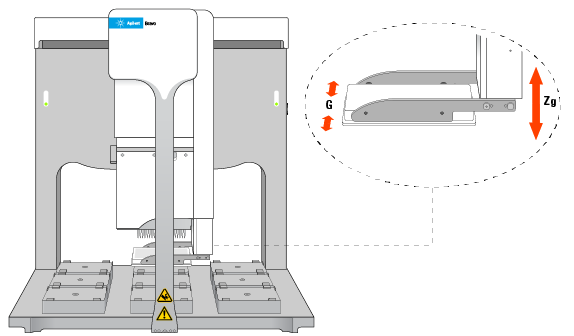
You can use the controls in the Gripper tab to jog the gripper in the Zg and the G axes of motion.
 |
To jog the gripper:
1 In the Jog Gripper Axes area, specify the distance (mm) to jog.
2 Click the direction button to move the gripper.
3 In the Zg-Axis and G-Axis areas, check the new distance from the home position.
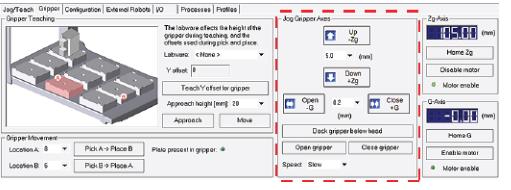 |
Opening and closing the gripper
To verify that the gripper is able to open and close properly, in the Jog Gripper Axes area, click Open gripper and Close gripper. Watch the gripper movement as you do so.
Changing the gripper speed
Under normal operating conditions, you do not need to change the gripper speed. However, for troubleshooting purposes, you might want to change the speed when you check other gripper functions.
To set the gripper speed:
In the Jog Gripper Axes area, select the desired speed (Slow, Medium, or Fast) in the Speed list.
Note: The speed setting applies only for Diagnostics and does not apply to the closing grip action.
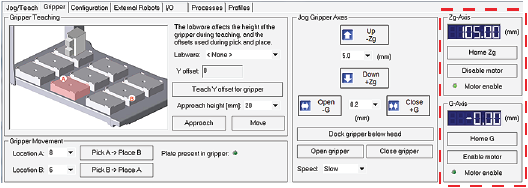
Homing the gripper
The gripper has a defined home position for each axis of its motion. Homing sends the gripper to the home position of the axes.
Homing the gripper is done automatically during startup. However, you might want to home the gripper during troubleshooting processes.
To home the gripper:
In the Zg-Axis or G-Axis areas, click Home Zg or Home G. The gripper moves to the predefined position on the corresponding axis.
 |
Docking the gripper
During troubleshooting or verification procedures, you might want to dock the gripper.
To dock the gripper:
In the Jog Gripper Axes area, click Dock gripper below head. The gripper moves upward and rests in the recess under the liquid-handling head.
Disabling and enabling the gripper motors
When you disable the Zg-axis (vertical direction) or the G-axis (opening-closing direction) motor, the motor remains disabled until a command is issued to enable the gripper motor.
To disable the gripper motors:
In the Zg-Axis or G-Axis area, click Disable motor. The corresponding Motor enable light goes out.
|
To enable the gripper motors:
In the Zg-Axis or G-Axis area, click Enable motor. The corresponding Motor enable light turns bright green.
Related information
For information about... | See... |
|---|---|
Gripper tab quick reference | |
Using the Jog/Teach tab controls to move the liquid-handling head | |
Moving the liquid-handling head manually | |
Opening Diagnostics |