Setting the robot pickup angle teachpoint
About this topic
The robot pickup angle is the position that the plate stage returns to after a print-and-apply cycle is completed. The teachpoint for the robot pickup angle is set at the factory.
If your Microplate Labeler is:
• A standalone device, this teachpoint should not require adjustment.
• Integrated in a BenchCel Workstation, this teachpoint is already set for you.
• Integrated in a third-party lab automation system, this teachpoint might require adjustment to accommodate your robot’s geometry.
This topic explains how to adjust the robot pickup angle and set the teachpoint so that a robot can deliver or pick up a microplate from the plate stage.
Viewing the robot pickup angle
The Stage Setup tab in Microplate Labeler Diagnostics displays the teachpoint settings.
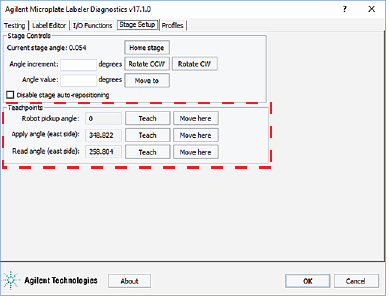 |
To view the robot pickup angle:
1 Ensure that the Microplate Labeler device is initialized. For the VWorks software, see Initializing the device in the VWorks device manager.
2 Open Microplate Labeler Diagnostics.
3 Click the Stage Setup tab.
4 Under Teachpoints, check the value for the Robot pickup angle.
Two methods for setting the robot pickup angle
You can use either of the following procedures for setting the robot pickup angle:
• Specify an angle in the Angle value box or the Angle increment box.
• Manually move the plate stage to a position and then set its position as the teachpoint.
Specifying a new angle
To set the robot pickup angle by specifying the angle:
1 Ensure the device is initialized, and Microplate Labeler Diagnostics is open.
2 Ensure that the applicator head is pointing towards the printer.
If necessary, click the I/O Functions tab, and then click Rotate to printer. The applicator head rotates towards the printer, moving it out of the plate stage rotation path.
3 Under Stage Controls, type a value in the Angle value box, and then click Move to.
Alternatively, type a value in the Angle increment box, and then click Rotate CCW or Rotate CW.
4 If the position is correct, under Teachpoints, locate Robot pickup angle, and then click Teach.
5 In the Profiles tab, click Update this profile.
Manually moving the plate stage
To set the robot pickup angle by manually moving the plate stage:
1 Ensure the device is initialized, and Microplate Labeler Diagnostics is open.
2 Ensure that the applicator head is pointing towards the printer.
If necessary, click the I/O Functions tab, and then click Rotate to printer. The applicator head rotates towards the printer, moving it out of the plate stage rotation path.
3 Click the Stage Setup tab, and select Disable stage auto-repositioning.
4 Manually rotate the plate stage to the desired position.
5 Under Teachpoints, locate Robot pickup angle, and then click Teach.
6 Clear the Disable stage auto-repositioning check box.
7 In the Profiles tab, click Update this profile.
Related topics
For information about... | See... |
|---|---|
Microplate Labeler Diagnostics | |
Plate stage positions | |
Designing label formats | |
Setting up and running a labeling protocol | VWorks Automation Control User Guide |