Preparing the solutions
The following solutions are required for the On-Cartridge Reaction protocol:
• Equilibration & Chase Buffer
• Reagent (for example, an enzymatic or chemical agent)
• Cartridge Wash Buffers
• Elution & Syringe Wash Buffer
Note: You can find the Labware Reference Guide in the Literature Library page of the Protein Sample Prep Workbench.
Using the Reagent Volume Calculator for On-Cartridge Reaction
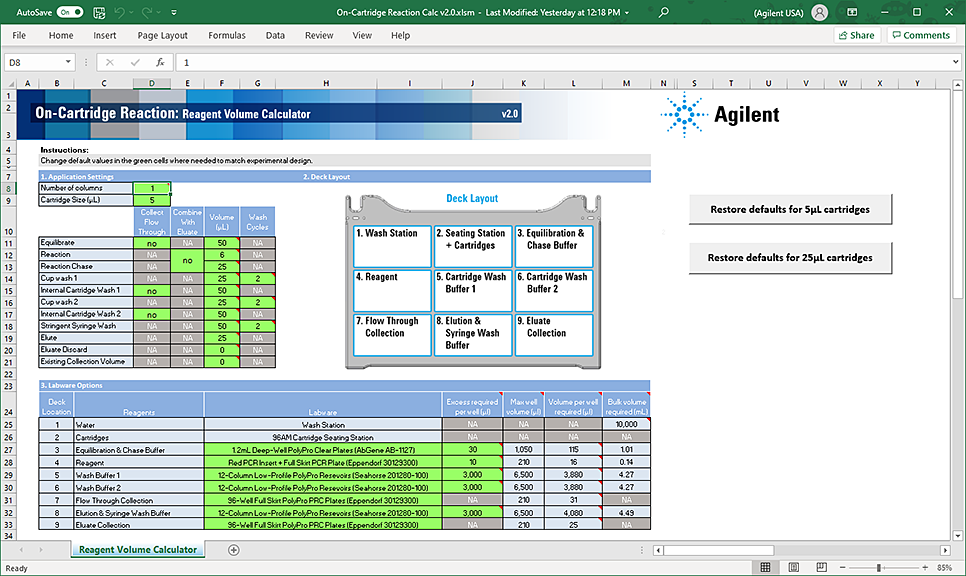
The Reagent Volume Calculator is a Microsoft Excel file that contains a Calculator worksheet. You enter the number of columns to process, whether to perform the Collect Flow Through options, the volume for each step in the protocol, the number of wash cycles to conduct, and the labware selection for each deck location. The calculator determines the volumes required based on your input, taking into consideration pipetting overage and evaporation concerns.
Note: The pipetting overage suggested is generally conservative. The minimal overage may be greater or less depending on the volatility of the solution, the length of the run, and when the step occurs during the run. The overage volume can be optimized to minimize loss of precious reagents.
To use the Reagent Volume Calculator:
1 Open the App Library.
2 Locate the application, and then click the corresponding Calculator button. Microsoft Excel starts and displays the calculator.
3 Ensure that you enable content in Microsoft Excel.
4 Click one of the following:
• Set defaults for 5µL cartridges. Sets the values in the calculator using the values from the default method for the 5 µL cartridges.
• Set defaults for 25µL cartridges. Sets the values in the calculator using the values from the default method for the 25 µL cartridges.
5 Modify the values in the green boxes as required to match your specific method. As you change the values in the green boxes, the calculated values change.
Note: The green box should remain green after you enter a value. If you enter a value that is outside the normal working range, the box becomes yellow. If you enter a value that is outside of the acceptable range, the box becomes red.
To display the corresponding tooltip for a setting, mouse over a box that has a red triangle in the upper right corner.
The following figure shows the On-Cartridge Reaction Reagent Volume Calculator.
Figure On-Cartridge Reaction Reagent Volume Calculator
 |
Determining the Reagent volume for deck location 4
The Reagent Volume Calculator determines a recommended volume for the Reagent (deck location 4) based on the reaction volume plus a standard overage for the labware type. The values for both the reaction volume and the overage are influenced by multiple factors.
Note: The labware-based overage in the Reagent Volume Calculator is a general recommendation that can changed. The overage value may be higher or lower than the default based on the length of the protocol run, when the labware is used during the run, and the volatility of the solution used in the labware. The Reagent (deck location 4) has additional factors to consider when determining the overage volume to use.
The Reaction volume is the volume that will be moved over the cartridge during the Reaction step, which is defined by the reaction time input. This volume is drawn up through the cartridges from the wells in two stages of the reaction:
1 First stage. The Initial Draw volume is drawn up through the cartridges at a relatively rapid rate to quickly replace the volume in the resin bed with the reaction solution (for example, enzyme solution).
Agilent recommends using the default value for the Initial Draw: 4 µL (5 µL cartridges) or 20 µL (25 µL cartridges). The default value is slightly less than one column volume, which should be sufficient for replacing the dead volume in the resin bed.
2 Second stage. The difference between the Reaction volume and the Initial Draw is aspirated over the resin bed at a flow rate that is required for this volume to be aspirated through the resin bed for the Duration input on the form.
The Reaction volume cannot be less than the Initial Draw volume, but it can be equal to it. How much larger the Reaction volume is compared to the Initial Draw is dependent on how much volume one wants to draw over the resin bed during the reaction. The properties of the reaction (for example, stability of the reacting agent, cost, molar ratio of reactant to substrate required, and so forth) will drive this decision.
When choosing an overage volume, consider the following:
• Dead volume required to ensure that air is not aspirated into the cartridge
• Evaporation, which is dependent on the temperature of the reaction
• Length of the reaction and the volatility of the sample during the sample loading step
Enough liquid must remain in the wells to act as a heat conductor to the resin bed. At least 3–5 µL of liquid is required in each well of a 96-well PCR plate at the end of the incubation time, as this is the minimum volume required to maintain contact with the bottom of the cartridges. This contact is required to conduct heat into the resin bed. A PCR plate is the most practical and common labware type at deck location 4 because of the low volumes of solution typically used at that location and the low dead volume requirements for a PCR plate.
Example using 5 µL cartridges
Note: See the app notes in the Reference library.
In this example, a PCR plate is seated in the Red PCR Plate Insert at deck location 4. To conduct a 30-minute reaction at a resin bed temperature of approximately 37 °C with a 6 µL total aspiration volume, the temperature should be set to 45 °C and 12 µL of enzyme solution should be added per well before the run is started. A volume of 12 µL is required in this example because:
• 6 µL will be aspirated (4 µL initial draw and 2 µL drawn through the resin bed over the 30 minute reaction).
• 3 µL is expected to evaporate.
• 3 µL is required at the end of the run to ensure heat conductance occurs during the entire run.
For more details, see the Reaction Volume and Temperature steps in Assay development guidelines and protocol notes.
Preparing the buffers and reagents
The following table describes the reagents and deck locations. The AssayMAP protocols are blind to the composition of the solutions, so you can easily adapt your optimized chemistry. Agilent Technologies recommends the buffers listed in the following table as a starting point for optimizing the AssayMAP On-Cartridge Reaction chemistry.
Table Reagent preparation
Reagent and deck location | Composition and comments |
|---|---|
Equilibration & Chase Buffer (deck location 3) | This reagent should provide optimal conditions for the reaction step, so it is typically the solvent used for the reaction reagent. For an enzymatic On-Cartridge Reaction run, this would typically be the enzyme reaction buffer. This buffer should not disrupt the affinity interaction between the cartridge resin and immobilized substrate. |
Reagent (deck location 4) | Contains molecules that modify the immobilized substrate during the on-cartridge reaction. • Enzymatic reaction, this solution would contain the enzyme. • Chemical reaction, this solution would contain chemically active molecules. |
Cartridge Wash Buffer 1 (deck location 5) | High-stringency buffer (for example, a neutral buffer with high NaCl) or a low-stringency buffer (for example, a neutral, mass-spec-compatible buffer). The On-Cartridge Reaction protocol is designed to allow up to two sequential washes. The buffer selection depends on a number of factors, such as: • Whether Wash Buffer 2 will be used, which is often dependent on whether a stringent wash is desired in the protocol. If so, Wash Buffer 1 would be a stringent buffer, and Wash Buffer 2 would be a less stringent wash buffer, which would remove the stringent component of the buffer before elution. • If a stringent buffer is not used, typically, you would use Wash Buffer 1 only. The buffer would be a low-stringency wash buffer, for example, a neutral mass-spec-compatible buffer. |
Cartridge Wash Buffer 2 (deck location 6) | Low-stringency buffer (for example, a neutral, mass-spec-compatible buffer). The composition of this buffer is often dictated by sensitivity of downstream steps to components of Cartridge Wash Buffer 2, as the void volume in the cartridges (~2 µL) will contain the last wash solution used before the elution step and end up in the eluate unless the Eluate Discard option is selected in the elution step. |
Elution & Syringe Wash Buffer (deck location 8) | Typically a low pH, mass-spec friendly solution, but this is highly dependent on the nature of the affinity interaction to be broken. A key consideration is if the sample will be neutralized following elution. If so, a weak acid that is easy to neutralize would be a good choice (for example, 12 mM HCl with 100 mM NaCl for the interaction between protein A and an antibody). However, this type of elution solution may be relatively inefficient in breaking the affinity interaction and, therefore, may require more volume for complete elution (for example, 4–6 column volumes for complete elution of antibodies off a protein A cartridge). If neutralization is not a key consideration or minimizing elution volume is a critical driver, a strong acid is a better choice (for example, 5% acetic acid) because complete elution can be achieved in as little as 2–3 column volumes. |
When preparing these reagents, you must:
• Remove macromolecular particulates.
• Adjust the buffer composition to optimize the pH conditions.
• Determine the volume of solutions required using the Reagent Volume Calculator.
The prepared reagents should be kept in a closed container before use to avoid evaporation.
Dispensing the solutions
To dispense the reagents into the labware:
1 Optional. Label the labware so that you can easily identify them.
2 Add the specified volume of Equilibration & Chase Buffer into the labware to be placed at deck location 3.
3 Add the specified volume of Reagent into the labware to be placed at deck location 4.
4 Add the specified volume of Cartridge Wash Buffer 1 into the labware to be placed at deck location 5.
5 If using two wash buffers, add the specified volume of Cartridge Wash Buffer 2 into the labware to be placed at deck location 6.
6 Add the specified volume of Elution & Syringe Wash Buffer into the labware to be placed at deck location 8.
7 If necessary, centrifuge the reagent labware to remove bubbles.
Note: You can run the Reagent Aliquot utility or Reagent Transfer utility to transfer the buffers and reagents to different labware. For instructions, see the Reagent Aliquot v2.0 User Guide or Reagent Transfer v3.0 User Guide.