Syringe Wash v3.0 User Guide

The Syringe Wash v3.0 utility enables you to conduct up to 6 sequential syringe washes, using up to 6 different wash solutions (plus, water in the wash station). You select which buffer to use for each of the 6 syringe washes. The same wash buffer can be selected for multiple washes.
Before you start
Labware
The following table provides a complete list of labware options and the corresponding deck locations.
Figure Labware locations on the Bravo deck (top view)
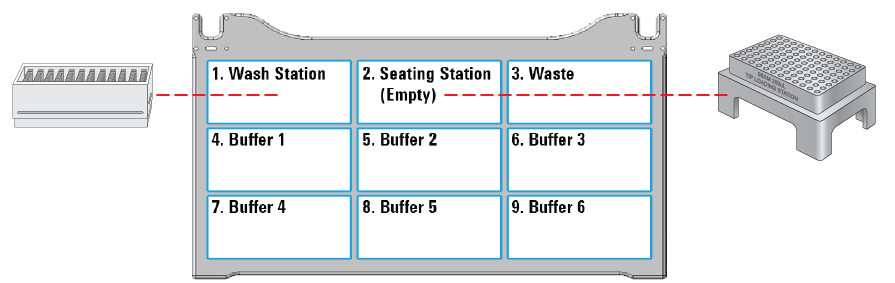 |
Labware options (deck locations 3–8) | Manufacturer part number* |
|---|---|
1.2mL Deep-Well PolyPro Clear Plate | ABgene AB-1127 |
96-Well U-Bottom PolyPro Clear Plate | Greiner 650201 |
12-Column Low-Profile Reservoir | Agilent 201280-100 |
8-Row Low-Profile PolyPro Reservoir | Agilent 201282-100 |
Reservoir, Seahorse 201254-100, PP, no walls, pyramid bottom | Agilent 201254-100 |
Reservoir, Axygen Scientific RES-SW96-LP, 86mL pyramid bottom | Axygen Scientific RES‑SW96‑LP |
96 V11 Manual Fill Reservoir | Agilent G5498B#049 |
*For dimensionally equivalent alternatives and other details about the labware, see the Labware Reference Guide in the Literature Library page of the Protein Sample Prep Workbench. | |
Reagents
An wash solution of 50 mM NaOH has been effective for washing the syringes between most protein and peptide sample preparation runs. The Syringe Wash utility provides up to 6 washes so that you can use multiple washes using solutions that cover different chemical spaces to address contaminates that are difficult to remove from the syringes.
Experiment ID and method requirements
Each workbench application and utility has an Experiment Settings section that allows you to select an experiment ID and a method.
• An experiment ID is a database record that captures the steps executed and the settings used during each run of an application or utility. Any errors that may have occurred during a run are also recorded.
To create an experiment ID, you open the Experiments Editor by clicking  in any Workbench app or utility. For details, go to the Literature Library and open Using the Protein Sample Prep Workbench. In the browser that opens, click Using Experiment IDs.
in any Workbench app or utility. For details, go to the Literature Library and open Using the Protein Sample Prep Workbench. In the browser that opens, click Using Experiment IDs.• A method is a comprehensive collection of saved settings for an application or utility, which you can use to run the application or utility.
Experiment IDs and methods are required for compliance-enabled VWorks editions and optional for noncompliance-enabled VWorks editions.
VWorks edition | Experiment ID and method selection |
|---|---|
VWorks Plus | Required |
VWorks Standard | Optional |
Setting up the protocol
Before starting the protocol, make sure the appropriate selections and values are specified in the Syringe Wash utility.
To set up the protocol:
1 Open the Utility Library.
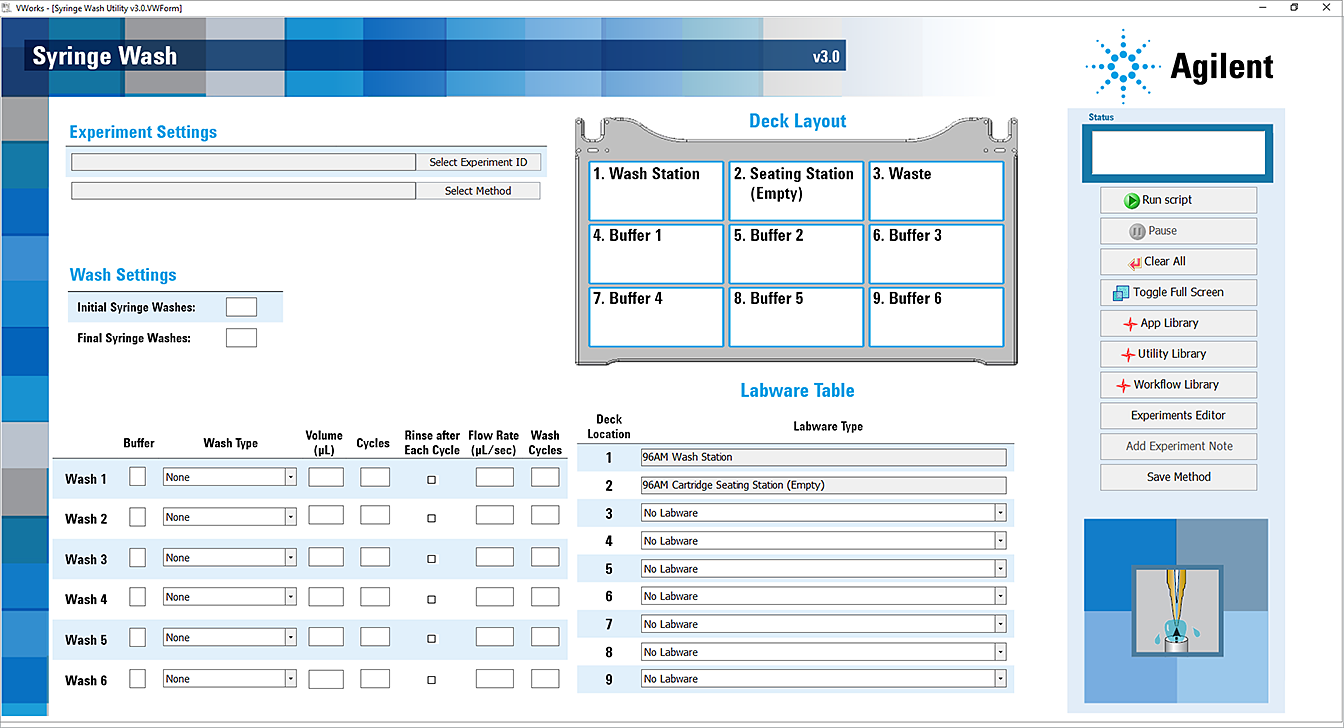
2 Locate Syringe Wash, and then click Utility.
 |
The Syringe Wash utility opens.
 |
3 If applicable, click Select Experiment ID.
 |
The Experiments Editor opens.
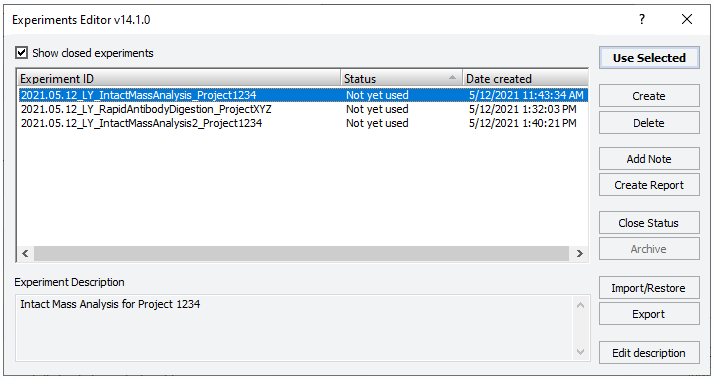 |
4 Select the Experiment ID that you want to use to record the steps performed during this application run, and then click Use Selected.
The Experiments Editor closes.
5 In the form, click Select Method to locate and select a method.
In the Open File dialog box, select the method, and click Open.
• To run the selected method, go to Starting the Syringe Wash run.
• To create or modify a method, proceed to step 6.
VWorks Plus. Administrator or technician privileges are required to create and modify methods.
6 In the Application Settings area, specify the following settings for the run:
a Under Wash Settings, specify the number of Syringe Washes at the wash station at the beginning and end of the run:
• Initial Syringe Washes. The number of standard Internal Syringe Washes to be conducted using the wash station at deck location 1, before starting any of the syringe washes.
• Final Syringe Washes. The number of standard Internal Syringe Washes to be conducted using the wash station at deck location 1, after completion of all the syringe washes.
b Set the following properties for each syringe wash. You can conduct up to six washes:
Property | Description |
|---|---|
Buffer | Set the deck location of the Buffer reservoir for the given syringe wash. The same deck location can be used for multiple syringe washes. 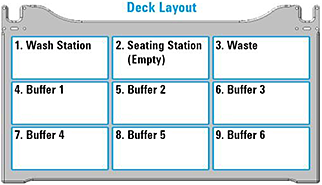 Defaults: • Wash 1: Buffer 1 (deck location 4) • Wash 2: Buffer 2 (deck location 5) • Wash 3: Buffer 3 (deck location 6) • Wash 4: Buffer 4 (deck location 7) • Wash 5: Buffer 5 (deck location 8) • Wash 6: Buffer 6 (deck location 9) |
Wash Type | The type of wash: • NONE. Select this option to specify no wash. If you select NONE for any of the 6 syringe washes, its corresponding syringe wash will be skipped. • Cycle in Reservoir. Select this option to conduct aspirate-and-dispense cycles in the designated wash buffer location. This option will not move the wash solution out of its original location. • Discard – Waste Plate. Select this option to aspirate from the specified Wash Buffer reservoir and dispense into the Waste Plate at deck location 3. • Discard – Wash Station. Select this option to aspirate from the specified Wash Buffer reservoir and dispense into the wash station waste sump. Default: • Wash 1: Cycle in Reservoir • Wash 2 – Wash 6: None |
Volume (µL) | The volume to be aspirated into the syringes and dispensed for each wash cycle. Range: 0–250 Default: 250 |
Cycles | The number of aspirate-and-dispense cycles to be conducted for each syringe wash. Range: 0–60 Default: 5 |
Rinse after Each Cycle | To wash the syringes at the wash station after each wash cycle in this wash, select the check box. Otherwise, clear the check box. Default: Not selected |
Flow Rate (µL/sec) | The volumetric speed of the pipetting axis (w‑axis) during each wash cycle. Range: 0–300 Default: 200 Note: Although the AssayMAP flow rate is normally expressed in µL/min, use µL/sec on this form. |
Wash Cycles | The number of Internal Syringe Washes at the wash station to be conducted after all the wash cycles are completed for the given wash. Range: 0–10 Default: 0 |
7 In the Labware Table, select that labware you are using:
a Deck Location 3. Select the labware for the Waste plate.
b Deck Location 4–9. Select the labware for the Buffer at each deck location that you are using for this wash method.
Note: The wash method can include up to six syringe washes.
8 To save the method:
a Click  .
.
.b In the Save File As dialog box, type the file name and click Save.
VWorks Plus. You must save the method before you can run it.
Starting the Syringe Wash run
To start the protocol run:
1 Ensure that the accessories and labware are at the assigned deck locations, as shown in the Deck Layout image of the form.
Make sure the volume of solution in the labware is sufficient for the overage requirement plus the parameters selected on the form. For volume overage requirements for a given labware type, see the Labware Reference Guide in the Literature Library page of the Protein Sample Prep Workbench.
Make sure the labware are properly seated on the Bravo deck.
|
2 Click  to start the run.
to start the run. To monitor the progress of the run, check the Status box in the upper right corner of the form.
When the run is finished, remove the labware from the deck.
To pause the run, click Pause. The task currently in progress finishes before the protocol pauses. The Scheduler Paused dialog box opens. For details, see Emergency stops and pauses.
To troubleshoot errors, see the Error Recovery Guide and the Bravo Platform User Guide in the Literature Library page of the Protein Sample Prep Workbench.