Creating BenchCel device in the VWorks software
About this topic
Read this topic if you are an administrator responsible for managing Agilent devices that are controlled by the VWorks software. This topic describes how to add and delete new BenchCel devices in the VWorks software.
The VWorks software uses the information in a device file to communicate with and operate devices within the lab automation system.
• If your computer was configured by Agilent Technologies. The correct device configuration is already set up for communication with the BenchCel Microplate Handler. You are not required to create a new BenchCel device in the software unless you want to reference different profiles, integrate additional devices with the workstation, or change the rack size. To establish communication, you must initialize the device.
• If you configured your own computer. You must add a device in the VWorks software for the BenchCel Microplate Handler. You must also add devices in the software for any devices that are physically integrated with the workstation.
For detailed information about device files and associations with profiles, teachpoints, and labware definitions, see the VWorks Automation Control User Guide. For instructions on how to add third-party devices, see the Device Driver User Guide.
Devices and device files defined
A device is an item in your lab automation system that has an entry in a VWorks device file. A device can be a robot, an instrument, or a location in a lab automation system that can hold a piece of labware.
The device file (*.dev) stores information for all the devices in an integrated system, including:
• Type of device (for example, BenchCel device)
• Device configuration information (for example, approach height, allowed or prohibited labware, and so on)
• Profile to use
Creating a device file
If you are setting up the BenchCel Microplate Handler for the first time, you will create a device file. You add the BenchCel device and the external devices to the device file.
To create a device file:
1 Log in to the VWorks software as an Administrator.
2 In the VWorks window, choose File > New > Device.
A Device File tab appears in the VWorks window.
3 Choose File > Save. In the Save File As dialog box, type a file name (*.dev), select the storage location, and click Save:
4 VWorks Plus only. If an audit trail is being logged for records in the development state, the Audit Comment dialog box opens. Select or type the audit comment, and then click OK.
Adding the device to a device file
Before you begin:
• Ensure that any devices are physically networked to the computer.
• Turn on the devices.
To add devices to a device file:
1 In the VWorks window, verify that the correct device file is open.
To open a device file, choose File > Open > Device. In the Open File dialog box, locate and select your device file (*.dev), and then click Open.
2 In the Available Devices area, double-click the BenchCel icon. Or, drag the BenchCel icon to the Device File tab.
Note: To show or hide the list of available devices, choose View > Available Devices.
 |
3 In the Device File tab, select the BenchCel‑n icon.
4 Under BenchCel Properties, type a Name for the device. By default, the software assigns BenchCel‑n, and increments the number for each BenchCel device that you add.
To identify the specific BenchCel, the device name should include the device serial number.
5 In the Profile list, select a profile for the device.
If the Profile list is empty, open BenchCel Diagnostics and create a profile. Then return to the Profile list under BenchCel Properties and select the new profile.
6 On the Device File tab, expand the BenchCel device icon to show the list of stackers, and then click the Stacker 1 icon. The corresponding stacker properties appear.
 |
Set the desired values for the following properties. Use the default values for the remaining properties.
Property | Description |
|---|---|
Allowed/prohibited labware | Optional. Click  if you want to specify labware restrictions for this location. The Allowed/prohibited labware dialog box appears. For details on the labware classes, see the VWorks Automation Control Setup Guide. if you want to specify labware restrictions for this location. The Allowed/prohibited labware dialog box appears. For details on the labware classes, see the VWorks Automation Control Setup Guide.Note: If the button is not visible, click the empty field. |
Stack Height | Type the maximum height (mm) of the rack you are using at this location. For example, type 660 if you are using a 660-mm tall rack. |
Repeat this step for each stacker.
7 Select File > Save.
If you are creating a new device file, the Save File As dialog box appears so that you can specify a name and location for your device file (*.dev).
Alternatively, you can select File > Save All to save the device file and the current protocol file at the same time.
8 VWorks Plus only. If an audit trail is being logged, the Audit Comment dialog box opens. Select or type the audit comment, and then click OK.
Specifying BenchCel accessibility at other devices
For any device in the workstation that the BenchCel robot will access, use the following procedure to set the Teachpoint for robot Agilent BenchCel property in the device file after you set the BenchCel teachpoint at the given device.
To set the Teachpoint for robot Agilent BenchCel property at a device:
1 In the VWorks window, open the device file that contains the BenchCel robot.
2 In the Devices area, click the location in the device that the BenchCel robot will access.
For example, if the device file contains the BenchCel and Bravo devices, click the Bravo deck location that the BenchCel robot will access.
3 In the Location Properties for the selected location, click the setting for the Teachpoint for robot Agilent BenchCel property.
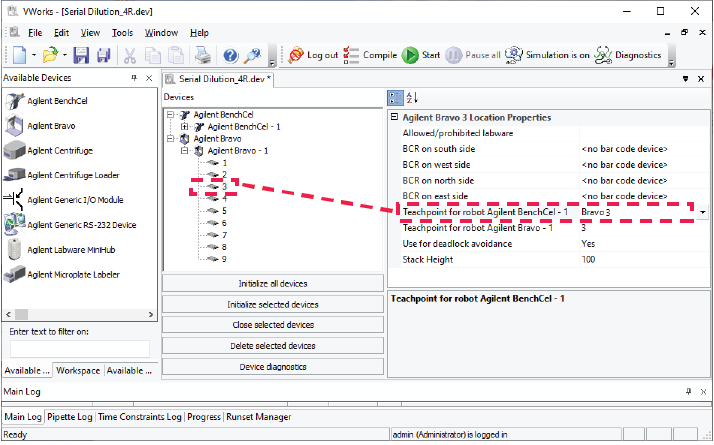
In the following example, the BenchCel robot will transfer labware to and from Bravo deck location 3. In the Bravo Location Properties for deck location 3, the Bravo 3 teachpoint is selected. The teachpoint name, Bravo 3, is assigned when this teachpoint is set in BenchCel Diagnostics.
 |
4 Select File > Save to save the change to the device file.
5 VWorks Plus only. If an audit trail is being logged, the Audit Comment dialog box opens. Select or type the audit comment, and then click OK.
Related information
For information about… | See… |
|---|---|
VWorks software | VWorks Automation Control User Guide |
Setting up BenchCel Microplate Handler | |
Profiles | |
Teachpoints |