Installing and setting up a Nested Rack Insert
About this topic
You should install the Nested Rack Insert if you are using nestable tip racks on the Bravo Platform. The insert ensures the stability of a nestable tip rack during tips-on and tips-off tasks. Up to five nestable tip racks can be stacked on a single platepad using the Nested Rack Insert.
After you install the Nested Rack Insert, you configure the software to automatically select the location in VWorks during tips-on and tips-off tasks.
This topic describes how to install and configure the Nested Rack Insert.
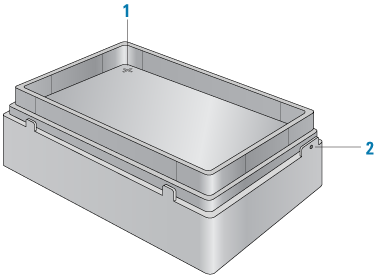
Figure Nested Rack Insert installed on a Bravo platepad
 |
Before you begin
Make sure you do the following before installing the Nested Rack Insert:
• Ensure that the labware definition specifies a nested tip box as follows:
In the Labware Editor, click the Plate Properties tab. In the Requires insert list, select Nested Rack Insert.
• Set the teachpoints for all deck locations.
• Verify that the gripper y‑axis offset is correct. See Verifying the gripper setup. In Bravo Diagnostics, perform a place plate task to move a nested tip box and ensure the gripper y‑axis offset is correct.
• Obtain a 1.5 mm hex wrench for installing the insert.
Installing the Nested Rack Insert
To install the Nested Rack Insert:
1 On the Bravo deck, locate the platepad where you plan to do tips-on and tips-off tasks. Place the Nested Rack Insert on the platepad, making sure to align the crosshairs on the insert (1) directly above the platepad crosshairs.
2 To secure the Nested Rack Insert, use a 1.5 mm hex wrench to tighten the platepad screw (2).
 |
Configuring the Nested Tip Rack Insert
To configure the Nested Tip Rack Insert:
1 In Bravo Diagnostics, click the Profiles tab, and verify that the correct profile is initialized.
2 Click the Configuration tab.
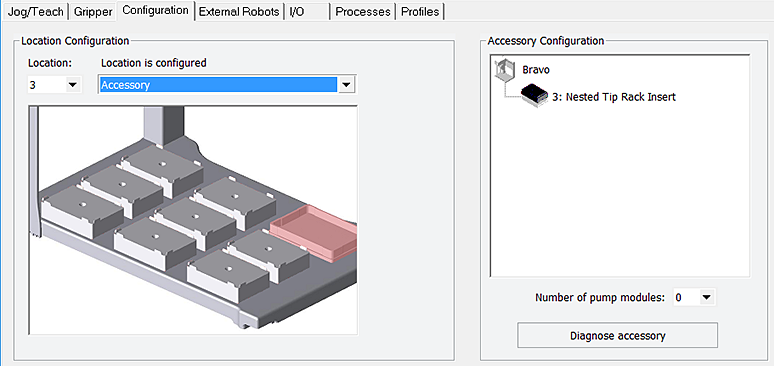 |
3 In the Location is configured as list, select Accessory. The Accessories Wizard appears.
4 Follow the instructions in the Accessories Wizard to:
a Specify the Location of the installed insert.
Note: Your selection in the Accessories Wizard overrides the default selection in the Configuration tab.
b Choose the Nested Tip Rack Insert.
5 When the configuration message appears, click Yes to initialize the accessory and move the teachpoint to a safe height.
6 Set the teachpoint for the Nested Rack Insert using the same procedure that you would for a platepad.
The Nested Rack Insert is approximately 5 mm taller than a standard platepad.
7 In the Profiles tab, click Update this profile.
8 VWorks Plus only. If an audit trail is being logged, the Audit Comment dialog box opens. Select or type the audit comment, and then click OK.
9 To verify the setup, perform a tips-on task.
Related information
For information about... | See... |
|---|---|
Bravo Platform hardware components | |
Gripper y-axis offset | |
Editing teachpoints | |
Setting up labware definitions | VWorks Automation Control Setup Guide |
Using the accessory in a protocol | VWorks Automation Control User Guide |