Connecting the device to the computer
About this topic
This topic describes how to connect the computer to the Microplate Labeler using either of the following:
• Ethernet connection (recommended)
• Serial connection
Using an Ethernet connection
You can use Ethernet to connect a Microplate Labeler to the computer using one of the following connections:
• Direct connection. A communication cable connects a single Microplate Labeler directly to a single host computer, where no other robots or devices must interact or communicate.
• Ethernet switch. An Ethernet switch connects the single cable from the computer to one or more cables that lead to one or more devices. If you are setting up a local area network (LAN) that has other devices on it, use an Ethernet switch.
The Agilent configured computer has two Ethernet ports:
• Port for the add-on Ethernet card. Configured for a static address. You connect the Microplate Labeler to the port configured for a static address.
• Port for the computer’s built-in Ethernet card. Configured for a dynamic address. You can use this port to connect to your company network.
To connect directly to the computer using Ethernet:
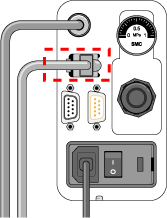
Connect one end of the Ethernet cable to the Ethernet port on the Microplate Labeler connection panel, and connect the other end of the cable to the Ethernet port of the computer.
Figure Connection panel: Ethernet connection
 |
To connect through an Ethernet switch:
1 Connect the switch to the computer as follows:
Note: If you are adding the Microplate Labeler to an existing LAN, this step should already be done.
a Connect the power cord to the switch.
b Connect one end of the Ethernet cable (black) into any Ethernet port on the switch, and connect the other end of the cable to an Ethernet port on the computer.
2 Connect the Microplate Labeler to the switch as follows:
a Connect one end of a second Ethernet cable to a port on the Ethernet switch.
b Connect the other end of the cable to the Ethernet port on the Microplate Labeler.
Connecting additional devices
You can connect additional Microplate Labelers to the network through the switch.
Each Microplate Labeler requires an additional profile.
About configuring the computer’s network card (Ethernet only)
The Agilent configured computer is already set up to communicate with the Microplate Labeler. No change to the network card IP address is required.
If you are using a computer other than an Agilent configured computer, make sure the value of the network card IP address and subnet mask are as follows:
• IP address: 192.168.0.1
• Subnet mask: 255.255.255.0
If your computer will be connected to your LAN, make sure the computer has a second network card. The second network card can have a dynamic IP address.
Using a serial connection
If you are connecting a single Microplate Labeler to a computer, you can use a serial connection.
To use a serial connection:
1 Connect one end of the supplied RS-232 DB-9 serial cable (beige) to a COM port on the computer.
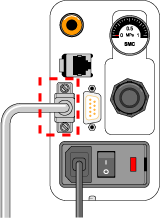
2 Connect the other end of the cable to the serial port on the Microplate Labeler connection panel.
Figure Connection panel: serial connection
 |
To install the automation control software, see the software release notes, for example, the VWorks Automation Control Software Release Notes.
Related topics
For information about... | See... |
|---|---|
Changing the IP settings on a computer and on the Microplate Labeler | Agilent Automation Solutions Technical Support |
How to install the device | |
Site requirements for installation | |
Connection panel | |
Safety | |
How to report a problem |