About label formats and content
About this topic
This topic has the following sections:
• Overview
Overview
To create a label, the software requires the following:
• Label format. The number and arrangement of fields on a label, and the field type, size, and other attributes.
Each label printed by the Microplate Labeler contains up to six fields of data. Only one field can be a barcode field. The remaining fields can be human-readable text.
• Label content. The data that the software substitutes for the text and barcode fields in the label format when the label is printed.
When you run a labeling protocol using the VWorks software, the label format loads from the printer's memory. The software substitutes the data (label content) for the text and barcode fields in the label format, and then prints the label.
Label format
The Microplate Labeler contains a set of template label formats that are ready to use or that you can customize for your lab. For an overview of the templates, see Templates for barcode formats.
Label format fields and label field data
A label format can consist of up to six label fields. Associated with every label field is a set of label field data that defines the following:
• Field type: human-readable text or barcode
• Font family used for printing the human-readable text fields
• Barcode symbology used for text encoding if it is a barcode field
• Position of the field on the label
• Attributes of the field such as field size
• Contents of the field for a test print from the Label Editor tab
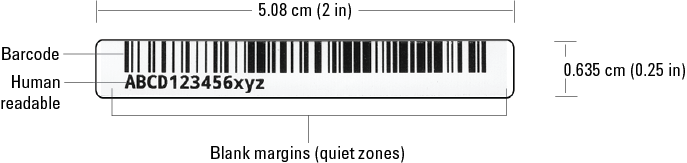
The following figure shows an example of a label with two fields: one barcode field and one human-readable text field.
Figure Example label with Code 128 barcode field and human-readable text field
 |
Label design considerations
If you want to design your own label format, consider the following parameters:
• Symbology encoding characteristics. Which characters does the symbology encode, for example, alphanumeric or numeric? What is the data density of the symbology? For instance, the Code 128 symbology can encode more data in the same space than the Code 39 symbology.
• Symbology size attributes. What size settings will you use for the narrow-bar width and the height of the bars in the barcode? What will the length and height of the barcode be?
Smaller size attributes allow greater data density but decrease the readability of the symbol. In general, a 0.25 mm (0.01 in) narrow bar width offers very good readability. A narrow bar width smaller than 0.17 mm (0.067 in) will be very hard to read and should not be used.
• Font type and size for human-readable text. The Agilent templates use the Droid Mono Bold font, which Agilent Technologies recommends for most applications. The font size depends on the size of the other fields on the label.
For example, the label in the preceding figure uses a 6‑point font.
• Proportions of fields on the label. Increasing the size of the barcode symbol will improve readability of the symbol but reduce the amount of space left for other fields on the label.
The example in the preceding figure shows a label where the barcode fills approximately 80% of the label area, while the human-readable field fills approximately 20% of the label area.
• Blank margins or white space. To ensure that the barcode reader can read a barcode, the label design should include the blank margins described in the following section.
Blank margins in the label design
The label design should include the following blank margins:
• Quiet zones. The barcode symbology requires quiet zones on each end to facilitate machine readability. The required size of the quiet zone can vary depending on the symbology.
For example, the minimum quiet zone for Code 128 is 10 times the width of the narrowest bar or space in the barcode. In general, you should allow a 3.81 mm (0.15-inch) margin on both the right and left sides of a linear symbol to accommodate quiet zones and other factors.
• Print drift allowance. Include blank space to compensate for horizontal and vertical drift between the print and the edges of the label, for example, as a result of the label media shifting relative to the printhead.
– The vertical print drift should be no more than ±0.25 mm (0.01 in.).
– The horizontal print drift should be no more than ±0.75 mm (0.03 in.).
• Separator between fields. Although no print drift occurs between two fields, allow for some blank space between fields to facilitate readability.
Figure Minimum blank margins for Code 128 (top) and Data Matrix (bottom) symbologies
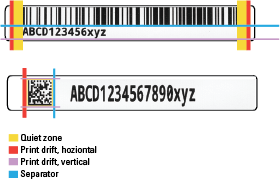 |
At a minimum, the required margin sizes on these two label designs are:
Parameter | 1D Code 128 symbology | 2D Data Matrix symbology |
|---|---|---|
Quiet zone | Required on each end: 2.5 mm (0.1 in) 10 * narrow bar width, where, narrow bar width = 0.25 mm (0.01 in) | Required on all sides: 0.30 mm (0.0117 in) 1 * module width, where, Module width (dot size) = 0.30 mm (0.0117 in) |
Print drift allowance, horizontal | On each end of the quiet zone: 0.76 mm (0.03 in) | On each end of the side quiet zones: 0.76 mm (0.03 in) |
Print drift allowance, vertical | Below bottom field on label: 0.25 mm (0.01 in) | Above and below the top and bottom quiet zones: 0.25 mm (0.01 in) |
Separator between fields | 0.25 mm (0.01 in) | 2.5 mm (0.1 in) |
The Data Matrix symbology requires quiet zones on all sides of the barcode. The Data Matrix symbology features an L-shaped finder pattern on the left and bottom sides that serves to locate the start of the symbology, and a timing pattern (opposite the L shape) to indicate the symbology end for a barcode reader.
Label format storage and uploading
You use the Label Editor tab in Microplate Labeler Diagnostics to create and edit label formats, and to upload the label formats to the printer.
Label formats must be stored in the printer so that they are available for use. The printer can store up to 20 label formats.
Label formats can also be saved in XML files. Before you can use a format that is stored in an XML file, you must first upload the label format to the printer.
To modify a label format, you load the format into the Microplate Labeler Diagnostics—Label Editor tab.
About specifying the label content
When configuring a VWorks labeling protocol, you select a predefined label format that has been loaded in the printer, and then specify the content for the fields that have been configured in that particular label format. The method for specifying the label content varies depends on which automation control software you use.
Software that controls the device | See... |
VWorks software. You create a protocol that contains a Print and Apply task. You select the label format and field content when setting the task parameters. Note: You set the plate stage height in the labware definition. You specify which sides of the microplate to label in the plate process parameters. | VWorks Automation Control User Guide |
ActiveX control. For a device integrated in a third-party lab automation system, you can use the ActiveX controls to define the label format and content. | Microplate Labeler ActiveX User Guide |
Related topics
For information about... | See... |
|---|---|
Workflow for running an integrated Microplate Labeler using the VWorks software | |
Barcode terminology and symbology | |
Customizing a label format template |