Creating and editing label formats
About this topic
The Microplate Labeler contains a set of template label formats that are ready to use or that you can modify. For an overview of the templates, see Templates for barcode formats.
This topic describes how to load a label format and then customize it to meet the requirements of your lab.
For a description of label formats and content, see About label formats and content.
Before you start
The following workflow assumes that:
• The profile for your device is initialized. For details, see Initializing the device in diagnostics.
Workflow for creating or editing a label format
Step | For this task... | See... |
|---|---|---|
1 | Load a label format that you want to customize. | |
2 | If desired, add additional fields to the label format by right-clicking the Label Editor preview box. | |
3 | Edit the properties of a field. | |
4 | Repeat steps 2 and 3 for the other fields in the label. | |
5 | Upload the edited label format to the printer. Before a label format is available for printing, the format must be uploaded to the printer. Optionally, save a backup copy to an XML file. | |
6 | Print a test label to check your changes. |
Loading a label format in the Label Editor
You can load the label format from the printer or from an XML file on the computer.
Note: The Microplate Labeler supports label formats developed for the cab A2+ printer only.
To load a label format from the printer:
1 In Microplate Labeler Diagnostics, click the Label Editor tab.
2 In the Current format list, select a format, and then click Load from printer.
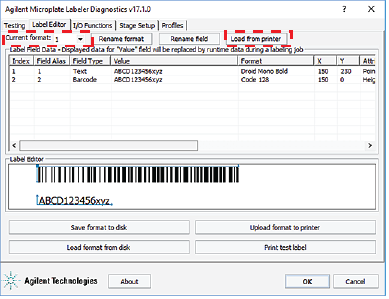 |
If the selected format has not been defined, the Label Field Data table and the Label Editor preview box are blank. Otherwise, data appear in the table, and a representation of the format appears in the Label Editor preview box.
Alternatively, you can load a label format from an XML file on the computer.
To load a label format from an XML file:
1 In the Label Editor tab, click Load format from disk.
2 In the Open dialog box, navigate to the file storage location, select the XML file, and then click Open.
By default, the label format templates are installed in the following folder:
C:\VWorks Workspace\Microplate Labeler Label Formats
Renaming a label format
To rename a label format:
1 In the Current format list, select the desired format and then click Rename format.
2 In the dialog box that appears, type the format name, and then click OK. The new name appears in the Current format list.
Adding a field to a label format
You can add up to six fields in the label. Only one field can be a barcode. The remaining fields can be human-readable text.
To add a field to a label format:
1 Ensure that the format you want to edit is loaded.
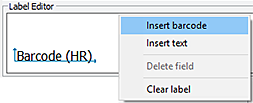
2 Right-click in the Label Editor preview box, and then choose one of the following from the shortcut menu:
• Insert text. Available for any field.
• Insert barcode. Available for field 2 only.
Note: If you want the label to contain a barcode only, you can add a text field, add a barcode field, and then delete the text field.
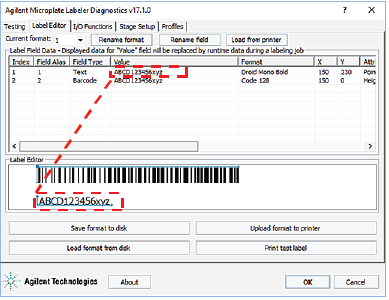
The default data fills a row in the Label Field Data, and a corresponding field appears in the preview box.
 |
Editing the field properties
This section describes how to change the following field properties:
• Alias
• Value
• Format
• Position (x, y coordinates)
To change the field size and other attributes, see Changing the field size and other attributes.
To clear or remove data from the format, see Removing unwanted label format data.
For a quick reference to each column in the Label Field Data table, see Label Editor tab.
Assigning an alias to a field in the format
To assign an alias to a field in the label:
1 In the Label Field Data table, select the desired field (Index 1 to 6), and then click Rename field.
2 In the dialog box that appears, type a name, and click OK. The name appears in the Field Alias column for the selected field.
For example, you might change the alias from a number to the name, Date.
 |
Changing the value
The value property that you specify in the Label Editor tab is used only when performing a test print from the Label Editor tab. When you run a labeling protocol using the VWorks software, the value of each field comes from the data source that you select in the VWorks software.
A field’s value parameter determines:
• Human-readable field. The actual text that is printed during a test print.
• Barcode field. The actual data that is encoded into the barcode for a test print. The barcode text should follow the rules of the specified symbology, for example, limited to numbers only or uppercase letters and numbers.
To change the value:
1 In the Field Data Table, click the entry in the Value column for the field that you want to edit. The row is highlighted.
2 Click the value once more to enable editing, and then type a new value that is about the same length as the text for the production labeling.
 |
Note: The Label Editor preview provides an approximate representation of the label layout. To view the actual field sizes and positions on the label, print a test label.
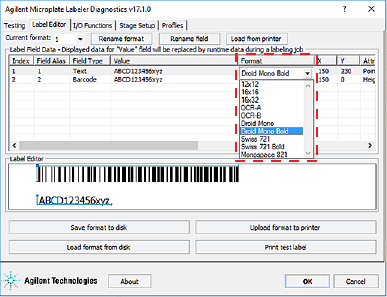
Changing the format
A field format determines the printed appearance of a field. For example, the font selection for a text field or the symbology selection for a barcode field.
To change the format of a field:
1 In the Label Field Data table, click the name in the Format column for the field that you want to edit. The row is highlighted.
2 Click the format name once more to display the list, and then select the desired text font or barcode symbology.
The list changes based on the field type (text or barcode).
 |
Note: The Microplate Labeler supports label formats developed for the cab A2+ printer only.
Positioning the fields on the label
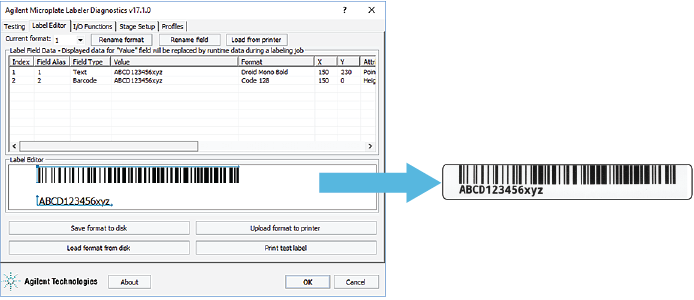
The Label Editor tab provides two methods for positioning the field on the label:
• Label Editor preview box. You can drag each field to an approximate position in the preview box. However, the preview is not precise, and you must test print the label to see the actual field sizes and positions, and then adjust as necessary.
Figure Example of format in the preview box and printed label
 |
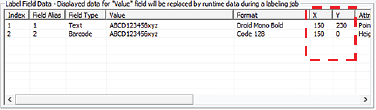
• X and Y columns. The X and Y values in the Label Field Data table correspond to the printer’s x- and y-coordinates for the label, where the origin is at the top left corner of the label.
– x-coordinate. The horizontal start position, the distance between the label’s left edge and the field’s left edge.
– y-coordinate. The vertical start position, the distance between the label’s top edge and the text field (bottom left corner) or barcode field (upper left corner).
 |
To position the field’s starting point using the X and Y values, you calculate the position based on the following:
• Label size: 0.25 by 2.0 in (0.0635 by 5.08 cm)
• X and Y unit of measure: 0.001 in (0.0254 mm)
Given the label size, the value ranges are Y: 0 to 250, and X: 0 to 2000.
For example, suppose you want to create a label similar to the one in the following figure. In this example, the upper edge of the barcode field is flush with the label’s top edge, the barcode field has a blank margin (quiet zone) on each end to allow readability, and a text field is aligned on the left under the barcode field. The following table provides the X and Y values for the label in the figure.
Figure Example barcode and text field positions on label
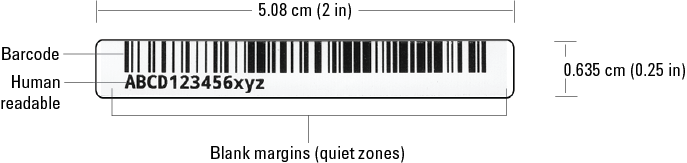 |
Field type | X, Y values | Position on label |
|---|---|---|
Barcode | X = 150 | The field left edge is 0.150 in (0.38 cm) from the label left edge. |
Y = 0 | The field top edge is 0.0 in from the label top edge. | |
Text | X = 150 | The field left edge is 0.150 in (0.38 cm) from the label left edge. |
Y = 230 | The field bottom edge is 0.230 in (0.58 cm) from the label top edge. |
To use the X and Y columns to position a field:
1 In the Label Field Data table, click the value in the X column for the field that you want to edit. Click the value again to enable editing, and type the new value.
2 Click the value in the Y column for the field that you want to edit. Click the value again to enable editing, and type the new value.
In addition to the field’s x, y coordinates, the field size attributes affect the field’s placement on the label. Initially, you can use the default values in the Attributes column. You can upload the label format to the printer, print a test label, and then evaluate whether to adjust the size or placements of the fields.
Uploading and saving a format
After you have created or edited a label format, you must upload it to the printer before it can be used. You might also want to save it in an XML file on the computer, especially as label formats can be accidently overwritten.
To upload a format to the printer:
1 In the Label Editor tab, click Upload format to printer.
To save a format to an XML file:
1 In the Label Editor tab, click Save format to disk.
2 In the Save As dialog box, specify the XML file name and the file storage location, and click Save.
Note: The software saves one label format per XML file.
Printing a test label from the Label Editor tab
After you upload a label format to the printer, you can check your changes by printing a test label.
To print a test label:
1 In the Label Editor tab, click Print test label, or press the green button on the device.
Alternatively, you can perform test print-and-apply cycles using the Testing tab. See Performing a print-and-apply test.
Related topics
For information about... | See... |
|---|---|
Opening Microplate Labeler Diagnostics | |
Label format and label content | |
Performing a print and apply test | |
Performing a test barcode read | Documentation for your barcode reader |
Setting the parameters for the label content | VWorks Automation Control User Guide |