Performing a print-and-apply test
About this topic
This topic describes how to perform a print and apply test using the Testing tab in Microplate Labeler Diagnostics.
When to do a test print
Perform a print-and-apply test when first setting up your Microplate Labeler, after creating a new label format, when loading new labels and ribbon, or when troubleshooting printing problems.
Testing helps you detect problems such as:
• Incorrect height settings for the plate stage
• Incorrectly loaded label or ribbon
• Poorly designed label formats, for example, overlapping fields, barcodes that are too large for the label, missing barcodes, or text fields that are too small to read
Before you begin
The following procedure assumes that:
• The profile for your device is initialized. For details, see Initializing the device in diagnostics.
Procedure
To print a label from the Testing tab:
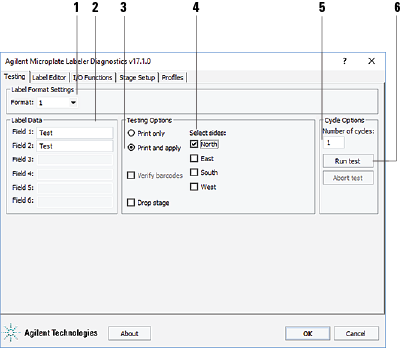 |
1 In the Testing tab, verify that the label format you want to use for this test is selected in the Format list.
Note: You can display a preview of the label format in the Label Editor tab.
2 Under Label Data, type the text in the field box for the position that you want to test.
Note: Only the fields that are defined in the label format can be edited. Fields that are defined in the label format as barcode fields will be encoded into a barcode before printing.
3 In the Testing Options area, select Print and apply.
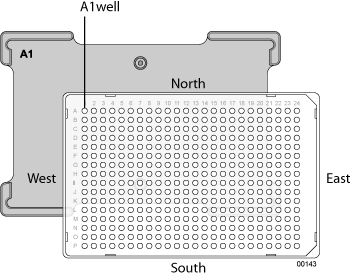
4 Select the compass points corresponding to one or more sides that you want to apply labels to, for example North and West.
 |
5 In the Number of cycles list, set the value to the number of microplates that you want to test label.
6 Click Run test or press the green button on the top of the device.
The first label is printed and applied to the microplate.
7 If you are test labeling multiple microplates, quickly replace the microplate on the plate stage with a new one.
Repeat this step until all the test cycles are completed.
Related topics
For information about... | See... |
|---|---|
Opening Microplate Labeler Diagnostics | |
Placing a microplate | |
Adjusting the height of the plate stage | |
The overall process of designing a label format | |
Running a labeling protocol | VWorks Automation Control User Guide |
Microplate Labeler Diagnostics controls and indicators | |
Troubleshooting problems |